BiCrafty Bootcamp: Triple Threat Tunisian Crochet for Beginners: Four
We will add to our skills by learning how to work Tunisian Crochet for beginners in the round with a double-ended hook. This skill is one of our favorites!
What Have We Learned So Far in BiCrafty Bootcamp: Triple Threat Tunisian?
We have grown our skills quite a lot! We have learned Tunisian Simple Stitch, Tunisian Knit Stitch, Tunisian Purl Stitch, Tunisian Reverse Stitch, Tunisian Wrap Stitch, Tunisian Slip Stitch, and Foundation Slip Stitches. We have learned how to edge our work with single crochet and the best ways to seam Tunisian Crochet fabric.
>>Click Here<< to visit the lesson one blog post and view the video instructions.
>>Click Here<< to visit the lesson two blog post and view the video instructions.
>>Click Here<< to visit the lesson two blog post and view the video instructions.
Tunisian Crochet for Beginners: Video Lesson Three
BiCrafty Bootcamp: Triple Threat Tunisian Crochet for Beginners
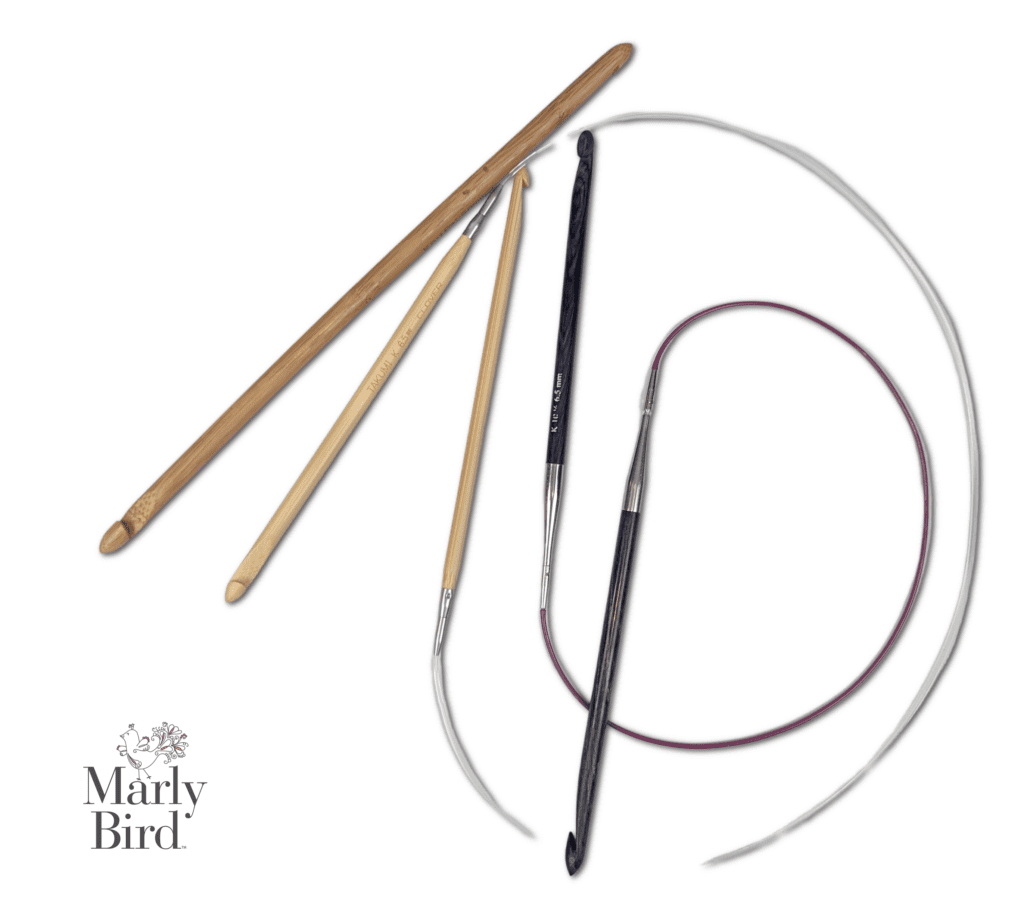
Tunisian Double Ended Hooks or Afghan Hooks
Double ended hooks come in 2 varieties. They are either one solid shaft with a hook on either end or a cable with a Tunisian Crochet hook on either end. Both are easy to work with. If you have a set of interchangeable Tunisian Crochet Hooks, you can make your own double ended hook with the size hook needed on one end and a smaller size hook on the other end. Use the size needed for the forward pass and the smaller size for the return pass.
➸ Knit Pals- Solid Double Ended Tunisian Hooks
➸ ChiaoGoo T-Spin Tunisian Interchangeable Set with Swivel Cords (swivel cords are purchased separately) ➸ ChiaoGoo SWIV 360 cord (this is an extra purchase but WORTH IT): http://shrsl.com/3q1kd
➸ Clover Interchangeable Takumi Tunisian Crochet Set
➸ Knitter’s Pride Dreamz (note, they do not have swivel cords)
Tunisian Crochet for Beginners: Working in the Round
There are a number of ways to work in the Round with Tunisian Crochet. Our favorite by far is with a double ended Tunisian Crochet Hook. The rounds will form a continuous spiral. But the beauty of working with a double ended hook, is you only have to work a few stitches at a time and NOT the entire round. You work a comfortable amount of stitches from the forward pass with one end, then TURN and work off those stitches in your return pass with the other end. You can do as many or as few stitches as you wish to work your way all around the project. See Video Tutorial for demonstration.

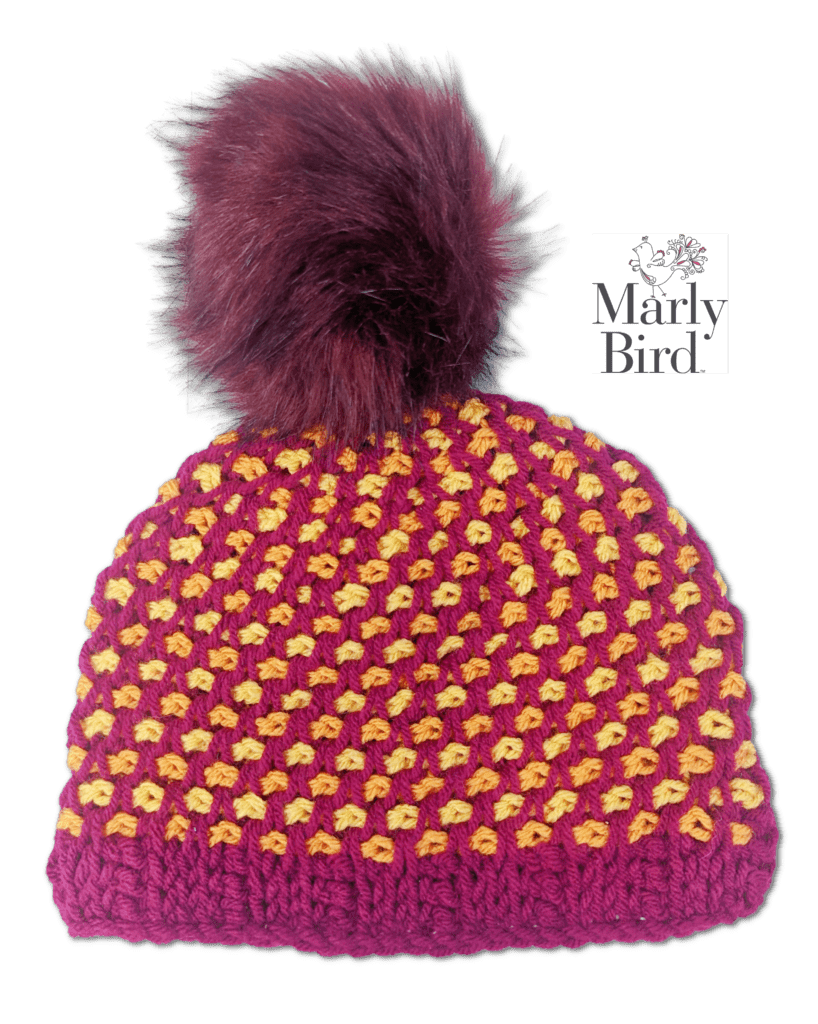
SWISS WOODS TUNISIAN CROCHET HAT
Designed by Robyn Chachula
SKILL LEVEL
Adventurous Beginner
MEASUREMENTS
Finished Measurements
Hat is 18.5” [47 cm] in circumference.
Gauge
12 sts x 11 rows = 4” [10 cm] x 4” [10 cm]; use any size hook to obtain the gauge.
MATERIALS
Yarn
Red Heart, With Love (100% acrylic, 338m/ 370yds, 198g/ 7oz, CYCA# 4 worsted)
Color A: Peacock, 1 ball
Color B: Mallard, 1 ball
Color C: Tangerine, 1 ball
Note: WeCrochet Swish Worsted can be substituted.
Hook
Notions
Tapestry needle, Stitch Marker, Optional: Pom Pom
ABBREVIATIONS
Ch – Chain(s)
PM – Place Marker
RS – Right Side
Sl st – Slip Stitch
St(s) – Stitch(es)
Tch – Turning Chain
TSS- Tunisian Simple Stitch
TKS – Tunisian Knit Stitch
TRS – Tunisian Reverse Stitch
WS – Wrong Side
SPECIAL STITCHES
⭐️ Foundation Slip Stitch:
First Stitch: Ch 1, insert hook into back ridge of chain, yarn over and pull up loop (2 loops on hook), yarn over and draw through 1 loop on hook (creates chain), draw through next loop on hook (creates slip stitch).
Next Stitch: Insert hook into chain just created (vertical bar furthest from hook), yarn over and pull up a loop (2 loops on hook), yarn over and draw through both loops on hook (first loop creates chain, second creates slip stitch)
⭐️ Tunisian Simple Stitch (TSS): Insert hook from right to left into front vertical bar of next st, yarn over and pull up a loop.
⭐️Tunisian Knit Stitch (TKS): Insert hook from front to back between the front and back vertical bars of the next st (under horizontal bars), yarn over and pull up a loop.
⭐️Tunisian Reverse Stitch (TRS): Insert hook from right to left into back vertical bar of next st on the wrong side (or back of work), yarn over and pull up a loop. This pushes the return pass to the front of the work creating a purl-like look.
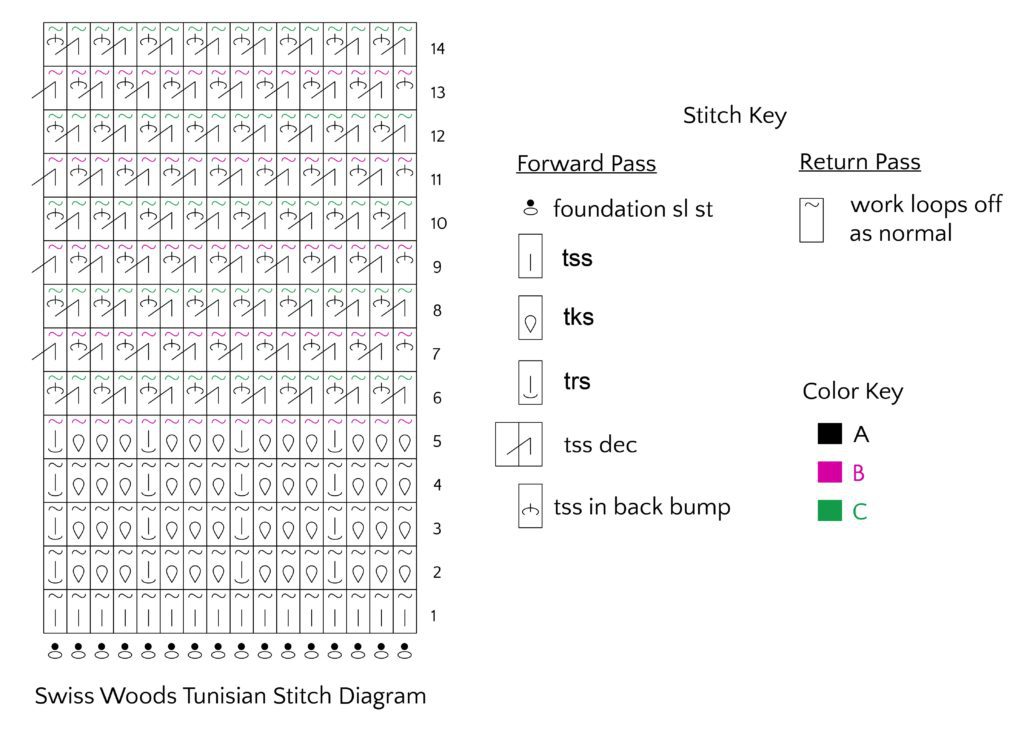
⭐️ “Work Loops off as normal” Yarn over and draw through 1 loop on hook, *yarn over, pull through 2 loops on hook; repeat from * to end of project. Note: project is worked in a continuous spiral so there is only 1 first stitch and all the remaining will be pulling through 2 loops.
⭐️ Tunisian Simple Stitch Decrease (TSS dec): Insert hook from right to left into the front vertical bar of the next 2 sts at the same time, yarn over and pull up a loop (1 st decreased).
⭐️ Tunisian Simple Stitch in Back Bump (TSS in back bump): Insert hook into the back bump of the horizontal bar of the stitch indicated, yarn over and pull up a loop.
DIAGRAM
NOTES
- If you do not want to use the Foundation Slip Stitch as a start, you can chain instead.
- If you do not enjoy working TRS or if you don’t like the look, you can do TPS for all TRS stitches throughout the pattern.
- Hat is worked in the round in a continuous spiral. Place marker in the first stitch of each round.
- In the brim, make a small ball of color A and use color A for the forward and return pass.
- In the body and crown use color A for every forward pass, change color to B or C at the start of each new return pass.
- On the forward pass work any number of stitches that comfortably fit on the Tunisian Double Ended hook. Turn and work stitches off of hook for the return pass until 2 loops are left on hook, then turn and work more forward pass stitches. Keep switching between forward and return passes until the round is complete.
- When working the body section, the stitch pattern repeat is an even number of stitches, but the stitch count is an odd number of stitches. This means you will have 1 stitch left at the end of the round. This is on purpose so the next round will be offset from the round before it and the decreases will spiral and not stack. Work the last stitch in the next round. See Video Tutorial for assistance.

SWISS WOODS TUNISIAN CROCHET HAT PATTERN
BRIM
Foundation Slip Stitch or Chain 55 with color A, sl st in first st to form ring. See notes for how to work fwd and rtn passes with double ended hook.
Round 1: Fwd: Pull up loop in each st around (loop on hook counts as a st).. Rtn: With color A, work loops off as normal. (55 sts)
Rounds 2-4: Fwd: *Tks in next 3 sts, trs in next st; repeat from * around to last 3 sts, tks in next 2 sts, trs in last st. Rtn: With color A, work loops off as normal.
Round 5: Fwd: *Tks in next 3 sts, trs in next st; repeat from * around to last 3 sts, tks in next 2 sts, trs in last st. Rtn: With color B, work loops off as normal.
BODY
Begin changing colors between color B and C on each round of the return pass. Color A will be used exclusively on every round of the forward pass.
Rounds 1-9: Fwd: With color A, *Tss dec in next 2 sts, tss in back bump of second st; repeat from * around to last st, leave last stitch unworked for next round (work last st in next round, see notes) . Rtn: Change color, work loops off as normal.
CROWN
We will start decreasing for the crown. The simple way we will decrease is to NOT pick up a stitch in the back bump. Continue changing colors each round in the return pass.
Round 1 (decrease round): Fwd: With color A, *[Tss dec in next 2 sts, tss in back bump of second st] 3 times, tss dec in next 2 sts (do not pick up a stitch in the back bump); repeat from * around to last 7 sts, [tss dec in next 2 sts, tss in back bump of second st] 3 times, leave last stitch unworked for next round (work last st in next round, see notes) . Rtn: Change color, work loops off as normal. – 49 sts.
Round 2: Fwd: With color A, *Tss dec in next 2 sts, tss in back bump of second st; repeat from * around to last st, leave last stitch unworked for next round (work last st in next round, see notes) . Rtn: Change color, work loops off as normal. – 49 sts.
Round 3 (decrease round): Fwd: With color A, *[Tss dec in next 2 sts, tss in back bump of second st] 3 times, tss dec in next 2 sts (do not pick up a stitch in the back bump), [tss dec in next 2 sts, tss in back bump of second st] twice, tss dec in next 2 sts (do not pick up a stitch in the back bump); repeat from * around to last 7 sts, [tss dec in next 2 sts, tss in back bump of second st] 3 times, leave last stitch unworked for next round (work last st in next round, see notes) . Rtn: Change color, work loops off as normal. – 43 sts.
Round 4 (decrease round): Fwd: With color A, *[Tss dec in next 2 sts, tss in back bump of second st] twice, tss dec in next 2 sts (do not pick up a stitch in the back bump); repeat from * around to last st, leave last stitch unworked for next round (work last st in next round, see notes) . Rtn: Change color, work loops off as normal. – 36 sts.
Round 5 (decrease round): Fwd: With color A, *[Tss dec in next 2 sts, tss in back bump of second st] twice, tss dec in next 2 sts (do not pick up a stitch in the back bump), tss dec in next 2 sts, tss in back bump of second st, tss dec in next 2 sts (do not pick up a stitch in the back bump); repeat from * around to last 6 sts, [tss dec in next 2 sts, tss in back bump of second st] twice, tss dec in next 2 sts (do not pick up a stitch in the back bump) . Rtn: Change color, work loops off as normal. – 29 sts.
Round 6 (decrease round): Fwd: With color A, *Tss dec in next 2 sts, tss in back bump of second st, tss dec in next 2 sts (do not pick up a stitch in the back bump); repeat from * around to last st, leave last stitch unworked for next round (work last st in next round, see notes) . Rtn: Change color, work loops off as normal. – 22 sts.
Round 7 (decrease round): Fwd: With color A, *Tss dec in next 2 sts, tss in back bump of second st, tss dec in next 2 sts (do not pick up a stitch in the back bump), tss dec in next 2 sts (do not pick up a stitch in the back bump); repeat from * around to last 4 sts, tss dec in next 2 sts, tss in back bump of second st, tss dec in last 2 sts (do not pick up a stitch in the back bump) . Rtn: Change color, work loops off as normal. – 15 sts.
Round 8 (decrease round): Fwd: With color A, *Tss dec in next 2 sts (do not pick up a stitch in the back bump); repeat from * around to last st, leave last stitch unworked for next round (work last st in next round, see notes) . Rtn: Change color, work loops off as normal. – 8 sts.
Bind Off Round: *Tss dec in next 2 sts, pull loop through loop on hook; repeat from * around, sl st in last st, fasten off with a long tail. Weave the long tail through the last round to close hole in the top of the hat.
FINISHING
Fasten off, weave in ends. Add pom pom to top of hat if desired.
Categories: BiCrafy Bootcamp Tunisian Crochet, Crochet


