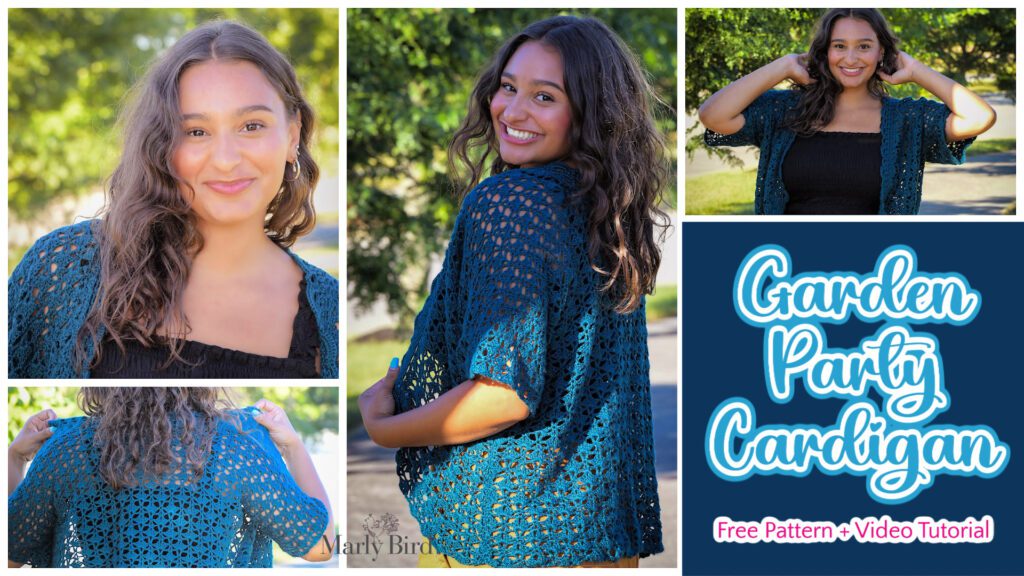
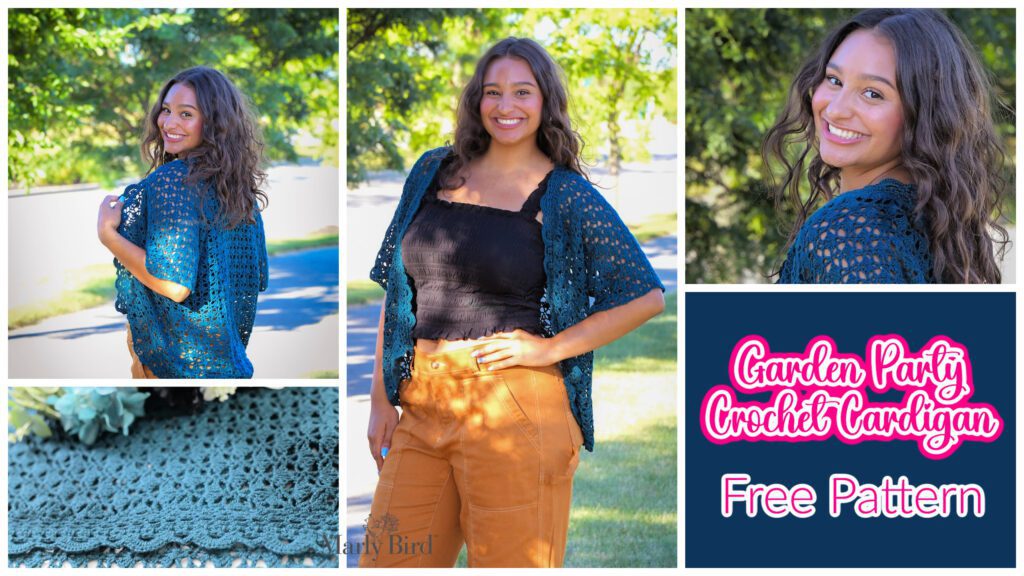
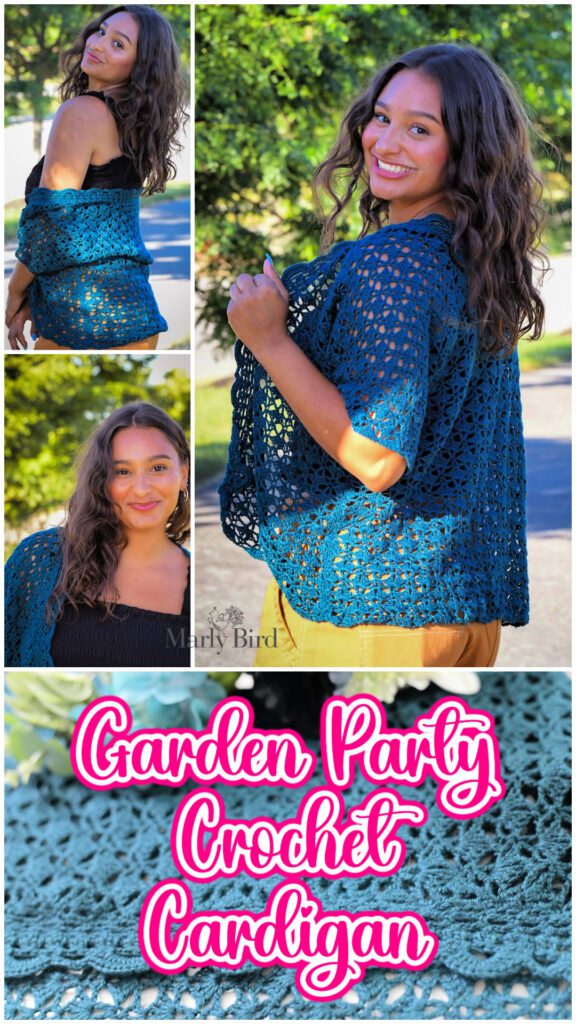
Garden Party Crochet Cardigan – Glow Up! Free Pattern + Full Tutorial
Hey there, crochet friends! 🌸 I’m beyond excited to share the glow-up of a fan favorite – the Garden Party Crochet Cardigan! This beautiful layering piece now comes with more size options, detailed instructions, and even a full video tutorial to guide you every step of the way. Whether you’re a seasoned crocheter or an adventurous beginner, this cardigan is a delightful project to add to your wardrobe. Let’s dive into the details and get started!
Get the free Garden Party Crochet Cardigan pattern below, or purchase printable PDF on Etsy, Shopify, or Ravelry.
Improved and Free Garden Party Crochet Cardigan Pattern
The Garden Party Crochet Cardigan is back and better than ever! This pattern has been upsized to be more inclusive, ranging from XS to 5XL. Plus, the ad-free PDF includes exclusive new stitch diagrams, and charts for each size; this cardigan is easier to make and customize than ever before. Crochet stitch diagrams and charts are perfect for those who prefer a detailed visual guide. The full written pattern can be found at the bottom of this blog post.
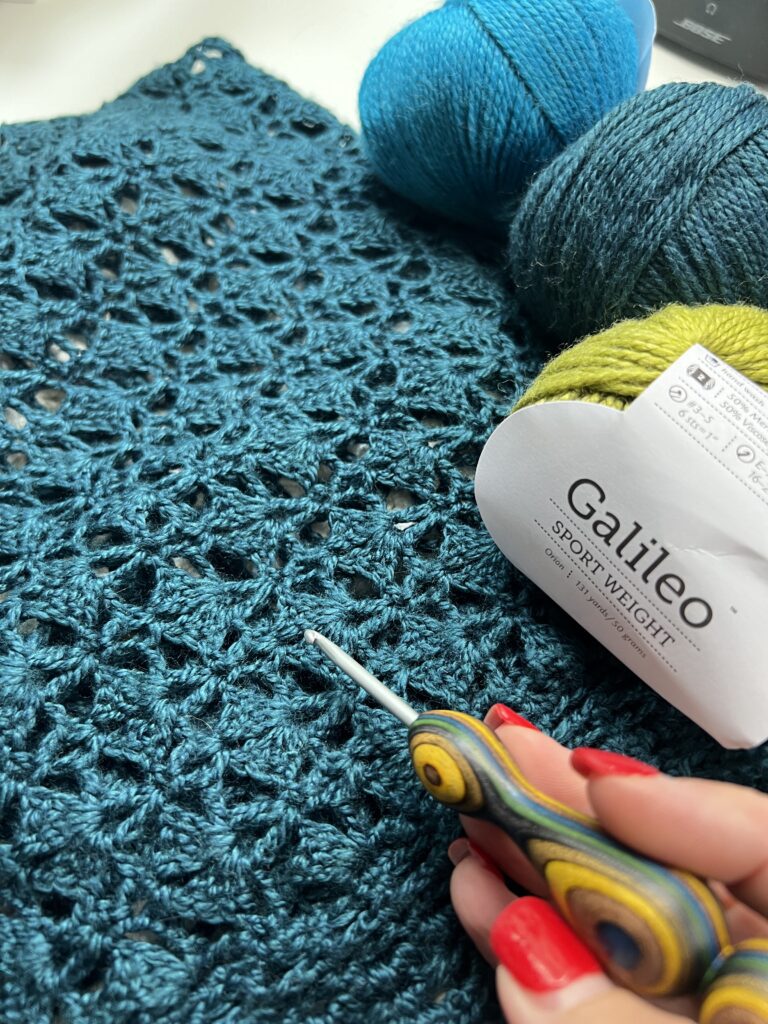
Choose the Right Yarn for Your Crochet Cardigan
The yarn used for this pattern is called Galileo, a sport weight yarn made of merino wool and bamboo. The beautiful shine and drape of this fabric come from the nature of this yarn. To achieve a similar effect, choose a yarn that has a mix of silk, bamboo, or rayon with wool, acrylic, or cotton.
🌟Don’t forget to work up a gauge swatch and wash and block it to get the full effect of the crochet shell lace stitch pattern!
Choose the Right Crochet Hook For The Crochet Cardigan
For the sample crochet cardigan, I used a US F/3.75mm hook. However, it’s crucial that you use a hook size that allows you to achieve the correct gauge on a BLOCKED SWATCH!
Make sure to allow your swatch to relax after blocking to ensure it doesn’t shrink down and become too small.
🌟Remember, the hook size mentioned on the yarn label is just a suggestion and should not be the standard for your project. Always go with what gets you the right gauge for a perfect fit!
Step-by-Step Video Tutorial for the Garden Party Crochet Cardigan
You have been asking for this and now you have it! Marly has got you covered with a full video tutorial that walks you through choosing the right yarn, selecting the perfect size, and working the crochet shell lace pattern and scallop edging. With extra tips and tricks sprinkled throughout, you’ll have all the guidance you need to create a cardigan that’s just right for you.
💕PLUS BONUS Video for how to choose the correct size for you!
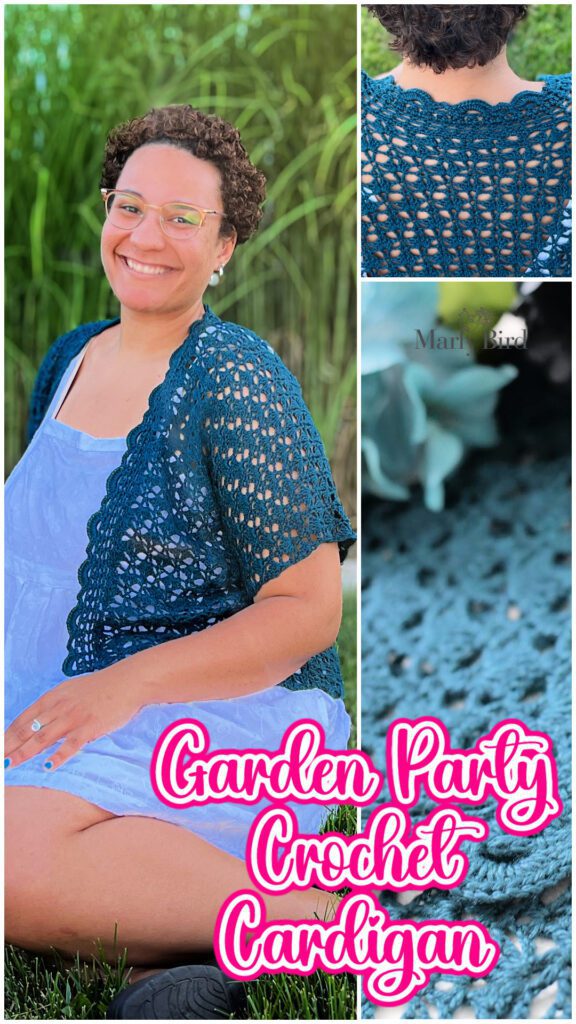
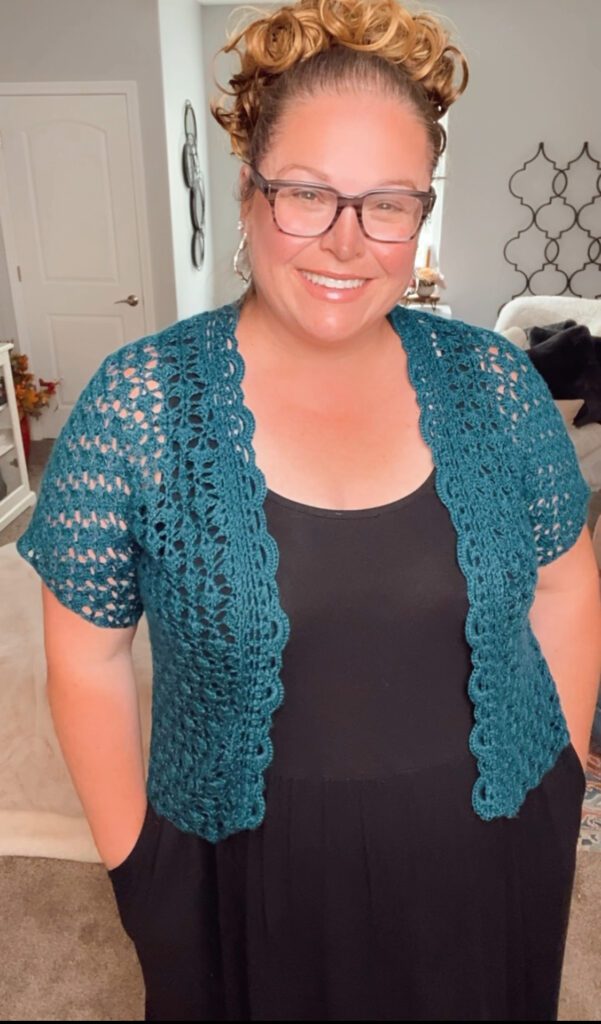
Crochet Cardigan that is Versatile, Stylish, and Comfortable
This crochet cardigan is a versatile piece that can be worn any time of year. It looks great over a sundress or paired with a shirt and cargo pants. Whether you prefer a snug fit with negative ease or a relaxed look with positive ease, the options are endless. I’ll be showing images of each fit so you can see the possibilities!


Good First Cardigan for Adventurous Beginners
If you’re an adventurous beginner looking for your first cardigan project, this pattern is perfect for you! The straightforward shell lace stitch pattern uses chains, single crochet, half double crochet, and double crochet – key stitches every crocheter should know.
The shaping is simple, and the entire sweater is made in one piece, minimizing seaming. The customizable edging allows for more or less coverage, ensuring a perfect fit.
If you think you might like a different edging, check out these options in this blog post. https://marlybird.com/blog/crochet-edgings-for-beginners
🌟 Are you a newer crochet or maybe a knitter who wants more guidance than you can find on YouTube alone? Then BiCrafty Bootcamp: Crochet for Knitters is the online course for you. Currently it is available for free on the MarlyBird.com website, but it will soon be part of the Marly Bird House. To be updated when that happens, sign up here.
Garden Party Crochet Cardigan – Get the Pattern
Ready to start your Garden Party Crochet Cardigan? I’ve decided to make the written version of the pattern free on the website. This version only includes the general information, notes, video links, and written information.
If you prefer an uninterrupted crochet experience and want to support your favorite BiCrafty Bestie, consider purchasing the ad-free PDF on Etsy, Shopify, or Ravelry. The PDF includes all the exclusive stitch diagrams and pattern charts for each size.
Get the Ad-Free PDF

Purchasing the ad-free PDF of the Garden Party Crochet Cardigan Pattern is a fantastic option for those who want a seamless, uninterrupted crafting experience. This convenient format allows you to easily follow along without distractions, and it’s perfect for printing out and taking on-the-go for your crochet projects.
The PDF includes fully formatted pattern with written instructions, schematic, crochet stitch diagrams, full pattern charts for each size, and video tutorial links.

Garden Party Crochet Cardigan – Free Pattern
Designed by Marly Bird
SKILL LEVEL
Adventurous Beginner
MEASUREMENTS
To Fit Sizes
XS (S, M, L, XL, 2X, 3X, 4X, 5X) with 2-4” of positive ease
Finished Measurements
Bust 32 (36, 40, 44, 48, 52, 56, 60, 64)” [81.5 (91.5, 101.5, 112, 122, 132, 142, 152.5, 162.5) cm]
Length 24 (24, 25, 25, 26, 26, 27, 27, 28)” [61 (61, 63.5, 63.5, 66, 66, 68.5, 68.5, 71) cm]
Video for Choosing the Right Size For You
Gauge
2 repeats and 8 rows = 4” [10 cm] in Shell Lace Pattern; use any size hook to obtain the gauge.
MATERIALS
Crochet Yarn
WeCrochet, Galileo (50% merino wool, 50% viscose, 131 yds / 120 m, 1¾ oz/ 50 g, CYCA#2 sport)
#26104 Gem, 5 (6, 7, 7, 8, 8, 9, 10, 11) skeins
Crochet Hook
Size F/5 [3.75 mm]
Notions
ABBREVIATIONS
Ch – Chain(s)
Dc – Double Crochet
Hdc – Half Double Crochet
RS – Right Side
Sc – Single Crochet
Sl st – Slip Stitch
Sp(s) – Space(s)
St(s) – Stitch(es)
Stacked Dc – Stacked Double Crochet (see Special Stitches)
Stacked Tr – Stacked Treble Crochet (see Special Stitches)
Tr – Treble Crochet
WS – Wrong Side
SPECIAL STITCHES
⭐️ Stacked Double Crochet: (Stacked Dc): (Do not ch 1 prior to making the first sc) Sc in first stitch, insert hook in between the two legs of the base of the sc, yarn over and pull up a loop, yarn over and draw through 2 loops on hook.
⭐️ Stacked Treble Crochet (Stacked Tr): (Do not ch 1 prior to making the first sc) Sc in first stitch, * insert hook in between the two legs of the base of sc just made, yarn over and pull up a loop, yarn over and draw through 2 loops on hook creating another sc; repeat from * once more.
⭐️Double Crochet 2 Together (dc2tog): *Yarn over hook, insert hook into indicated st, yarn over and pull up a loop, yarn over and draw through 2 loops on hook; repeat from * in next st indicated, yarn over and draw through all 3 loops on hook.
⭐️Half Shell (h-sh): (3 dc, ch 1, dc) OR (stacked dc, ch 1, 3 dc) in indicated ch or ch-sp.
⭐️Shell (sh): (3 dc, ch 2, 3 dc) in indicated ch or ch-sp.
To Unlock Exclusive Subscriber Content click the Box below and join for free by simply adding your email and creating a password! If you are having troubles, reset your password or login to the Grow Publisher Portal.
I’m thrilled to share this amazing pattern with you, many patterns on my blog are absolutely free! I kindly request that you don’t copy and paste or distribute this pattern. Prefer an ad-free experience? Buy a digital PDF pattern for a small fee from one of my online stores for a seamless crafting journey.
I appreciate your support and readership. You are the reason I can keep doing what I love and sharing it with others. So, thank you from the bottom of my yarn-loving heart! Disclosure: This post contains affiliate links, meaning I get a commission if you decide to make a purchase through my links at no cost to you.
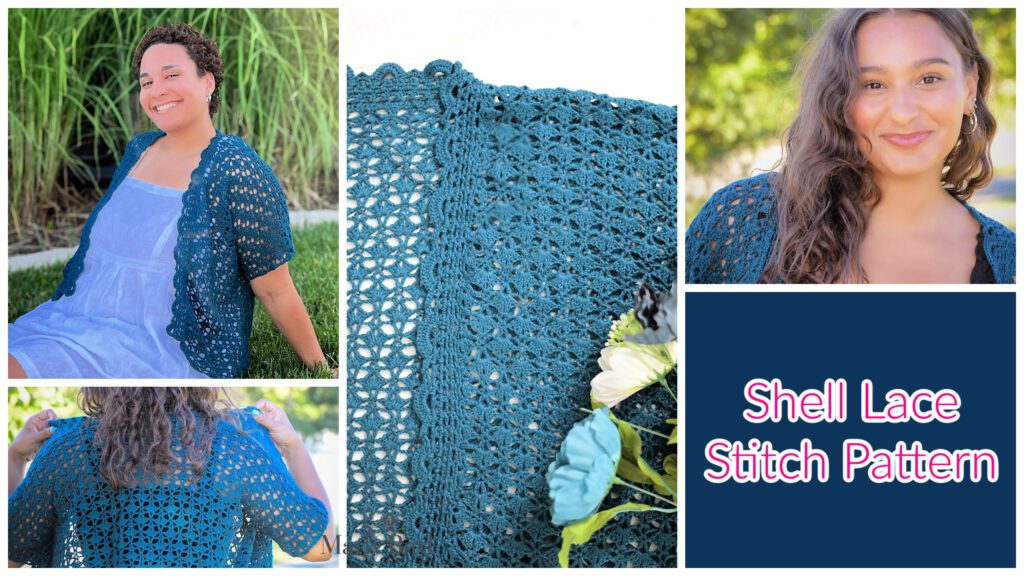
SHELL LACE PATTERN
See Shell Lace Stitch Diagram on page 9 for assistance — only available in ad-free pdf.
(Foundation is a multiple of 8 ch + 2)
Row 1 (RS): Sc in 2nd ch from hook, * ch 1, skip 3 foundation ch, (3 dc, ch 2, 3 dc) in next ch (shell made), ch 1, skip 3 foundation ch, sc in next ch; repeat from * to end, turn.
Row 2: Stacked dc, dc in 1st sc, ch 2, (sc, ch 3, sc) in next ch-2 sp, ch 2, * (dc, ch 1, dc) in next sc, ch 2, (sc, ch 3, sc) in next ch-2 sp, ch 2; repeat from * to last sc, 2 dc in last sc, turn.
Row 3: Stacked dc, ch 1, 3 dc in 1st dc (half shell made), ch 1, skip ch-2 sp, sc in next ch-3 sp, ch 1, * skip ch-2 sp, (3 dc, ch 2, 3 dc) in next ch-1 sp, ch 1, skip ch-2 sp, sc in next ch-3 sp, ch 1; repeat from * to last ch-2 sp, skip last ch-2 sp, (3 dc, ch 1, dc) in last stacked dc (half shell made), turn.
Row 4: Ch 1, hdc in 1st dc, ch 1, sc in 1st ch-1 sp, ch 2, * (dc, ch 1, dc) in next sc, ch 2, (sc, ch 3, sc) in next ch-2 sp, ch 2; repeat from * to last sc, (dc, ch 1, dc) in last sc, ch 2, (sc, ch 1, hdc) in last stacked dc, turn.
Row 5: Ch 1, sc in 1st hdc, ch 1, skip 1st ch-1 sp and ch-2 sp, (3 dc, ch 2, 3 dc) in next ch-1 sp, ch 1, * skip next ch-2 sp, sc in next ch-3 sp, ch 1, skip next ch-2 sp, (3 dc, ch 2, 3 dc) in next ch-1 sp, ch 1; repeat from * to last ch-2 sp, skip last ch-2 sp and ch-1 sp, sc in last hdc, turn.
Repeat Rows 2-5 only for Shell Lace Pattern.
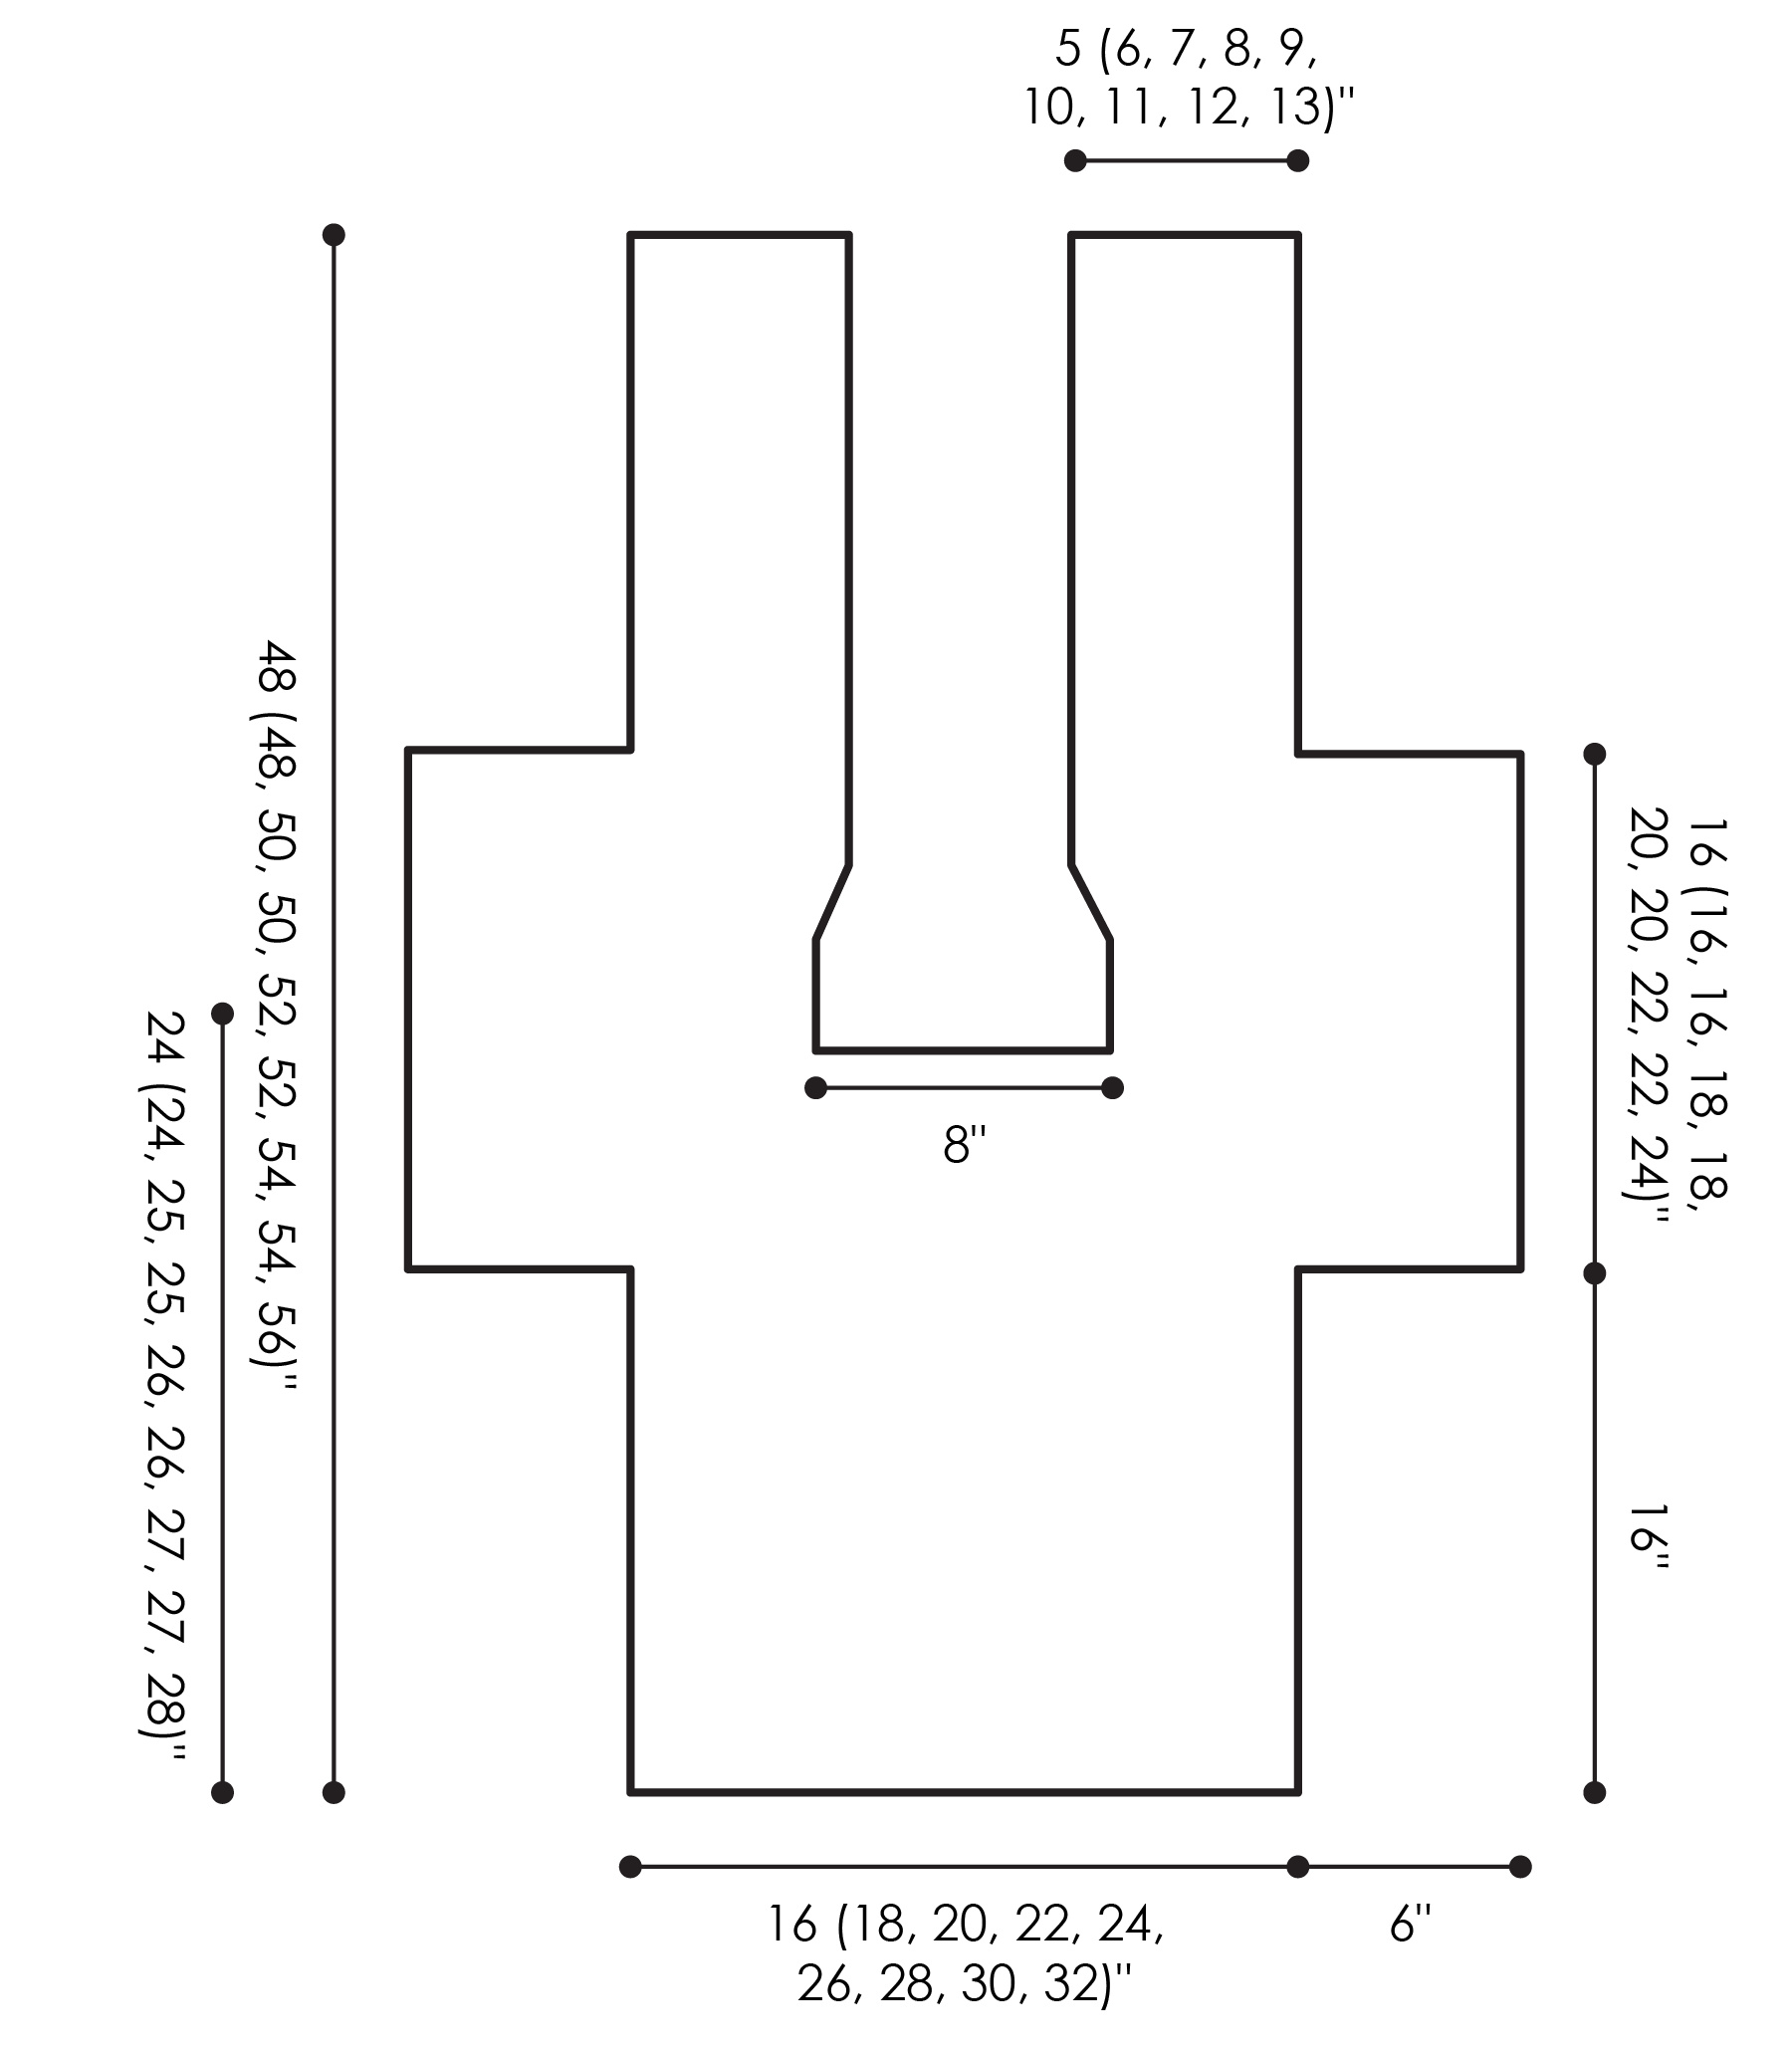
SCHEMATIC
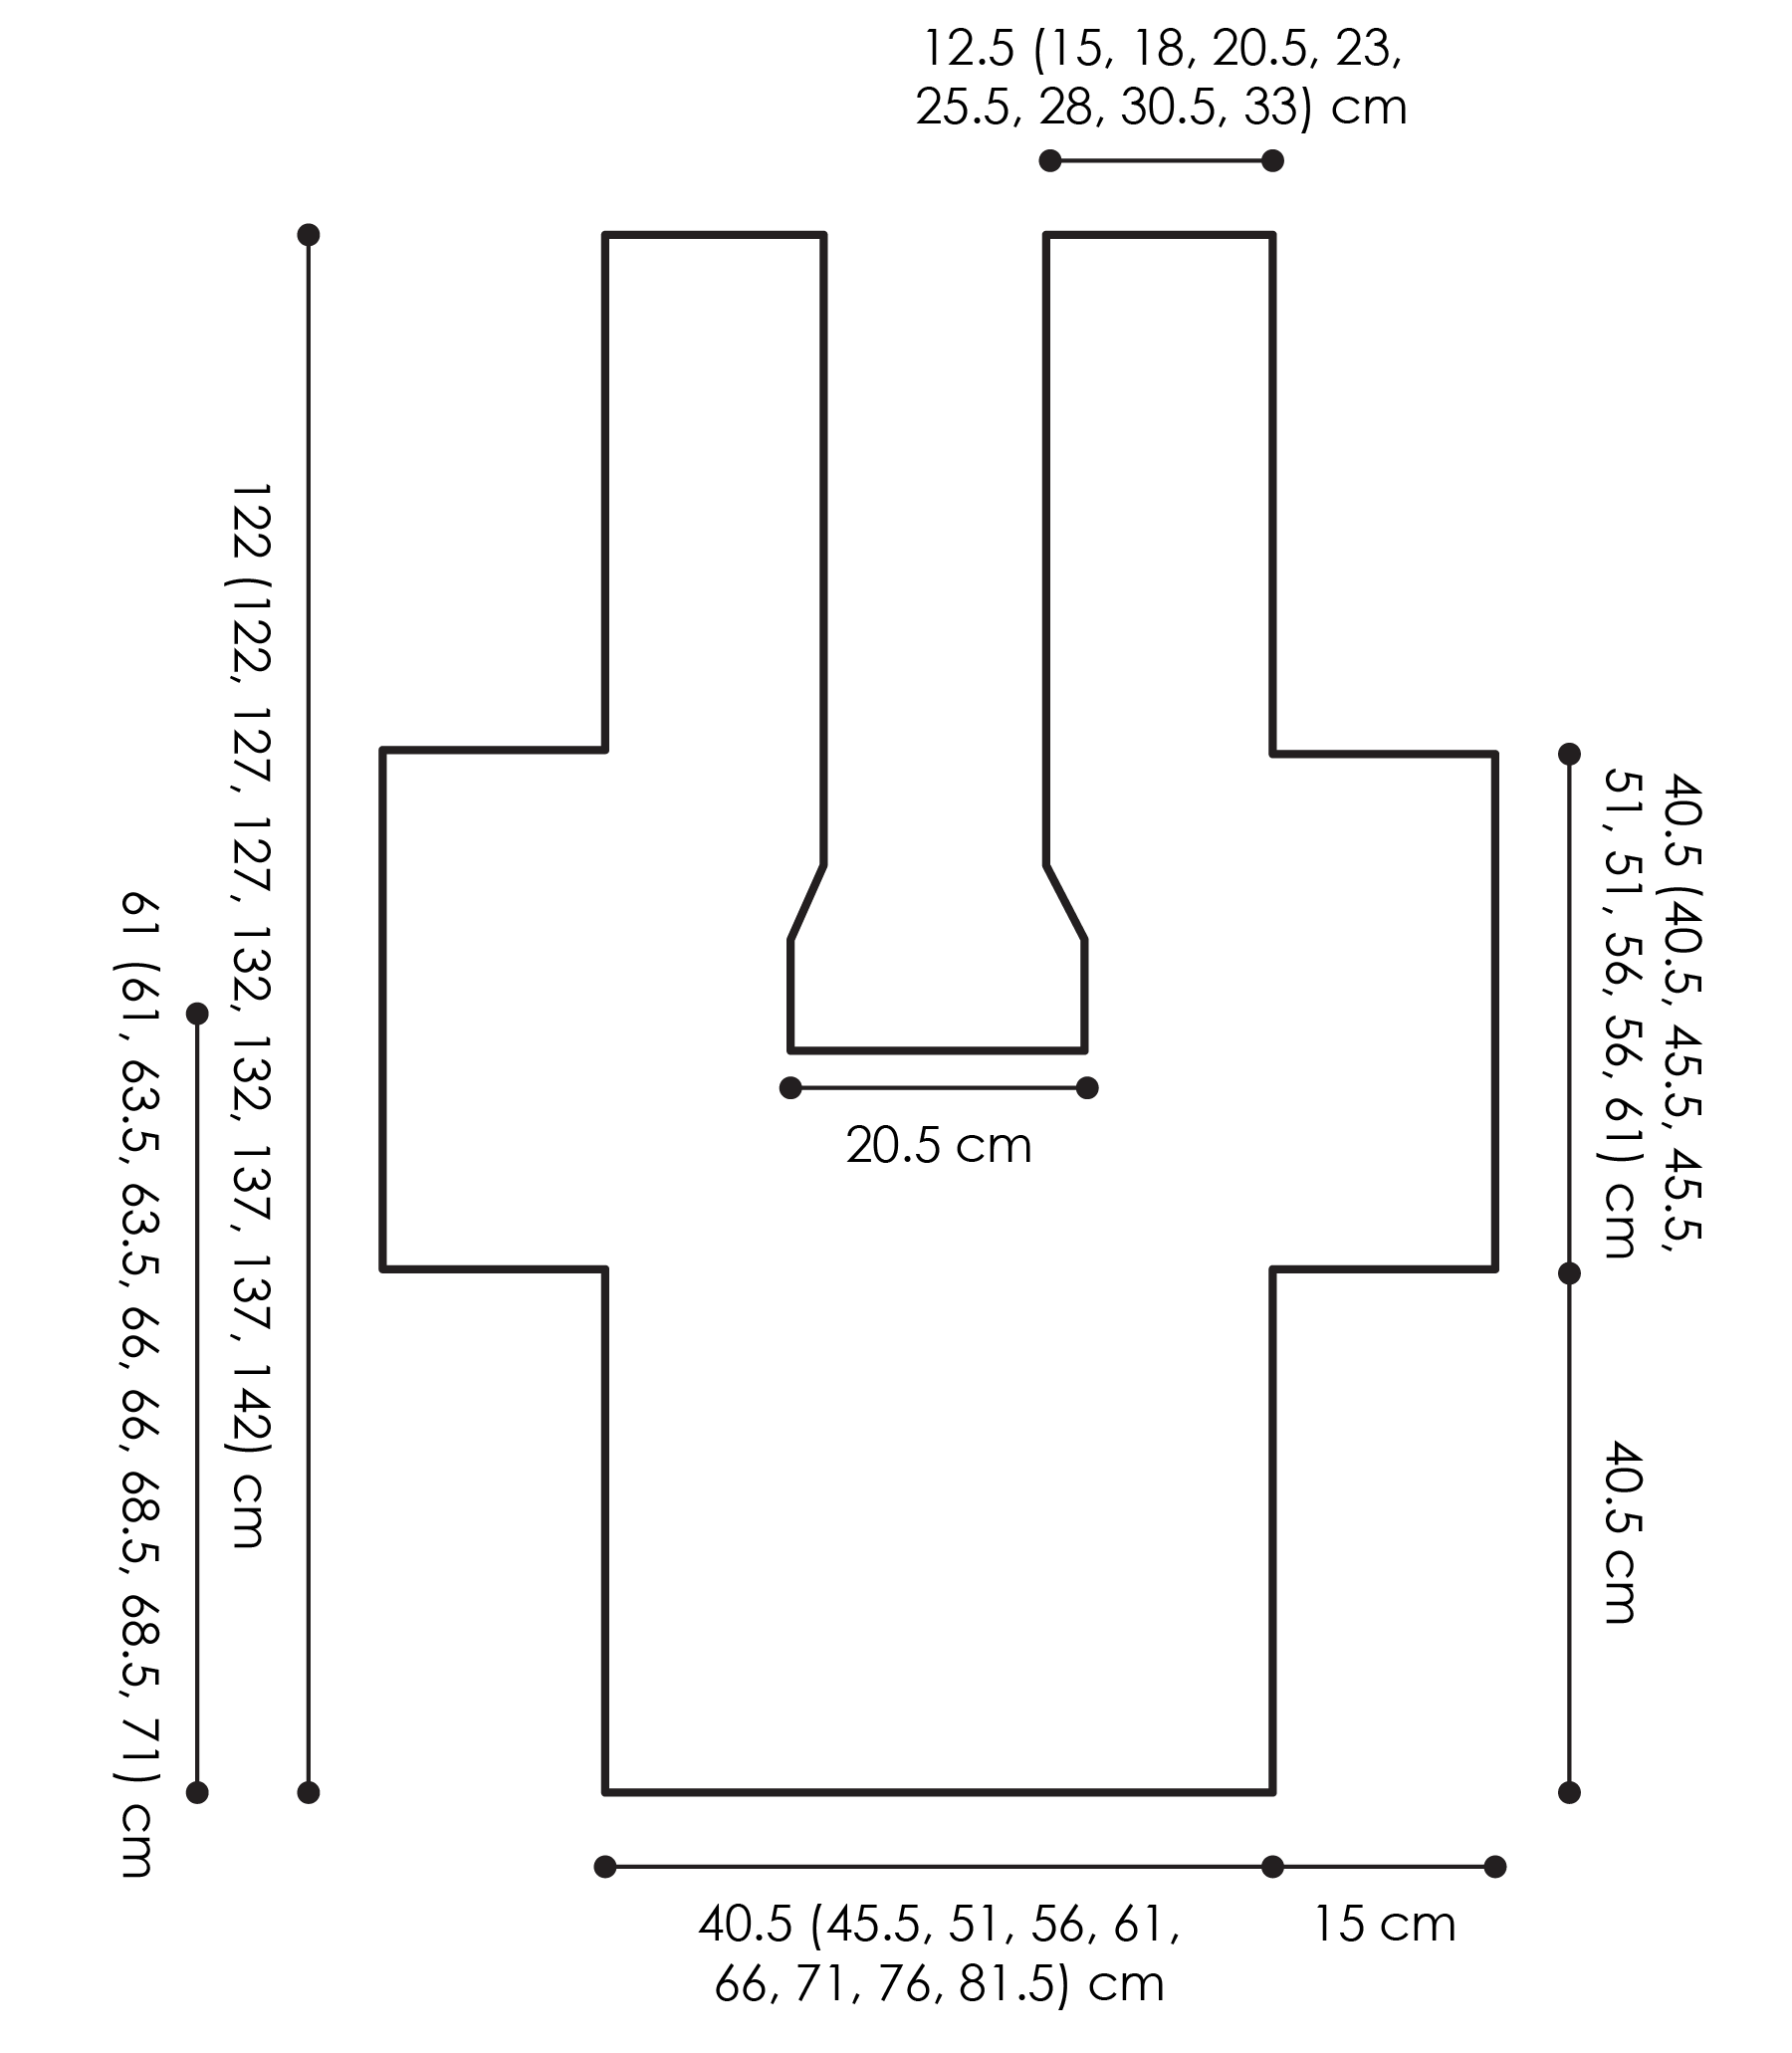
NOTES
- Directions are for size XS; changes for sizes S, M, L, XL, 2XL, 3XL, 4X, 5X are in parentheses. When only one number is given then that number applies to all sizes.
- Cardi is worked from the back up the back sleeves over the shoulders and down to the front edge. Arms and sides are seamed then the scalloped edging is then added on to the long open front edge.
- The cardigan is a classic fit with only 2-4″ of positive ease. Our sample is 2X in size modeled on a 2X and L model.
- 1 Stitch Repeat is 1 shell + 2 ch-sps + 1 sc that is repeated across Row 3 or 5
VIDEO TUTORIALS
- How to Make a Slip Knot >> Click Here for Video Help <<
- How to Chain >> Click Here for Video Help <<
- How to Single Crochet >> Click Here for Video Help <<
- How to Double Crochet >> Click Here for Video Help <<
- How to Half Double Crochet >> Click Here for Video Help <<
- Stacked Double Crochet >> Click Here for Video Help <<
- How to Bury Ends >> Click Here for Video Help <<
- Reading Crochet Charts- https://youtu.be/fJvO9WwGAUU
- Wet Blocking- https://youtu.be/lJnH4DD75zI
- Full Pattern Video Tutorial- https://youtu.be/NPSgDbKZsQI
Garden Party Crochet Cardigan – Free Pattern Instructions
BACK
See Layouts for each size for assistance. These are located at the end of the pattern.
Ch 66 (74, 82, 90, 98, 106, 114, 122, 130), and work in Shell Lace Pattern for 32 rows, ending after a pattern Row 4 – 8 (9, 10, 11, 12, 13, 14, 15, 16) shells.
Shape Sleeves
Pull last loop large to keep it from unraveling, and remove hook from work.
Using new yarn, ch 24, sl st to opposite end of row, and fasten off.
Place hook back into large loop and tug yarn to bring loop back to normal size.
Next row (RS): Ch 25, skip 1 ch, * sc in next ch, ch 1, skip 3 foundation ch, (3 dc, ch 2, 3 dc) in next ch, ch 1, skip 3 foundation ch; repeat from * to 1st hdc of Back, sc in 1st hdc, work across back in established Shell Lace Pattern working a sc in last hdc of Back, ** skip 3 foundation ch, (3 dc, ch 2, 3 dc) in next ch, ch 1, skip 3 foundation ch, sc in next ch; repeat from ** to end of Sleeve ch, turn- 14 (15, 16, 17, 18, 19, 20, 21, 22) shells.
Work 13 (15, 17, 15, 17, 19, 21, 19, 21) more rows evenly in established Shell Lace Pattern.
RIGHT FRONT
Row 1 (RS): Work in established Shell Lace Pattern to 5th (6th, 6th, 7th, 7th, 8th, 8th, 9th, 9th) ch-1 sp, (3 dc, ch 1, dc) in this ch-1 sp (half shell made), turn.- 4 sh + 2 h-sh (5 sh + 1 h-sh, 5 sh + 2 h-sh, 6 sh + 1 h-sh, 6 sh + 2 h-sh, 7 sh + 1 h-sh, 7 sh + 2 h-sh, 8 sh + 1 h-sh, 8 sh + 2 h-sh).
Row 2: Ch 1, hdc in 1st dc, ch 1, sc in 1st ch-1 sp, ch 2, (dc, ch 1, dc) in next sc, work in established Shell Lace Pattern to end, turn.
Work evenly in established Shell Lace Pattern for 6 (6, 6, 6, 6, 10, 10, 10, 10) more rows.
Shape Neck
See Right Front Neck Shaping Stitch Diagram on page 10 for assistance.
Row 1 (RS): Work in established Shell Lace Pattern to last stacked dc, (3 dc, ch 2, dc) in last stacked dc, turn.
Row 2: Ch 1, (sc, ch 3, sc) in 1st ch-2 sp, work in established Shell Lace Pattern to end, turn.
Row 3: Work in established Shell Lace Pattern to last ch-3 sp, sc in last ch-3 sp, ch 1, hdc in last sc, turn.
Row 4: Stacked tr, ch 3, (dc, ch 1, dc) in next sc, work in established Shell Lace Pattern to end, turn.
Row 5: Work in established Shell Lace Pattern to last ch-1 sp, (3 dc, ch 2, 3 dc) in last ch-1 sp, ch 1, sc in last stacked tr, turn – 5 sh + 1 h-sh (5 sh + 2 h-sh, 6 sh + 1 h-sh, 6 sh + 2 h-sh, 7 sh + 1 h-sh, 7 sh + 2 h-sh, 8 sh + 1 h-sh, 8 sh + 2 h-sh, 9 sh + 1 h-sh).
Work 5 (3, 5, 7, 9, 3, 5, 7, 9) more rows evenly in Shell Lace Pattern.
Fasten off.
Shape Sleeves
With RS facing, skip 2 ch-3 sps, and join yarn with a sl st in next ch-3 sp.
Next row (RS): Ch 1, sc in same ch-3 sp, ch 1, skip next ch-2 sp, (3 dc, ch 2, 3 dc) in next ch-1 sp, work in established Shell Lace Pattern to end, turn – 2 sh + 1 h-sh (3 shells, 3 sh + 1 h-sh, 4 shells, 4 sh + 1 h-sh, 5 shells, 5 sh + 1 h-sh, 6 shells, 6 sh + 1 h-sh).
Work 31 more rows evenly in Shell Lace Pattern, then fasten off.
LEFT FRONT
With RS facing, skip 3 ch-1 sps at back neck, and join yarn with a sl st in next ch-1 sp
Next row (RS): Stacked dc ch 1, 3 dc in same ch-1 sp as joining sl st, ch 1, skip next ch-2 sp, sc in next ch-3 sp, work in established Shell Lace Pattern to end, turn – 4 sh + 2 h-sh (5 sh + 1 h-sh, 5 sh + 2 h-sh, 6 sh + 1 h-sh, 6 sh + 2 h-sh, 7 sh + 1 h-sh, 7 sh + 2 h-sh, 8 sh + 1 h-sh, 8 sh + 2 h-sh).
Work evenly in established Shell Lace Pattern for 7 (7, 7, 7, 7, 11, 11, 11, 11) rows.
Shape Neck
See Left Front Neck Shaping Stitch Diagram on page 10 for assistance.
Row 1 (RS): Stacked dc, ch 2, 3 dc in 1st dc, ch 1, skip next ch-2 sp, sc in next ch-3 sp, work in established Shell Lace Pattern to end, turn.
Row 2: Work in established Shell Lace Pattern to last sc, (dc, ch 1, dc) in last sc, ch 2, (sc, ch 3, sc) in last ch-2 sp, turn.
Row 3: Ch 3, sc in 1st ch-3 sp, ch 1, skip next ch-2 sp, (3 dc, ch 2, 3 dc) in next ch-1 sp, work in established Shell Lace Pattern to end, turn.
Row 4: Work in established Shell Lace Pattern to last sc, (dc, ch 1, dc) in last sc, ch 2, tr in last ch-3 sp, turn.
Row 5: Ch 1, sc in 1st tr, ch 1, skip next ch-2 sp, (3 dc, ch 2, 3 dc) in next ch-1 sp, work in established Shell Lace Pattern to end, turn – 5 sh + 1 h-sh (5 sh + 2 h-sh, 6 sh + 1 h-sh, 6 sh + 2 h-sh, 7 sh + 1 h-sh, 7 sh + 2 h-sh, 8 sh + 1 h-sh, 8 sh + 2 h-sh, 9 sh + 1 h-sh).
Work 5 (3, 5, 7, 9, 3, 5, 7, 9) more rows evenly in Shell Lace Pattern.
Shape Sleeves
Next row (RS): Work in established Shell Lace Pattern to last 3 ch-3 sps, sc in 3rd to last ch-3 sp, turn – 2 sh + 1 h-sh (3 shells, 3 sh + 1 h-sh, 4 shells, 4 sh + 1 h-sh, 5 shells, 5 sh + 1 h-sh, 6 shells, 6 sh + 1 h-sh).
Work 31 more rows evenly in Shell Lace Pattern, then fasten off.
FIRST FINISHING
Wet block body to schematic size. See video tutorial for assistance. With RS facing, whip stitch side and underarm seams together.
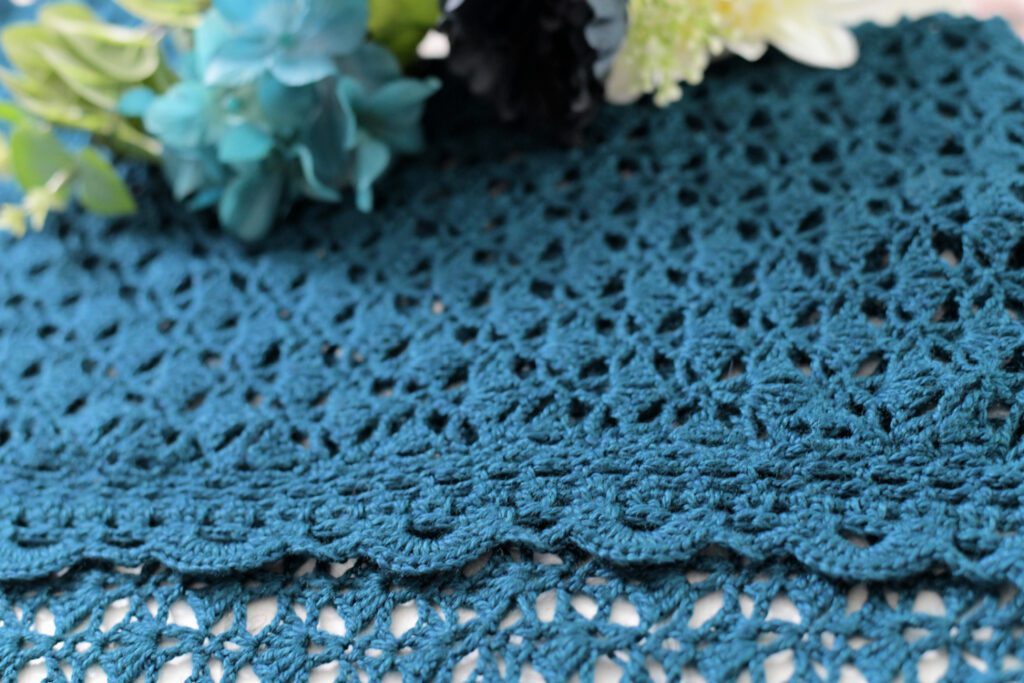
Front Edging
See Edging Stitch Diagram for assistance — only available in ad-free pdf.
Place removable markers up right front edge, across back neck, and down left front edge, spacing them approximately 2½“ [6.5 cm] apart. Take your time moving the markers around if needed to make sure all the sections look even.
With RS facing, join yarn with a sl st at bottom right front corner.
Row 1 (RS): Ch 1, work 11 sc evenly along edge in first section, then 12 sc in each remaining section, turn
Row 2: Ch 3, skip 1st 2 sc, hdc in next sc, * ch 2, skip 2 sc, hdc in next sc; repeat from * to last 2 sc, ch 1, skip 1 sc, hdc in last sc, turn.
Row 3: Ch 3, hdc in next hdc, * ch 2, hdc in next hdc; repeat from * to last ch-3 sp, ch 1, hdc in last ch-3 sp, turn.
Row 4: Repeat row 3.
Row 5: Stacked dc, ch 1, dc2tog over 1st 2 sps, * ch 2, dc2tog over last worked sp and next sp; repeat from * to last ch-3 sp, ch 2, dc2tog over last worked sp and last ch-3 sp, ch 1, dc in last ch-3 sp, turn.
Row 6: Ch 3, sc in 1st ch-1 sp, * ch 2, sc in next ch-2 sp, ch 5, sc in next ch-2 sp; repeat from * to last stacked dc, ch 2, (sc, ch 1, hdc) in last stacked dc, turn.
Row 7: Ch 1, sc in 1st hdc, 11 dc in next ch-5 sp, * (2 sc, ch 3, 2 sc) in next ch-5 sp, 11 dc in next ch-5 sp; repeat from * to last ch-3 sp, sc in last ch-3 sp, turn.
Fasten off.
Weave in all loose ends. Block Edging if needed.
Want more Beginner Crochet Cardigan and Sweater Patterns?
Here are some of our favorite patterns designed by Marly and Robyn over the years. Do you have a favorite?
- Amimono Crochet Cardigan – one of my first and still one of my favorites
- You Are Valued – best seller!
- Stoney Creek – great layering piece
- Lyvia Ruana – you will want one in every color 🌈
- Creekside Crochet Ruana – a bit more advanced than beginner but great as a goal project
- Aurora Lace – splurge on yarn and make this next
- Trifle – get the turkey trot package and get full tutorials + more patterns!


Okay, as you make any of these patterns please be sure to snap a picture and share with us on social media.
Why? Because I can’t wait to see all the beautiful Garden Party Crochet Cardigans you create! Be sure to share your progress and finished pieces with the hashtags #mmmdi and #marlybird.
Happy crocheting, everyone!