Turkey Trot 2021 Knitting Day 1
The turkey has been eaten, the pie has been served, and it is time to relax and start the TURKEY TROT MYSTERY AKE ALONG 2021! Here you will find the instructions for knitting day 1.
Good luck and enjoy the process.
TURKEY TROT 2021 KNITTING
Designed by Marly Bird and Robyn Chachula
SKILL LEVEL
Intermediate
MEASUREMENTS
To Fit Size
S (M, L) – to keep this a mystery, here is a hint…
S = Young Adult (this seems to be confusing people. I would say 5′ – 5’5.9″
M = 5’6″ – 5’11″
L = 6’ – or taller
Finished Measurements
*To Be Added
Gauge
23 sts x 18 rows = 4” [10 cm] in 1 x 1 Ribbing unstretched
MATERIALS
Yarn
Knit Picks Chroma Tweed Bulky (70% Superwash Merino, 30% Nylon, 127 yds / 100 g, CYCA#5 Bulky)
Color A: # Lupine 2 hanks
Color B: # Go Go Boots 2 hanks
How to choose the right colors?
- Self-striping yarn + solid: Let the striping yarn create shifting color patterns.
- Neutral + bright: The neutral can showcase a vivid color.
- Dark + light: Creates high-contrast striping.
- Warm + cool: Warm colors can seem to advance while cool colors recede from the eye.
Needles
Size 10 [6 mm] 24” [61 cm] or longer circular needles and set of double-pointed needles, or size needed for gauge
Notions
Tapestry needle, stitch markers, 4 buttons approx 3/4” [2 cm] in diameter (optional), fake leather (optional)
ABBREVIATIONS
Approx – Approximately
K – Knit
K2tog – Knit Two Stitches Together (decrease)
LHN – Left Hand Needle
M1 – Make 1 (increase)
P – Purl
P2tog – Purl Two Stitches Together (decrease)
PM – Place Marker
PSSO – Pass Slipped Stitch Over
RHN – Right Hand Needle
Sl – Slip
SLM – Slip Marker
St(s) – Stitches
Tbl – Through the Back Loop
Wyib – With Yarn in Back
Wyif – With Yarn in Front
Yo – Yarn Over
SPECIAL STITCHES AND TERMS
Knitwise: As if to knit. When slipping a stitch knitwise, insert the right-hand needle into the stitch from front to back, as if you’re going to knit the stitch. This will turn the stitch around, as opposed to slipping a stitch purlwise (inserting your right-hand needle from back to front) which doesn’t turn the stitch.
K2tog (Knit Two Together) Insert tip of RHN from front to back into next 2 sts on LHN at the same time, and knit them together, resulting in 1 stitch.
K2tog tbl (Knit Two Together Through Back Loop or Leg) With needle tips pointed at each other, insert tip of RHN between the legs of the next 2 stitches on LHN at the same time, point RHN out through the back of the work rather than pointing it to the front as you would in a p2tog, yo and knit the back legs of these 2 stitches together, resulting in 1 stitch.
M1 (Make 1 Increase): With tip of LHN, pick up the horizontal strand between sts from front to back. Knit this strand through the back loop or leg thus, twisting it into a loop in the process.
P2tog (Purl two together): Insert tip of RHN as if to purl into front loops of next 2 sts on LHN at the same time, and purl them together, resulting in 1 stitch.
Sl 1 (Slip 1): Insert tip of RHN as if to purl in next stitch on LHN and slip it off LHN and onto RHN.
Star Stitch: (worked over 5 stitches and is a two row process)
- (WS): * Insert RHN in next stitch as if to purl, yo RHN twice, pull double yo through stitch; repeat from * 4 times more.
- (RS): * Insert RHN into the first loop of the double yo as if to knit and slip off LHN, letting the second loop of the double yo fall off. This will create an elongated loop on the RHN; repeat from * 4 more times. Insert the LHN into the front leg of the 5 elongated loops on the RHN, Yo the RHN and pull up a loop but do not let the 5 elongated loops drop from the LHN yet! ** Yo the RHN and insert into the back leg of the 5 elongated loops again, yo the RHN and pull up a loop but do not let the 5 elongated loops drop from the LHN yet (3 loops on RHN); repeat from ** once more. There are now 5 loops on the RHN. Now you can let the 5 elongated loops drop from the LHN. A Start Stitch has been made.
Yo (Yarn Over): Bring the yarn over the right-hand needle from front to back.
PATTERN STITCHES
1 x 1 Ribbing
Row 1 (RS): Sl 1 wyib, * p1, k1; repeat from * to end.
Row 2 (WS): Sl 1 wyif, * k1, p1; repeat from * to end.
Repeat Rows 1 and 2 for 1 x 1 Ribbing.
SCHEMATIC
*To Be Added
NOTES
- Make two.
- Decide on day 1 if you will be using buttons or not.
- Directions are for size S; changes for sizes M, & L are in parentheses. When only one number is given then that number applies to all sizes.
VIDEO TUTORIAL
- Day 1: https://youtu.be/yUiStsfX9HM
PURCHASE THE AD-FREE PDF’S
This year we will be releasing the Ad-Free PDF patterns prior to the event.
They will be available the week of the event. Links will be provided here for you to purchase the full pattern.
Simply click the images below to purchase the ad-free pdf’s.
*Note, the cover images do not show you what the project is but the pattern will have ALL THE DETAILS about the patterns! DO NOT SPOIL THE MYSTERY FOR OTHERS!

TURKEY TROT KNITTING 2021 PATTERN
DAY 1
Read through all instructions before beginning!
Make Two
If not using buttons, follow the instructions below:
With color B, cast on 37 (39, 41) sts.
Both Pieces:
Row 1 (RS): Sl 1 wyib, * p1, k1; repeat from * to end.
Row 2 (WS): Sl 1 wyif, * k1, p1; repeat from * to end.
Change to color A. Cut color B.
Repeat Rows 1 and 2 until piece measures 4½” [11.5 cm] in length, ending after a RS row.
Next row (WS): Sl 1 wyif, k11, PM, sl 1 wyif, k11 (13, 15), p1, PM, k11, p1.
Set aside and wait for Day 2.
If using buttons, follow the instructions below:
Make two, but each one is worked differently once the piece measures 4” [10 cm]. Follow along the the instructions and make one of each.
With color A, cast on 47 (49, 51) sts.
Both Pieces:
Row 1 (RS): Sl 1 wyib, * p1, k1; repeat from * to end.
Row 2 (WS): Sl 1 wyif, * k1, p1; repeat from * to end.
Repeat Rows 1 and 2 8 more times or until piece measures 4” [10 cm] in length, ending after a WS row.
First Piece Only (in video referred to as part 1):
Next 5 rows:
Row 1 (RS): Bind off 10 sts in pattern, * p1, k1; repeat from * to end — 37 (39, 41) sts.
Row 2 (WS): Sl 1 wyif, * k1, p1; repeat from * to end.
Row 3 (RS): Sl 1 wyib, * p1, k1; repeat from * to end.
Row 4 (WS): Sl 1 wyif, * k1, p1; repeat from * to end.
Row 5 (RS): Sl 1 wyib, * p1, k1; repeat from * to end.
Second Piece Only (in video referred to as part 2):
Next 5 rows:
Row 1 (RS): Sl 1 wyib, * p1, k1; repeat from * to end.
Row 2 (WS): Bind off 10 sts in pattern, * k1, p1; repeat from * to end — 37 (39, 41) sts.
Row 3 (RS): Sl 1 wyib, * p1, k1; repeat form * to end.
Row 4 (WS): Sl 1 wyif, * k1, p1; repeat from * to end.
Row 5 (RS): Sl 1 wyib, * p1, k1; repeat form * to end.
Both Pieces:
Next row (WS): Sl 1 wyif, k11, PM, sl 1 wyif, k11 (13, 15), p1, PM, k11, p1.
Set aside and wait for Day 2.
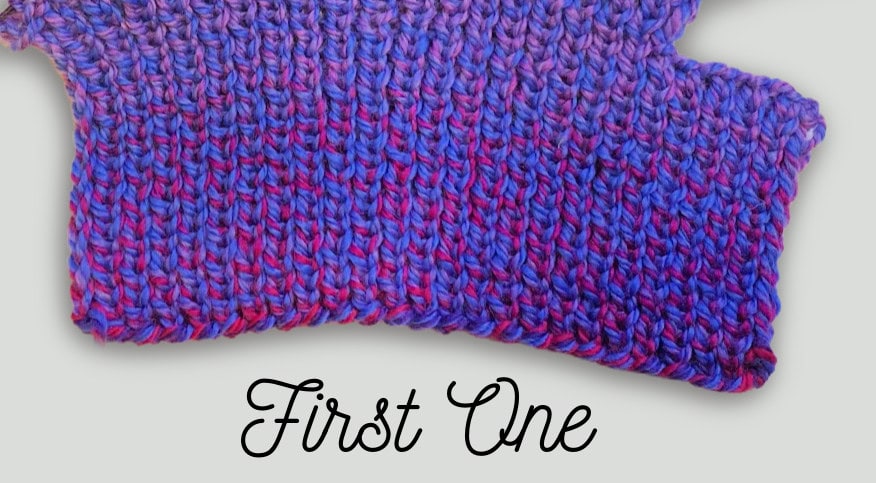
Since this is a mystery and you don’t really know what the item looks like at this point, let me share a picture with you. Below is a cropped in picture of what you piece looks like at the end of day 1. i
This is what it looks like if you made the first one. If you made the second one, the little “flap” will be on the left side.


