Ivy’s Poppy Blanket: Free Crochet Baby Blanket Pattern
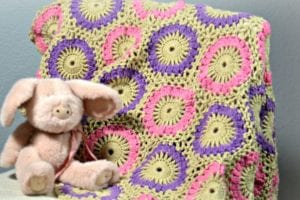
 This free crochet baby blanket pattern is Ivy’s Poppy Blanket! It is a free baby blanket pattern that I named after my only niece. The blanket is made by making the Ivy motifs and joining them as you go to make a super quick blanket! I’ve provided an optional trim that you can include on your blanket to really finish it off.
Not only will you get a free crochet baby blanket pattern but I am also providing you with an instructional YouTube video showing you how to make the motifs and how to join-as-you-go. How easy is that?
The yarn used in this free crochet baby blanket pattern is Red Heart, “With Love” which comes in MANY different colors. Choose one that is right for you. This one is for my niece who is in love with pink and purple.
Gentle reminder: It has just come to my attention that many people are unaware that free patterns still have copyrights and it is not legal to distribute. I ask that if you like the pattern and want to tell your friends that you share the link to the pattern. This includes all charts and schematics that are providing with the pattern. By doing so you are allowing me to make a little money via advertising which in turn makes it possible for me to keep designing fun and free patterns.
Thanks so much!
*Disclaimer: this post includes affiliate links**
Ivy’s Poppy Blanket
Finished Size
37 x 43″ / 94 x 109 cm
Materials and Pattern Information
-
Yarn Red Heart, “With Love” (100% acrylic, 370 yds / 338m, 198g / 7 oz):
Tan #1308 (A) – 3 skeins
Bubble Gum #1704 (B) – 2 skein
Lilac #1538 (C) – 2 skein
Or colors of your choice
-
Hook Size H-8 (5 mm) hook or size required for gauge
-
Notions Removable stitch markers, yarn needle
- Gauge 1 Motif = 6½” / 16.5 cm from corner to corner
Notes
The body of the blanket is made up of 58 Motifs and 6 Half-Motifs.
Motifs are worked in rnds, while Half-Motifs are worked back and forth in rows.
Use color A for Rows or Rnds 1, 2, and 4 of each piece. Use color B for Rnd 3 of 30 of the Motifs, and for Row 3 of all 6 Half-Motifs. Use color C for Rnd 3 of remaining 28 Motifs.
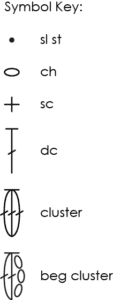
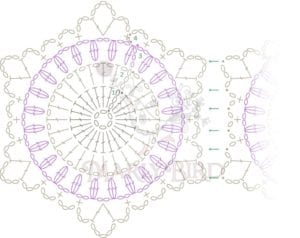
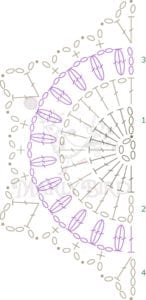
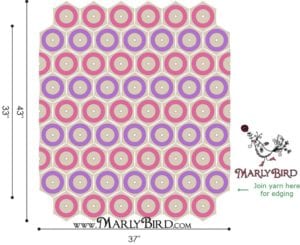
Join these Motifs as you go following the written instructions, charts, and / or the companion video. Arrange them as shown in the assembly diagram, or in the order of your choice.
Abbreviations
beg – begin(ning)
rep – repeat
rnd – round
RS – right side
sk – skip
sl st – slip stitch
sp – space
st – stitch
WS – wrong side
Yo – yarn over
Special Stitches
Beg Cl (Beginning Cluster): Ch 3, [yo, pull up a loop in indicated st or sp, yo and draw through 2 loops] twice, yo and draw through all 3 loops on hook.
Cl (Cluster): [Yo, pull up a loop in indicated st or sp, yo and draw through 2 loops] 3 times, yo and draw through all 4 loops on hook.
PATTERN
First Motif
Using A, ch 6, and join with a sl st in first ch to form a ring.
Rnd 1 (RS): Ch 3 (counts as 1 dc) and mark the 3rd of these ch, 23 dc in ring, join with sl st in marked ch, remove marker – 24 sts.
Rnd 2: Ch 4 (counts as 1 dc and 1 ch) and mark the 3rd of these ch, (dc, ch 1) in next st and in each st around, join with sl st in marked ch using second color (the color to be used for Rnd 3, either B or C), remove marker.
Cut A.
Rnd 3: Beg Cl in first sp and mark this Beg Cl, ch 2, (Cl, ch 2) in each sp around, join with sl st in marked Beg Cl using A, remove marker.
Cut second color.
Rnd 4: Sl st in next ch-2 sp, ch 1, sc in same sp and mark this sc, ch 3, (dc, ch 5, dc) in next sp, * (ch 3, sc) in each of next 3 sps, ch 3, (dc, ch 5, dc) in next sp; rep from * 4 more times, (ch 3, sc) in each of next 2 sps, ch 3, join with sl st in marked sc, remove marker.
Fasten off.
Work same as first Motif through Rnd 3, and cut second color.
Rnd 4 (joining rnd): Sl st in next ch-2 sp, ch 1, sc in same sp and mark this sc, ch 3, (dc, ch 2, sl st in corresponding corner sp on adjoining Motif, ch 2, dc) in next sp, * [ch 1, sl st in corresponding edge sp on adjoining Motif, ch 1, sc in next sp on current Motif] 3 times, ch 1, sl st in corresponding edge sp on adjoining Motif, ch 1, (dc, ch 2, sl st in corresponding corner sp on adjoining Motif, ch 2, dc) in next sp; rep from * for each joined edge, complete rnd as established by first Motif.
Fasten off.
Using A, ch 5, and join with a sl st in first ch to form a ring.
Row 1 (RS): Ch 3 (counts as 1 dc) and mark the 3rd of these ch, 12 dc in ring, turn – 13 sts.
Row 2: Ch 4 (counts as 1 dc and 1 ch) and mark the 3rd of these ch, (dc, ch 1) in next st and in each st to last st, dc in last (marked) st and remove this marker, turn.
Change to B.
Row 3: Ch 3 (counts as 1 dc) and mark the 3rd of these ch, Cl in first sp, (ch 2, Cl) in each sp to end including last sp, dc in last (marked) st and remove this marker, turn.
Row 4: Ch 4, sl st in corresponding corner st on adjoining Motif, ch 2, sc in first dc, * [ch 1, sl st in corresponding edge sp on adjoining Motif, ch 1, sc in next sp on current Motif] 3 times, ch 1, sl st in corresponding edge sp on adjoining Motif, ch 1, ** (dc, ch 2, sl st in corresponding corner sp on adjoining Motif, ch 2, dc) in next sp; rep from * twice more ending 2nd rep at **, (dc, ch 2, st st in corresponding corner sp on adjoining Motif, ch 1, dc) in last (marked) st and remove this marker.
Fasten off.
With RS facing, join B with sl st in bottom corner ch-5 sp of right edge, as shown in layout diagram.
Rnd 1 (RS): Ch 1, (sc, ch 4, sc) in same sp as join, working up right edge of Blanket, (ch 4, sc) in each sp to next corner ch-5 sp, working across top of Blanket, (ch 4, sc) twice in each corner ch-5 sp and once in all other sps, work left edge of Blanket same as right edge, and bottom edge same as top, ch 4, join with sl st in first sc.
Rnds 2 and 3: Sl st in each of next 2 ch, ch 1, sc in first sp, ch 4, (sc, ch 4) in each sp around, join with sl st in first sc.
Rnd 4: Sl st in next sp, ch 2, 4 hdc in each sp around, join with sl st in first hdc.
Fasten off.
Finishing
Weave in all loose ends.
Schematic for motif placement
Video to help you with Ivy’s Poppy Blanket: Free Crochet Baby Blanket Pattern

Looking for more? I love making quick projects and even wrote a leaflet with Leisure Arts on how to do some fun things! If you too are looking for fun and quick projects go and check out the One Skein or Less book by Marly Bird.
Categories: Crochet, Our Free Patterns, Pattern, Uncategorized, YouTube Video Tutorial




This is very beautiful. I can’t wIt for someone to have a baby, but I think I will make this as my nieces Christmas blanket!
HI Marly, I really liked your work. I think you should do a pattern for the fallen soldiers, in black, red and fushia. For remembrance day.
Juste a tought.
We remember…