How to Knit Mittens, Part One (BiCrafty Bootcamp Lesson 15)
We hope you had a nice little break last week from BiCrafty Bootcamp even though it was unplanned. Our apologies for that last-minute change. Marly was off being in charge of more than half a dozen teenagers. And we might have still pulled it together but Kathryn got super sick with a summer cold that totally knocked her out. So, as you likely saw via email or social media, we gave you the week off. Did you use it to catch up on past lessons? Did you practice some new stitches? Maybe you returned to crochet? Or perhaps you just gave your hands a rest? Whatever your process, here we are again, back to BiCrafty Bootcamp. And now we’re going to learn how to knit mittens.
Mittens to Complement Your Hat and Cowl Projects
We thought that learning how to knit mittens would be a great way to wrap up a full set of accessories. Throughout May, you made your first knit cowl in the round. (Remember all lessons are here.) Then you were able to make a matchy-matchy hat for it, if you wanted. Furthermore, you spent June making a complementary knit hat. Therefore, you were able to build upon your new knitting skills to create a matching accessories set. We think adding mittens to that set will really round things out. You’ll add even more new skills. Plus you’ll end up with a set you can truly take pride in.
Crocheter’s Edge
The biggest edge that you have at this point, honestly, is that you’re bicrafty now. You’re not just a crocheter; you also know how to knit. You know how to knit dishcloths, mug rugs, coffee cup sleeves, cowls, and hats. And pretty soon, you’re going to know how to knit mittens.
But here’s what we think you should remember as a crocheter as you continue building your knitting skills:
- There’s always more to learn in either craft.
- However, you can choose very simple projects with basic stitches any time that you want.
- Crochet and knitting both have healing properties. Work them into your daily self-care routine.
- When you lose your crojo, try a knitting project. And vice versa.
- Crochet and knitting are both tough on the hands and the posture. Therefore, make sure to take breaks and do exercises.
How to Knit Mittens in Three Steps
To give you an overview of what we’re going to do as we wrap up BiCrafty Bootcamp:
- This week we’re going to start to learn how to knit mittens. We’ll begin with the cuff.
- Next week we’re going to add a Latvian braid details. After all, so many of you loved learning that knitting technique. We’ll also learn how to pick up stitches and create the thumb gusset.
- Finally, in week three of this project, we’ll learn shaping to complete the mittens. We’ll learn duplicate stitch. Moreover, we’ll learn kitchener stitch.
This project will really round out your beginner knitting skills. Plus, you’ll have better experience with DPNs once you complete this project. And guess what that means? Even though BiCrafty Bootcamp is almost over, you’ll be in the perfect position to transition to the upcoming sock knitalong!
BiCrafty Community Mittens
MEASUREMENTS
To Fit Size
Adult Medium Women (Adult Large Women, Adult Large Men)
Hand Circumference: 7-8 (8-9, 9-10) inches [18-20.5 (20.5-23, 23-25.4) cm]
Finished Measurements
Finished Hand Circumference approx: 7 (8, 9) inches [18 (20.5, 23) cm]
Hand Length (not including cuff) approx: 6 (7, 8) inches [15 (18, 20.5) cm]
Gauge
24 stitches and 30 rows = 4″ (10 cm) in Stockinette stitch in the round
MATERIALS
Yarn
Red Heart, Chic Sheep by Marly Bird™ (100% washable merino wool; 186 yds [170m], 3.5 oz [100 g]): 2 ball MC, 1 ball CC (optional for Latvian braid).
Needle
US 7 (4.5 mm) set of 5 double pointed needles — or size required for gauge
Hook
US H (5mm) for provisional cast on.
>> Use Code: MARLYKNITS and get 10% off your order of Signature Needle Arts <<
Notions
Scrap yarn for holding stitches, stitch markers, tapestry needle
ABBREVIATIONS
BO – Bind Off
CO – Cast On
DPN – Double Pointed Needle
K – Knit
LHN – Left Hand Needle
M1 – Make 1 (1 increase)
P – Purl
RHN – Right Hand Needle
Skp – slip 1, knit 1, pass slipped stitch over knit st
Sk2togp – slip 1 knitwise, k2tog, pass slipped st over knit st
Sl – Slip
SSK – slip, slip, knit
St st – Stockinette Stitch (see pattern stitches)
st(s) – stitches
SPECIAL STITCHES
k2tog: Knit 2 stitches together (1 st decreased).
Provisional Cast-on: Using a crochet hook and scrap yarn, chain desired number of stitches. Fasten off. Using knitting needle, pick up and knit 1 st in each chain, using the back-bump, or spine, of the chain. After piece is completed, you can unravel the crochet chain to reveal, and work from, live stitches at CO edge. Here’s a video to show you how you’ll do this part:
NOTES
- Sizes are written for the smallest size. If changes are necessary for larger sizes the instructions will be written thus ( ).
- Mittens are worked in the round from cuff to fingers.
VIDEO TUTORIALS
- How to do Latvian Braid https://youtu.be/O2Cxvqh68w0
- How to add a lifeline to knitting https://youtu.be/FiqYUE_aHAw
- How to bury in ends https://youtu.be/8_NBGUKjO-E
BICRAFTY COMMUNITY MITTENS PATTERN
CUFF
Using Provisional Cast-on and MC, chain 30 stitches. Skip the first 5 chains, and pick up and knit 21 stitches along the back bump of the chain, leave remaining chains unworked.
Continue to work the Lacy Arrow stitch along the 21 stitches as follows (or see chart below).
Chart for Lacy Arrow Stitch
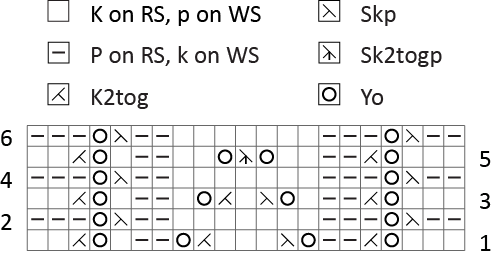
Row 1 (RS): K3, yo, k2tog, p2, yo, skp, k3, k2tog, yo, p2, k1, yo, k2tog, k2.
Rows 2, 4, 6: K3, yo, skp, k2, p7, k3, yo, skp, k2.
Row 3: K3, yo, k2tog, p2, k1, yo, skp, k1, k2tog, yo, k1, p2, k1, yo, k2tog, k2.
Row 5: K3, yo, k2tog, p2, k2, yo, sk2togp, yo, k2, p2, k1, yo, k2tog, k2.
Repeat rows 1-6 until cuff measures comfortably around wrist or until it measures approx. 7 (8, 9)” [18 (20.5, 23) cm] long ending after a row 6.
Do not bind off. Place live stitches from cuff on scrap yarn.
Cut tail leaving at least 24” [61 cm] of length for seaming.
Position the completed cuff with RS facing, starting at the right corner of the cuff and working along the long edge, pick up and knit 42 (46, 54) stitches evenly spaced with 4 double pointed needles.
Divide the stitches as evenly as possible across the 4 dpn’s.
Needles #1 and #4 hold the palm stitches, and needles #2 and #3 hold the back of the hand stitches.
Join to work in the round.
Latvian Braid
TIP: You might want to add a lifeline after you complete the Latvian Braid.
Note that the Latvian Braid is an optional decorative detail. It ties this together with the BiCrafty Community Cowl and Hat patterns made during BiCrafty Bootcamp.
Round 1: *K1 MC, K1 CC; rep from * around.
This round forms the “base” of your braid. It isn’t visible from the bottom of the braid, but it is the horizontal line of stitches you see in between each round of twists you’re about to create. Traditionally you work the same color on Round 1 as it is worked on Round 2, (MC over MC, CC over CC, etc). Bring both yarns to the front of the work.
Round 2: *P1 MC. Bring CC under MC (twisting yarns), P1 CC. Bring MC under CC (twisting yarns); repeat from * around.
Reminder: Do not take the time here to untwist the yarns. They will become untwisted on Round 3 when you switch the direction of twist.
Round 3: *P1 MC, bring CC over MC (twisting yarns), P1 CC, bring CC over MC (twisting yarns); rep from * around.
If done correctly, once you have worked every stitch in the round, your two yarns will become totally untwisted, ready to work in whatever patterning is called for on subsequent rounds.
Cut CC. Continue with MC.Next Round: Knit around.
How to Knit Mittens: Video
Additional Patterns and Videos
At this stage of BiCrafty Bootcamp, some of the things that you might to check out include:
- 3-in-1 Handwarmer Stitch-along: Knit and Crochet Patterns
- Mittens and Fingerless Mitts Free Crochet and Knit Patterns
- Feel The Heat Mittens: Free Knit and Crochet Patterns
- Knit Mittens for the Family
Frequently Asked Questions
Can I make these mittens to match my hat and cowl?
Yes! This mitten pattern is designed to perfectly complement the cowl and hat patterns you made earlier in the BiCrafty Bootcamp. It’s a wonderful way to create a full, matching set of accessories that you can really take pride in. Plus, you’ll learn even more new skills along the way!
I’m a crocheter, is this knitting pattern going to be super hard?
Honestly… no! The biggest edge you have right now is that you’re already bicrafty. You know how to knit dishcloths, cowls, and hats… so mittens are just the next fun step! Remember that there’s always more to learn, but you can totally choose simpler projects. Plus, knitting can be super healing when you need a break from crochet… or vice versa!
How long will it take to knit these mittens?
This project is broken down into three parts over three weeks. This week we start with the cuff, next week we’ll add details like a thumb gusset, and the third week we’ll focus on shaping to finish them off. So, you’ll learn how to knit mittens in about three weeks of BiCrafty Bootcamp lessons!
What yarn do you recommend for these mittens?
The pattern calls for Red Heart Chic Sheep by Marly Bird yarn. You’ll need two balls of the main color (MC) and one ball of a contrasting color (CC) if you want to add the optional Latvian braid detail. It’s a lovely 100% washable merino wool that comes in lots of pretty colors!
What’s a Latvian braid and do I have to do it?
The Latvian braid is an optional decorative detail that ties this mitten pattern in with the cowl and hat patterns you might have already made. It’s a fun way to add some extra flair! There are video tutorials to help you learn it, but if it’s not your style, you can definitely skip it and just continue with your main color.