First Fall Felted Crochet Weekender Bag – Lesson One
Let’s get started on the inaugural Marly Bird First Fall Make-Along with a felted crochet weekender bag! This is lesson one and we are making the base of the bag.
Read more: First Fall Felted Crochet Weekender Bag – Lesson One*THIS POST CONTAINS AFFILIATE LINKS. BY CLICKING ONE OF THESE LINKS AND MAKING A PURCHASE A SMALL PORTION COMES BACK TO THE BLOG. THE PRICE YOU PAY WILL NOT CHANGE. THANK YOU FOR YOUR SUPPORT OF THE BLOG.*
REMEMBER…
This is a ???? free make-along ???? and will remain free until the end of Nov. 2022.
After that, the pattern will only be available as a paid pdf.

Important Dates of the First Fall Make-Along
This make-along will take place over four weeks.
Oct. 19, 2022 – Base of Bag
Oct. 26, 2022 – Body of Bag
Nov. 02, 2022 – Body of Bag Continued
Nov. 9, 2022 – Finishing and Felting
Special How to Line Class released on Nov. 16, 2022 <– VIP ONLY

The Marly Bird First Fall Make-Along | Felted Crochet Weekender Bag
SKILL LEVEL
Adventurous Beginner
MEASUREMENTS
Bag Finished Measurements
30”wide x 20” tall x 11.5” base [76 x 51 x 29 cm] pre-felt
26” wide x 17” tall x 8.5” base [66 x 43 x 21.5 cm] post-felt
Size will vary slightly depending on felting.
Gauge
10 hdc sts and 8 rows = 4” [10 cm] pre-felt with yarn held double; use any size hook to obtain the gauge.
MATERIALS
Yarn
Patons, Classic Wool (100% wool, 194 yds / 177 m, 3.5 oz / 100 g CYCA #4 worsted)
Color A: 7 ball— #00225 Dark Gray Mix
Color B: 7 ball— #00201 Winter White
Color C: 7 ball— #77767 Teal Chalk
Hook
Size K/8 (6.0 mm) or size required for gauge
Notions
Stitch markers, tapestry needle, washing machine for felting
Optional Extras:
- Zipper (sized to fit finished bag) *will discuss more about zippers in makealong
- Two rolled leather handles (length & style is your choice)
ABBREVIATIONS
Ch – Chain(s)
Hdc – Half Double Crochet
RS – Right Side
Sc – Single Crochet
Sp(s) – Space(s)
St(s) – Stitch(es)
Tch – Turning Chain
WS – Wrong Side
SPECIAL INSTRUCTIONS
Tapestry Colorwork Technique
Changing colors in tapestry colorwork, work to last 2 loops on hook of first color, draw new color through last 2 loops and proceed in next color. Carry color when not in use loosely across top of row and work sts around it being sure to maintain gauge.
Felting Instructions
NOTE: We recommend you test felt your yarn. Knit a swatch using the same yarn in the same colors shown and test felt it before proceeding with your project.
You cannot predict the effects of all washing machines, detergents and local water conditions. Felting is irreversible. It is easy to felt “just a little more”, but impossible to undo the effects of over-felting.
Place the project in the washer and add a very small amount of baking soda or detergent (1⁄4 cap). Set the washer on hot water/cold rinse cycle, minimum size load, and wash garment. Check the felting process every 11-15 minutes depending on your machine, detergent, and local water conditions.
If using spin cycle to remove excess water, set on lowest setting. After the piece has finished, remove from washer and remove extra water from the fabric with a dry towel (DO NOT TWIST).
Lay project flat or shape piece to measurements to dry. Do not put in the sun or use a clothes dryer. Allow the project to dry thoroughly.
Zipper (optional)
With RS facing and zipper closed, pin zipper to top opening so that top edges are touching the outer edges of the zipper teeth, leaving zipper teeth exposed between the opening.
With contrasting sewing thread and RS facing, baste zipper to fronts close to zipper teeth. Turn the work inside out. With matching sewing thread, use a whipstitch to sew the outer edges of the zipper to the WS of the edge, being careful to follow along a single column of sts to ensure that the zipper is straight.
Turn the work back so the RS is facing, and with matching sewing thread, use small backstitches to secure the knitted fabric close to the zipper teeth. Remove basting thread.
VIDEO TUTORIAL
- Bury Ends >> Click Here for Video Help <<
- Lesson One Base of Bag >> Click Here for Video Help <<

SWATCH INSTRUCTIONS
Measurements of Swatch
9 x 6.5″ [23 x 16.5 cm] pre-felt
7 ¾” x 5.5” [19.5 x 14 cm] post-felt
With color C, holding two strands together, ch 22 sts.
Row 1: Hdc in 2nd ch from hook, and in each ch to end of row, ch 1, turn — 21 sts.
Row 2: Hdc in 1st hdc and in each hdc to end of row, ch 1, turn.
Repeat row 2 ten times more.
FINISHING
Weave in ends.
Measure the piece and log the information.
Felt the piece to desired measurements.

FIRST FALL WEEKENDER PATTERN — Lesson One
ONE COLOR BASE
With color A held double, ch 30.
Row 1: hdc in 2nd ch from hook and in each ch to end, ch 1, turn — 29 hdc.
Row 2: Hdc in first hdc and in each st to end, ch 1, turn.
Repeat row 2 until base measures approx. 30” [76 cm]
THREE COLOR BASE
With color A held double, ch 30.
Row 1: hdc in 2nd ch from hook and in each ch to end, ch 1, turn — 29 hdc.
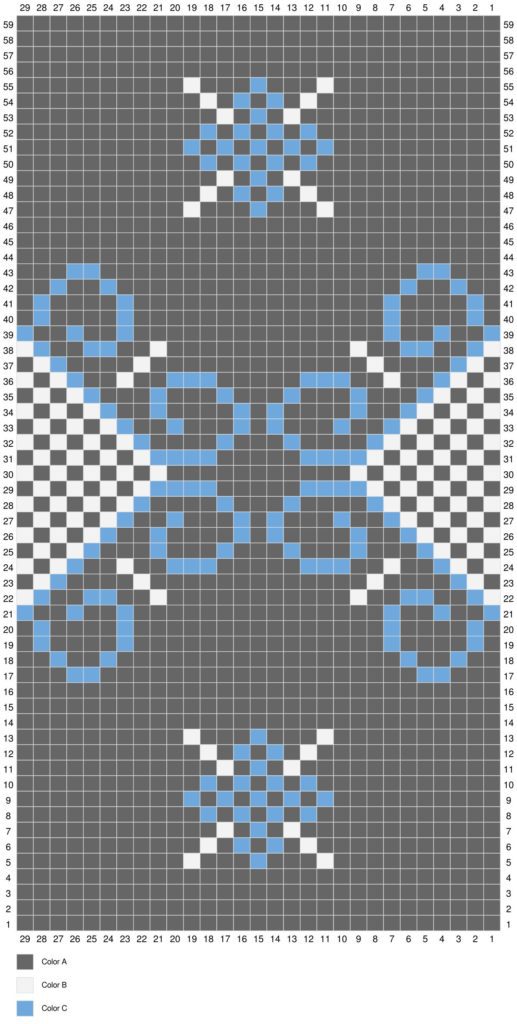
Using the tapestry colorwork technique, work in the established HDC pattern following the chart for the base of the bag through row 59.
Finish off.
DO NOT FELT THE BASE! You will pick up stitches next lesson to continue to the body.
NOTES:
- Read the chart from bottom to top,right to left for RS rows, and left to right for WS rows.
Marly Bird First Fall Make-Along VIP EXPERIENCE
Don’t forget, the free pattern is only free for a limited time, but the VIP Experience has UNLIMITED ACCESS to the pattern, videos, and extras.
For week one: these extras:
- Learn how to read a color chart
- Learn how to add pockets to the inside
- Learn how to use Stitch Fiddle to customize chart colors
- Ad-Free PDF of Lesson One Instructions (full pdf to be added at end of event)
- Live Q&A with Marly
Each week of instructions includes a video tutorial and a segment of the pattern to work along with the Marly’s Minions community. It’s not too late to upgrade to the VIP Experience.

Felted Crochet Weekender Bag Show and Tell
Be sure to share your progress with us. In the Marly’s Minions FB Group there are a plethora of cheerleaders who want to cheer you on and see your amazing bags!


