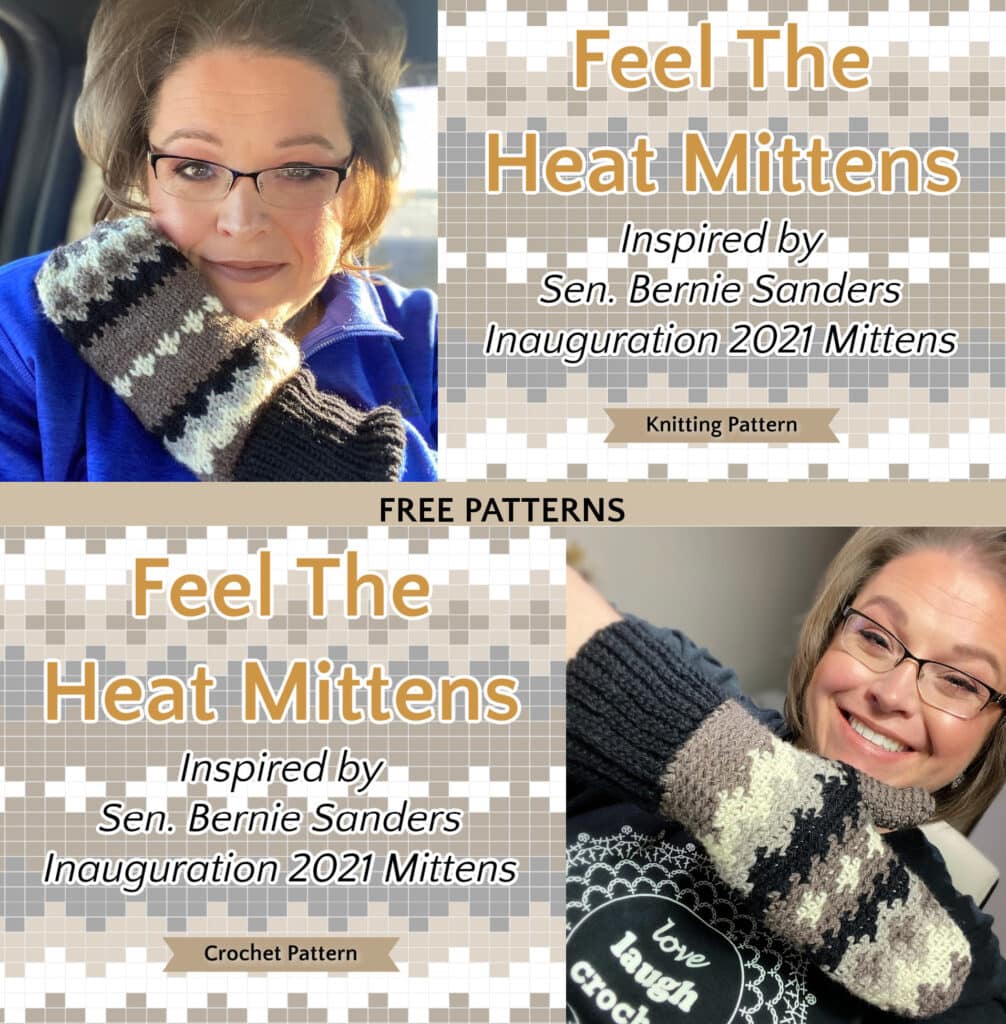
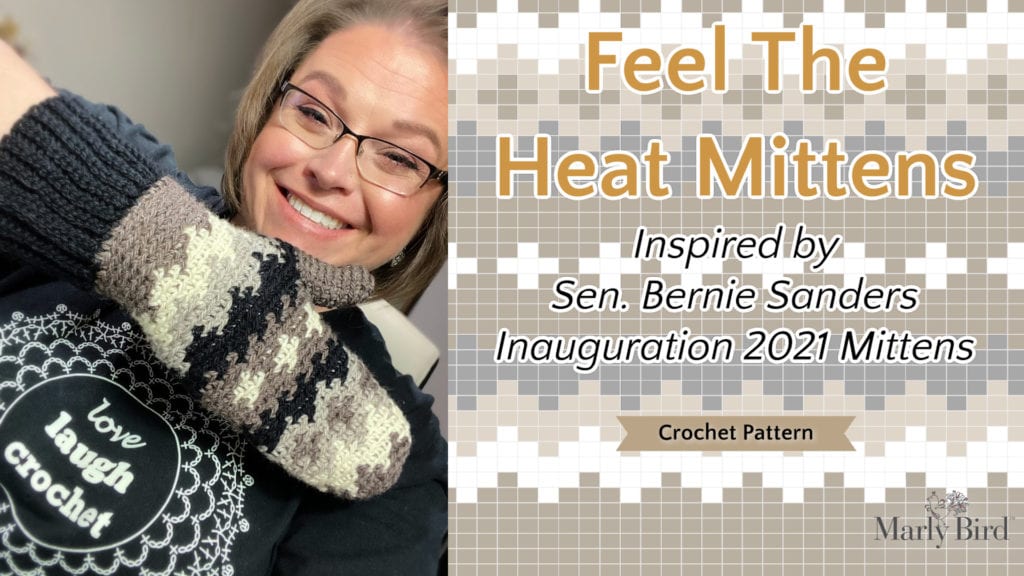
Bernie Sanders Inspired Mittens – Feel The Heat Crochet Mittens
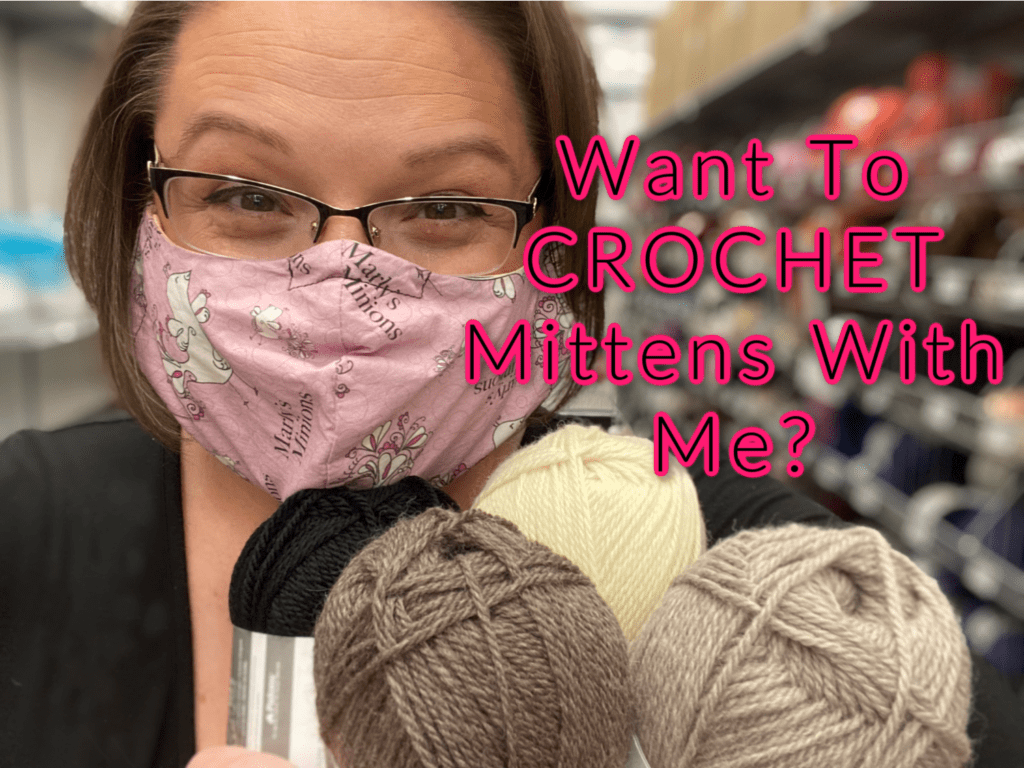
All my knit and crochet friends are looking for a great pattern for the Bernie Sanders Inspired Mittens. Look no further than here! Get a free crochet pattern for the Feel The Heat Crochet Mittens by Marly Bird (inspired by the Bernie Sanders Mittens no in affiliation with him or the original mittens).
That’s right, you saw the inauguration and you’ve seen all the meme’s and now you want to make your own Sen. Bernie Sanders inspired mittens. Like I said, you are not alone. Many of you reached out to me to ask if I could write a pattern similar to his now famous mittens. Well, the long and short of it is, yes I can, and yes I did!
*This post contains affiliate links. By clicking on one of these links and making a purchase a portion will go to the blog. The price you pay will not change and the small commission I receive helps me to keep bringing you free content and giveaways on the blog. Thank you for your continued support.*
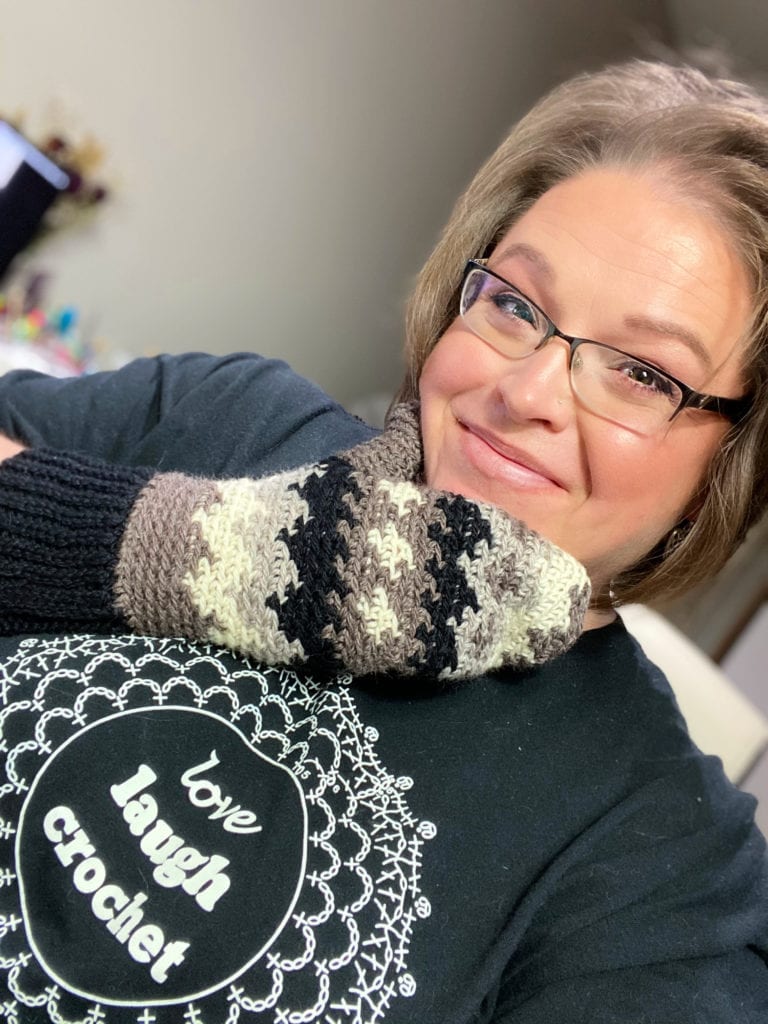
Let me introduce to you the Feel The Heat Crochet Mittens. This is a crochet pattern inspired by the beautiful “smittens” worn by Sen. Bernie Sanders at the 2021 Presidential Inauguration.
➡️ Favorite them on Ravelry and Queue them up! https://www.ravelry.com/patterns/library/feel-the-heat-crochet-mittens ⬅️
*Disclaimer: Let me state clearly that neither this pattern or myself are affiliated or endorsed by Sen. Sanders. This pattern is an artist’s’ interpretation of the original pattern and not a 100% copy as that would not be right.
What is a “smitten”? It is a mitten made out of old sweaters! See, the mittens worn by Bernie are actually made out of recycled sweaters making them “smittens. Now, in order to 100% duplicate the mittens I would need to make knitted fabric, cut it up and then sew it all together. Which is a nice option if you want to do that, but alas, I did not.
Instead, I used the skills I have as a knitter (and yes, there is a crochet pattern as well) to design a fabric that can be made in the round and turned into a nice pair of fair isle mittens that are inspired by and resemble Bernie’s.
???? The knit pattern is available here >> Click Here <<
Side note: If you want to read all about the original smittens and the wonderful woman who made them for the senator, check out this story: https://www.npr.org/2021/01/21/959335867/meet-jen-ellis-the-woman-behind-sanders-meme-worthy-mittens or here: https://slate.com/human-interest/2021/01/bernie-sanders-inauguration-mittens-vermont-teacher-interview.html
It’s always interesting when I crochet colorwork. There are so many options for the technique to use. Do I use tunisian, entrelac, split single crochet (waistcoat), sc-blo, tapestry or just basic stitches. The decisions can be a little overwhelming.
My pattern for the Feel The Heat Crochet Pattern I chose to use Sc-blo. But an experienced crocheter could use split stitch sc instead and get a more crisp look.
Either way, this is a fun pattern.
???? WARNING: It does stretch more vertically vs horizontally so be aware of that.If you tend to forego gauge swatches (say it ain’t so) and just wing it, you might end up with a mitten that is way too long and way too snug ![]()
There is a video tutorial to go along with the pattern coming soon. In the video I will show you everything you need to know to make the mittens as written and how to make changes that can make the mitten a custom fit.
Print this pattern and download the charts. Then go stash diving and grab some worsted weight yarn (that was the most requested yarn weight for this pattern by the Marly’s Minions FB Group) and your hook.
If you make this pattern PLEASE be sure to share with me on social media! #MarlyBird #MMMDI #MarlyBirdYouTubeChannel
Feel the Heat Mittens Crochet
Designed by Marly Bird
SKILL LEVEL
Intermediate
MEASUREMENTS
To Fit Size
Adult Medium Women (Adult Large Women/Medium Men, Adult Large Men)
Hand Circumference: 7-8 (8-9, 9-10) inches [18-20.5 (20.5-23, 23-25.4) cm]
Finished Measurements
Finished Hand Circumference approx: 8 (9, 10) inches [20.5 (23, 25.5) cm]
Hand Length (not including cuff) approx: 8 (9, 10) inches [20.5 (23, 25.5) cm]
Gauge
14 sc-blo and 14 rounds = 4″ [10 cm]
MATERIALS
Patons Classic Wool Worsted (100% pure new wool, 194 yds / 177 m, 3.5 oz/100 g)
1 ball Color A: Black
1 ball Color B: Heath Heather
1 ball Color C: Aran
1 ball Color D: Natural Mix
Hook
US H/8 (5 mm) — or size required for gauge
Notions
Stitch markers, tapestry needle
ABBREVIATIONS
Ch – Chain(s)
Cont – Continue(ity)
Rem – Remaining
Rep – Repeat
Rnd(s) – Round(s)
RS – Right side
Sc – Single crochet
Sc-blo – Single crochet in back loop only of next stitch
Sl st – Slip stitch
Sl st-blo – Split stitch in back loop only of next stitch
Sp(s) – Space(s)
Sc2tog-blo – Single crochet 2 stitches together in back loop only
St(s) = Stitch(es)
WS = Wrong side
YO = Yarn over hook
PATTERN STITCHES
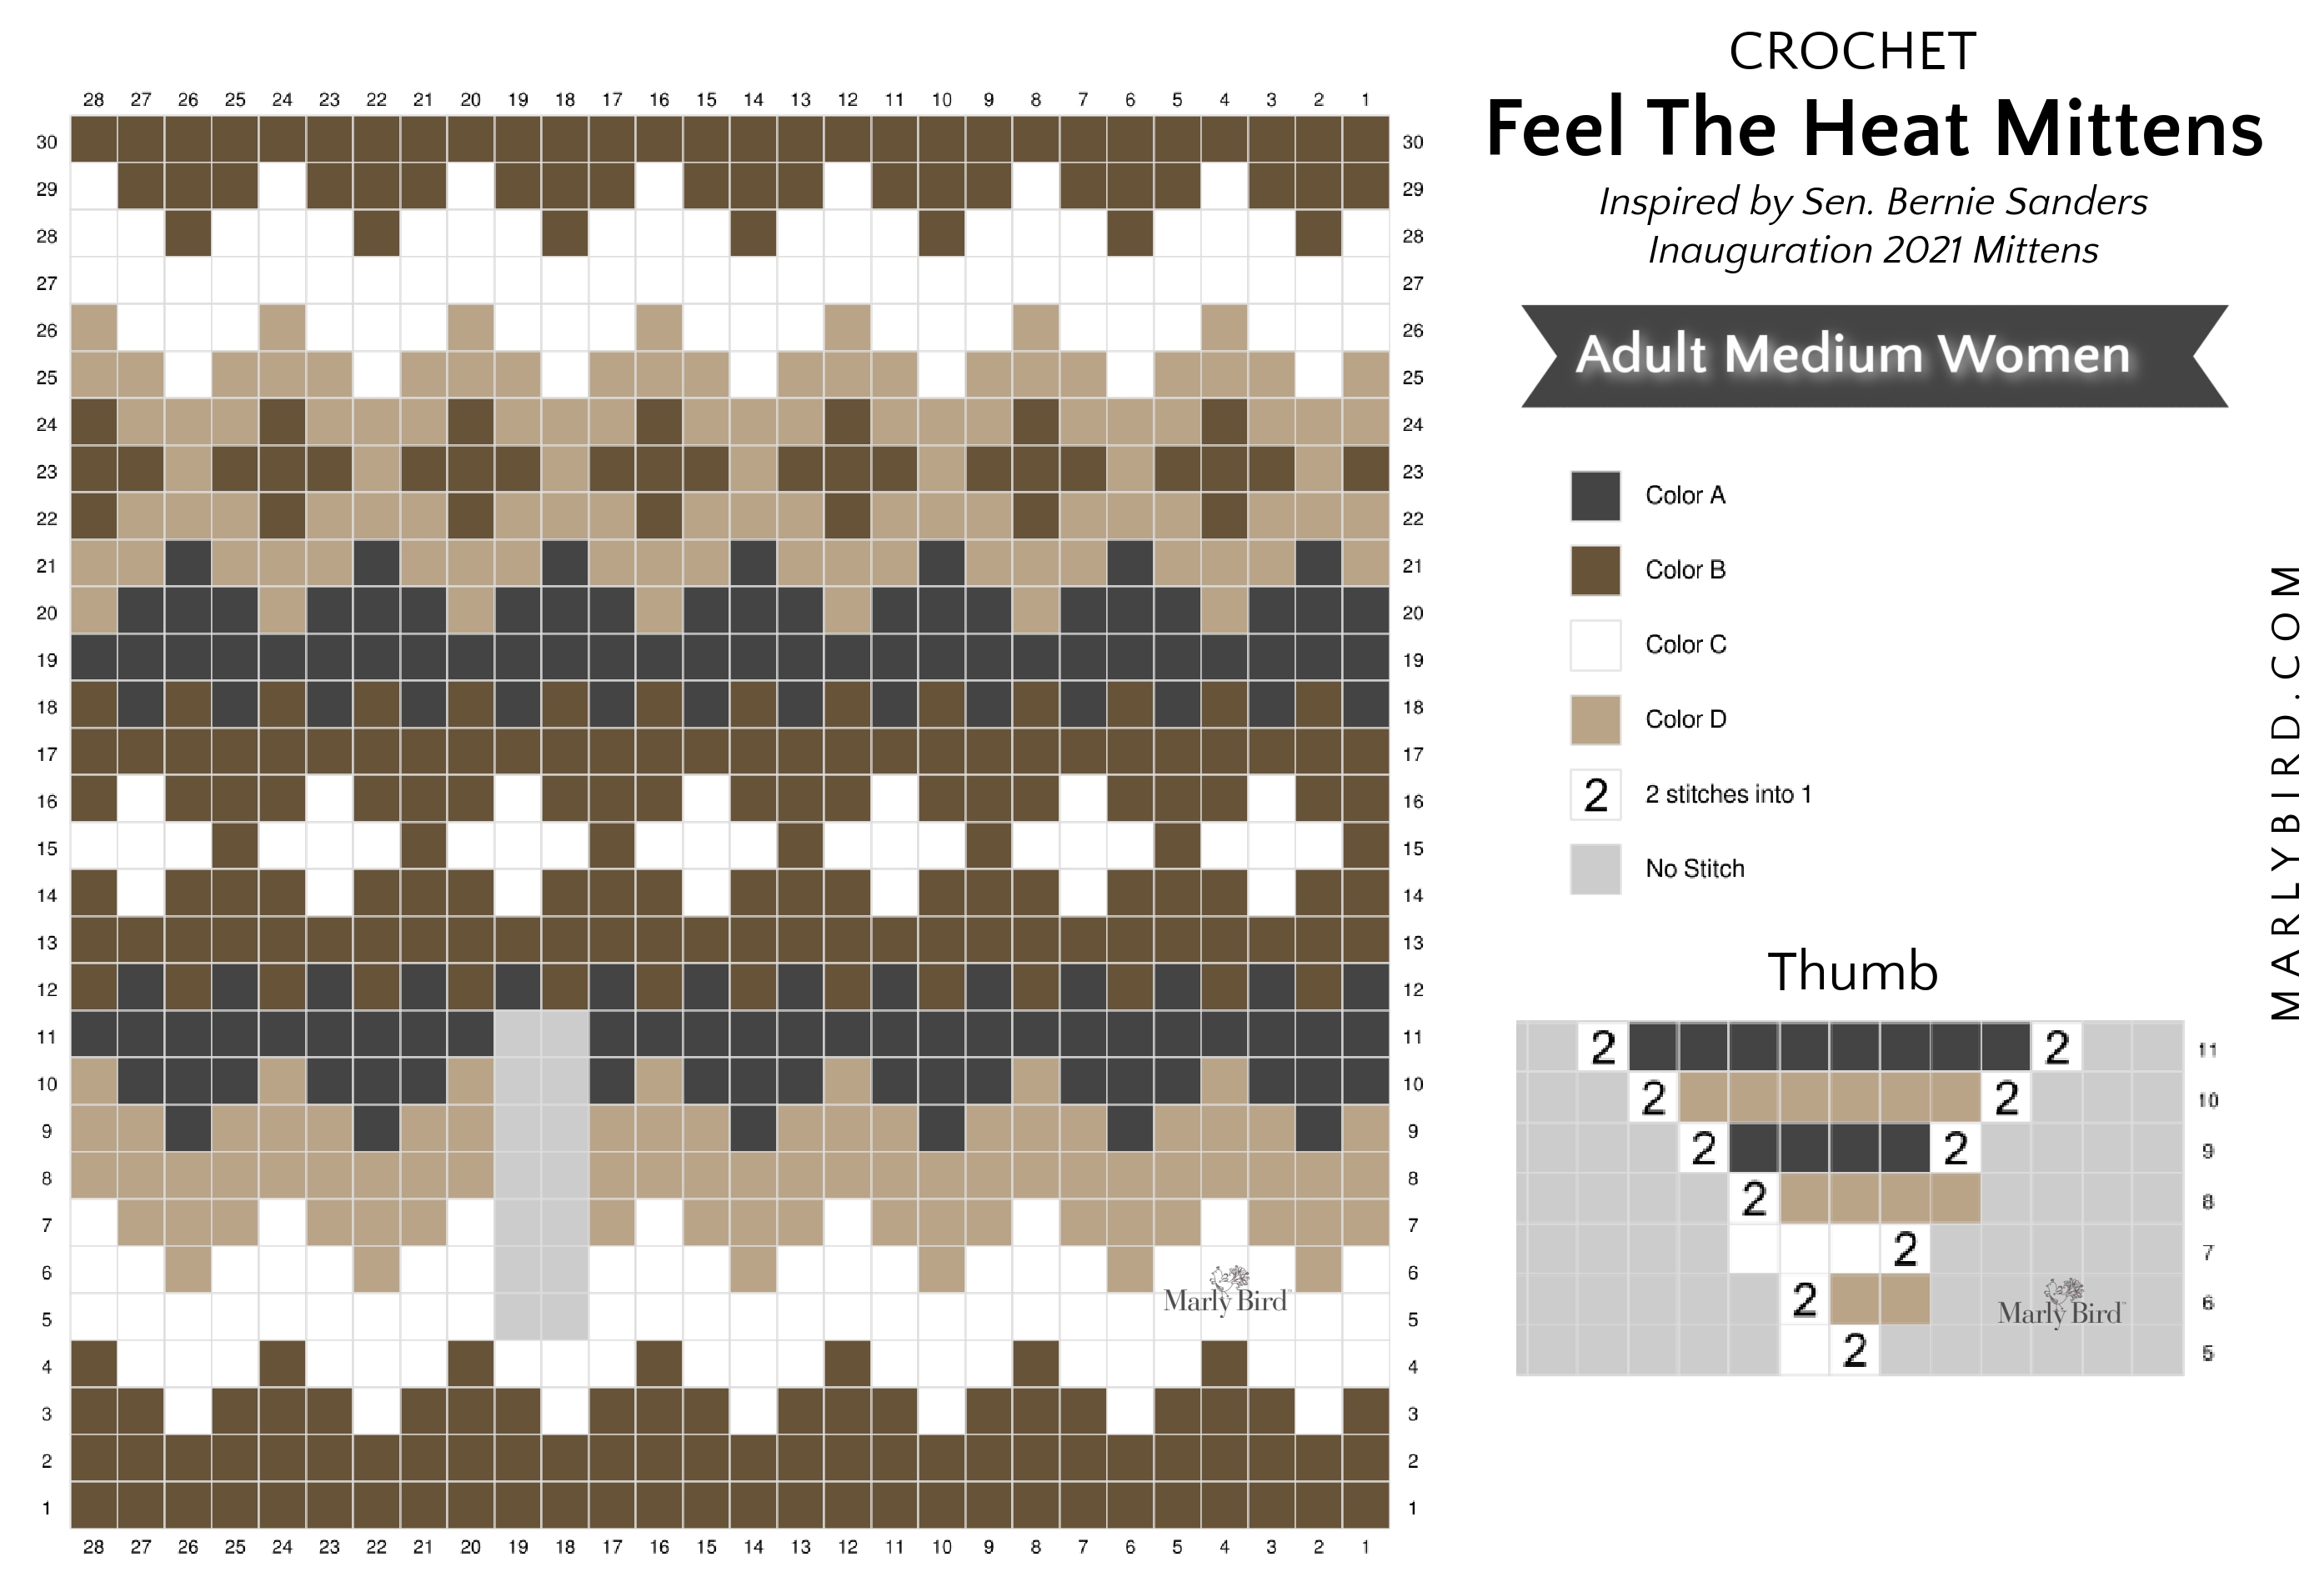
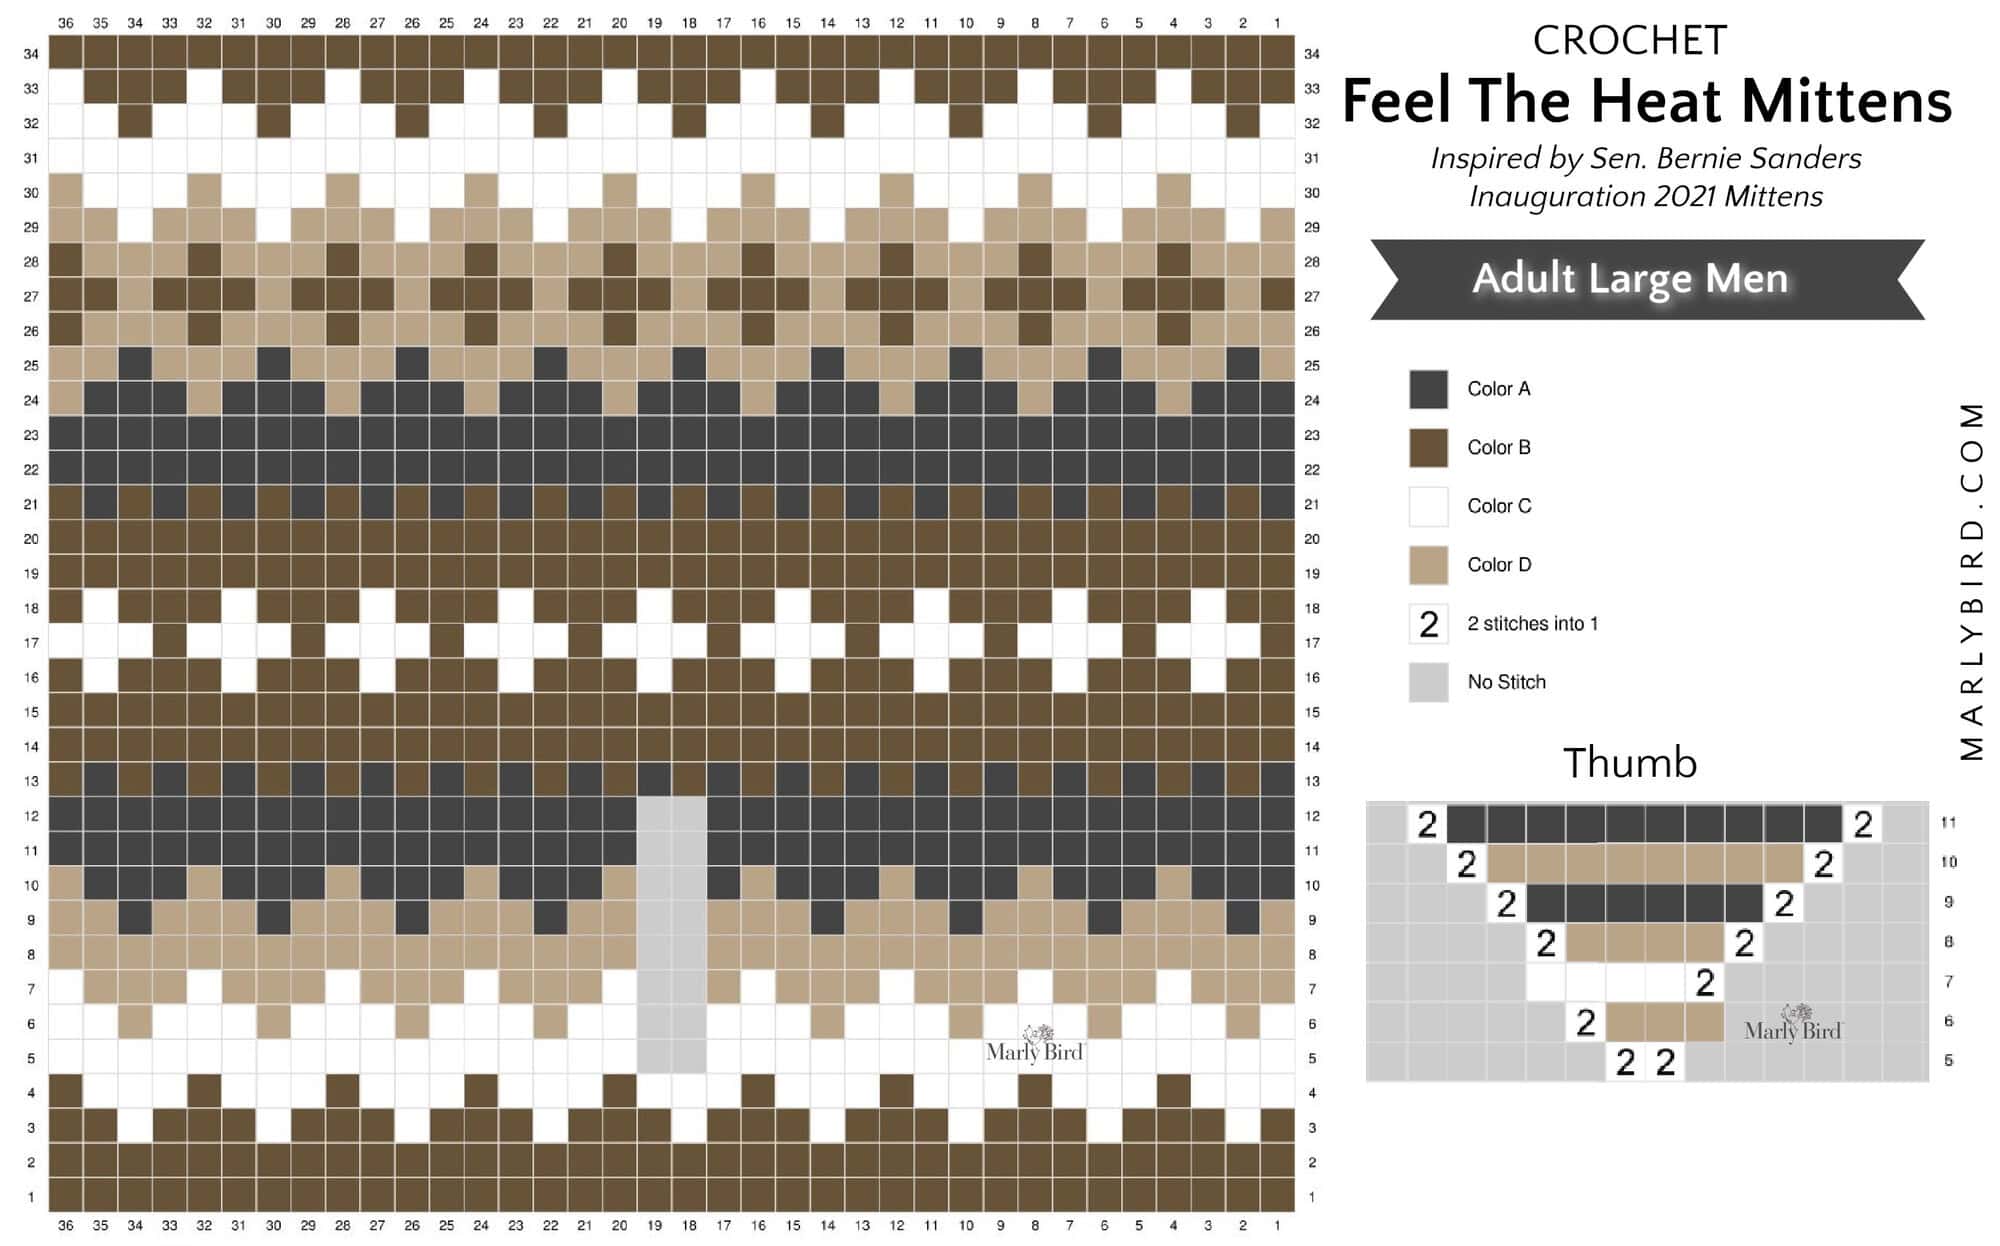
Fair Isle pattern
(Worked circularly, multiple of 4 sts)
follow the chart attached for the size you’re making. Start at the bottom right corner and read the chart from right to left. Each row represents 1 round of crochet.

NOTES
- The sc-blo could be changed to a split st-sc, just like I used in the 3-1 Hand Warmer Pattern.
- The fabric of the mittens tends to stretch more vertically rather than horizontally. Take care to keep the stitches consistent throughout.
- Sizes are written for the smallest size. If changes are necessary for larger sizes the instructions will be written thus ( ).
- Mittens are worked in the round from cuff to fingers.
- Do not join at end of rounds. Continue to work in a spiral. PLACE A MARKER AT THE START OF THE ROUND for easier counting.
- When changing colors in chart, work to the last 2 loops on the hook of the first color, then yo and pull through with the next color.
- Carry color when not in use loosely across top of row and work sts around it being sure to maintain gauge.
- Only work with and carry 2 colors at a time. If a color is not in use for several rounds then cut it (leaving a long tail to weave in later). When that yarn is needed again rejoin it to the mittens.
VIDEO TUTORIALS
- Perfect Slip Stitch Ribbing https://youtu.be/ByLQC3s36mc
- 3 in 1 Hand Warmers (if you want a more crisp fair isle, use this video to learn the split single crochet): https://youtube.com/playlist?list=PLCtrs9o46Za4BpXXT_Lpo_M2jVer-o8bB
- How to bury in ends https://youtu.be/8_NBGUKjO-E
- How to Crochet Feel The Heat Crochet Mittens: https://youtu.be/XdxYe0xcZRw
FEEL THE HEAT MITTENS CROCHET PATTERN
CUFF
With color A,
Chain 15
Row 1 (WS): Sl st in 2nd ch from hook and in each chain to end, ch 1, turn — 14 slip stitches
Row 2 (RS): Sl st-blo in each stitch to end, ch 1, turn.
Repeat the last row until the cuff measures 6.5 (7.5, 8.5)” [16.5 (19, 21.5) cm] ending after a RS.
Do not finish off.
With WS facing, fold the cuff in half so the foundation chain edge is in front of the last row completed. * Slip stitch into the unused chain of the foundation chain and the blo of the last row completed; repeat from * to end — 14 slip stitches in blo. Do Not Fasten off.
HAND
With RS facing you, turn the cuff 90 degrees and work along the long edge.
1st set-up rnd: Ch 1, sc 28 (32, 36) evenly across. Join with a slip stitch to the first sc. Ch 1, do not turn.
Continue with the instructions changing color as indicated in the chart or the size you are making. Start at the bottom right corner and read the chart from right to left. Each row represents 1 round of crochet.
Round 1: Sc in each st around. Take care and do not make these stitches too tight.
Do not join, continue to work in continuous rounds.
Rounds 2 – 4 : 1 sc-blo in each st around.
THUMB GUSSET
On the charts for all sizes, stitches #18 and #19 are shown as no stitch beginning on round 5 and remain no stitch through round 11 (11, 12)
Stitches #18 and #19 are actually the first two stitches on the thumb chart. When working the thumb gusset, work the thumb chart over those two stitches and all increased stitches in the thumb gusset through round 11 (11, 12) There are markers in place to help you easily identify the gusset stitches between the markers.
When working the following rounds be sure to follow the color indicated for the stitches on the main chart & thumb gusset chart.
Size Adult Medium Women Only
Round 5: Sc-blo in each of the next 17 sts, 2sc-blo in next st (place marker in the first stitch of the 2sc set to indicate start of thumb gusset), sc-blo in next st (place marker in stitch to indicate end of thumb gusset), sc-blo in each st to end of round — 1 stitch increased in thumb gusset.
Rounds 6 & 8: Sc-blo in each stitch to marker, sc-blo in next st (move marker up from stitch below to indicate start of thumb gusset), sc-blo in each stitch to next marker, 2sc-blo in next st (move marker to the 2nd stitch to indicate end of thumb gusset), sc-blo in each st to end of round — 1 stitch increased in thumb gusset each round.
Round 7: Sc-blo in each stitch to marker, 2sc-blo in next st (move marker up from stitch below the 1st stitch to indicate start of thumb gusset), sc-blo in each stitch to next marker, sc-blo in next st (move marker to indicate end of thumb gusset), sc-blo in each st to end of round — 1 stitch increased in thumb gusset each round.
Rounds 9 & 10 & 11: Sc-blo in each stitch to marker, 2sc-blo in next st (move marker up from stitch below the 1st stitch to indicate start of thumb gusset), sc-blo in each stitch to next marker, 2sc-blo in next st (move marker to the 2nd stitch to indicate end of thumb gusset), sc-blo in each st to end of round — 2 stitches increased in thumb gusset each round.
For the Adult Medium Women there are 12 stitches in thumb gusset.
➸ Thumb gusset chart complete, move ahead to Hand Continued…
Size Adult Large Women/Medium Men Only
Round 5: Sc-blo in each of the next 17 sts, 2sc-blo in next st (place marker in the first stitch of the 2sc set to indicate start of thumb gusset), 2sc-blo in next st (place marker in 2nd stitch to indicate end of thumb gusset), sc-blo in each st to end of round — 2 stitches increased in thumb gusset.
Round 6: Sc-blo in each stitch to marker, sc-blo in next st (move marker up from stitch below to indicate start of thumb gusset), sc-blo in each stitch to next marker, 2sc-blo in next st (move marker to the 2nd stitch to indicate end of thumb gusset), sc-blo in each st to end of round — 1 stitch increased in thumb gusset each round.
Round 7: Sc-blo in each stitch to marker, 2sc-blo in next st (move marker up from stitch below the 1st stitch to indicate start of thumb gusset), sc-blo in each stitch to next marker, sc-blo in next st (move marker to indicate end of thumb gusset), sc-blo in each st to end of round — 1 stitch increased in thumb gusset each round.
Rounds 8 & 9 & 10 & 11: Sc-blo in each stitch to marker, 2sc-blo in next st (move marker up from stitch below the 1st stitch to indicate start of thumb gusset), sc-blo in each stitch to next marker, 2sc-blo in next st (move marker to the 2nd stitch to indicate end of thumb gusset), sc-blo in each st to end of round — 2 stitch increased in thumb gusset each round.
For the Adult Large Women/Medium Men there are 14 stitches between the gusset markers.
➸ Thumb gusset chart complete, move ahead to Hand Continued…
Size Adult Large Men Only
Round 5: Sc-blo in each of the next 17 sts, 2sc-blo in next st (place marker in the first stitch of the 2sc set to indicate start of thumb gusset), 2sc-blo in next st (place marker in 2nd stitch to indicate end of thumb gusset), sc-blo in each st to end of round — 2 stitches increased in thumb gusset.
Round 6: Sc-blo in each stitch to marker, sc-blo in next st (move marker up from stitch below to indicate start of thumb gusset), sc-blo in each stitch to next marker, 2sc-blo in next st (move marker to the 2nd stitch to indicate end of thumb gusset), sc-blo in each st to end of round — 1 stitch increased in thumb gusset each round.
Round 7: Sc-blo in each stitch to marker, 2sc-blo in next st (move marker up from stitch below the 1st stitch to indicate start of thumb gusset), sc-blo in each stitch to next marker, sc-blo in next st (move marker to indicate end of thumb gusset), sc-blo in each st to end of round — 1 stitch increased in thumb gusset each round.
Rounds 8 & 9 & 10 & 11 & 12: Sc-blo in each stitch to marker, 2sc-blo in next st (move marker up from stitch below the 1st stitch to indicate start of thumb gusset), sc-blo in each stitch to next marker, 2sc-blo in next st (move marker to the 2nd stitch to indicate end of thumb gusset), sc-blo in each st to end of round — 2 stitch increased in thumb gusset each round.
For the Adult Large Men there are 16 stitches between the gusset markers.
➸ Thumb gusset chart complete, move ahead to Hand Continued…
HAND CONTINUED…
Work the following written instruction in conjunction with the main chart for correct color placement.
All Sizes
Next Round: Sc-blo in each stitch to marker, sc-blo in next st (this is stitch #18 on the main chart), skip next 10 (12, 14) stitches and sc-blo in next marked stitch (this is stitch #19 on the main chart), sc-blo in each st to end of round — 10 (12, 14) stitch on hold for thumb, 28 (32, 36) around hand.
TOP OF MITTEN
With color B
Next Round: *Sc2tog-blo; repeat from * to end of round — 14 (16, 14) stitches
Last Round: *Sc2tog-blo; repeat from * to end of round, slip stitch into the next stitch– 7 (8, 9) stitches.
Fasten off.
1st FINISHING
Cut yarn leaving a long tail and thread onto tapestry needle. Working around the work, insert the tapestry needle through both legs of each stitch, then pull the tail through all the stitches and pull snug like a drawstring.
Weave in all tails to the WS of the mitten to secure.
THUMB
With RS of mitten facing, join color B with a slip stitch to thumb.
Round 1: Sc-blo in each stitch around thumb and make 2 sc at the join point to the hand. Do not join, continue to work in the round in a spiral — 14 (16, 18) stitches.
Next Rounds: Sc-blo in each stitch around.
Repeat the last round until thumb measures 1.5 (2, 2.5)” [3.8 (5, 6.3) cm] or to desired length.
Last Round: *sc2tog-blo; repeat from * to end of round, slip stitch into the next stitch– 7 (8, 9) stitches.
Fasten off.
2nd FINISHING
Cut yarn leaving a long tail and thread onto tapestry needle. Working around the work, insert the tapestry needle through both legs of each stitch, then pull the tail through all the stitches and pull snug like a drawstring.
Weave in tail to the WS of the mitten to secure.