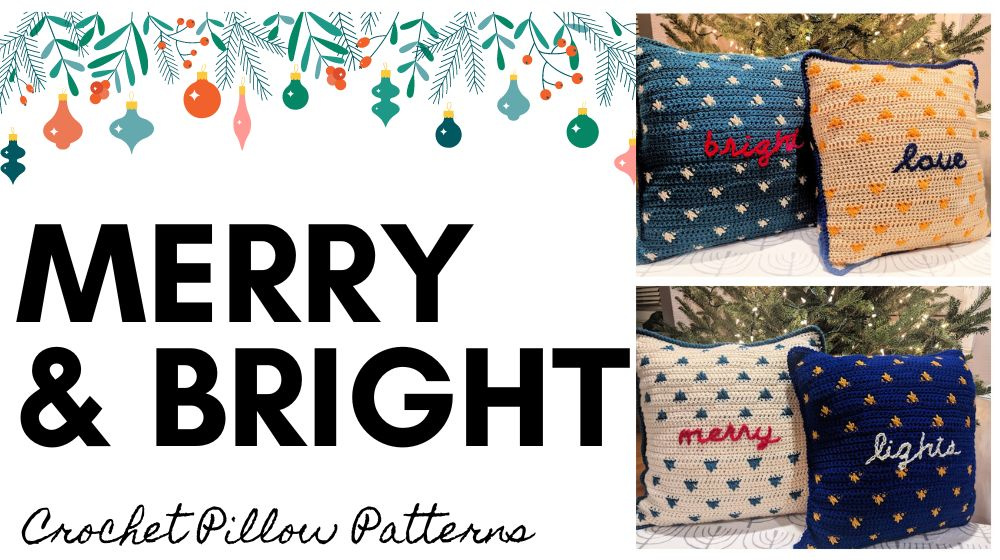
Merry Lights Crochet Pillow Pattern – Free Holiday Decor to Stitch!
Want a festive handmade touch for your home—but not full Santa mode? The Merry Lights Crochet Pillow Pattern adds holiday charm without going over the top. It’s cozy, cute, and works for any seasonal celebration. Whether you decorate for Christmas, Hanukkah, Winter Solstice—or just love twinkle lights and cocoa vibes—this pattern is for you! ✨
Affiliate Disclosure: This post contains affiliate links. If you click on one of these links and make a purchase, I may earn a small commission at no additional cost to you. This helps support the content and free patterns I provide here on MarlyBird.com. Thank you for your support—it means the world to me! 💖
🧶 Why You’ll Love This Crochet Holiday Pillow
Not everyone loves glitter and red-green everything. That’s why I designed this pillow with:
- A modern color palette
- A graphic stitch pattern
- Bold embroidery that’s joyful but flexible
The result? A winter-ready accent pillow that feels festive without being too specific. It’s the perfect handmade detail for your couch, chair, or even under the tree.
❄️ Merry Light Crochet Pillow Pattern Details – Skill Level, Yarn & Hook Info
Whether you’re a seasoned hooker (oops, I mean crocheter 😜) or still perfecting your single crochet, this pattern is easy to follow with just enough technique to keep it interesting.
Skill Level: Advanced Beginner
Techniques Used:
- Panel Joining
- Foundation Single Crochet (fsc)
- Spike Single Crochet
- Surface Slip Stitch (for embroidery)
- Reverse Single Crochet
Yarn Used:
WeCrochet Brava Worsted – a soft, sturdy 100% acrylic yarn
Merry & Bright Pillow:
- Color A (Cream) – 2 balls
- Color B (Hunter) – 2 balls
- Color C (Red) – 10g (just a dash for embroidery)
Love & Lights Version (also included):
- Color A (Cream) – 2 balls
- Color B (Celestial) – 2 balls
- Color C (Caution Yellow) – 1 ball
💡 Want to customize? Try icy blue and white for Hanukkah, or jewel tones for a moody winter vibe.
Hook Size: I/9 (6.0 mm) or size needed to obtain gauge
Finished Size: 18” x 18”
Gauge: 13 sc x 15 rows = 4.25” x 4” (blocked)

💡 Embroidery Magic: Add the Words “Merry” & “Bright”
This is where the fun really happens! Once the front and back panels are stitched up, you’ll add bold words like merry or bright using surface slip stitch and a bit of tissue paper (yes, really!).
Don’t worry—full instructions and templates for the lettering are included in the free pattern, along with video links if you need a visual guide. The embroidery adds texture and personality without requiring any fancy tools or intimidating techniques.
🎄 Display Ideas for Your Handmade Holiday Pillows
These pillows are more than just functional—they’re statement pieces. Try these ideas:
- On the couch: Layer with chunky knit blankets and your other handmade cushions.
- Under the tree: A great photo backdrop for presents or pets (hello, holiday card!)
- Entry bench or hallway nook: Give guests a soft and festive welcome.
- Craft fair booth or market display: They’re totally giftable!
You can even mix and match with the Love & Bright version of the pattern (also included in the PDF) for a full handmade holiday pillow set!

✨ Want the Merry Lights Crochet Pillow Pattern Ad-Free PDF?
✅ Printable PDF with written instructions
✅ Exclusive Stitch Diagram
✅ Surface embroidery templates
✅ Yarn, hook, and gauge details
✅ Written Instructions for both the Merry Lights AND Love & Bright pillow versions!
🛒 Want the ad-free, printer-friendly version? Grab the upgraded PDF in my Ravelry shop!

❤️ Make It Your Own
The Merry Lights Crochet Pillow Pattern is meant to be personalized. Switch up the colors. Use your own favorite festive words. Make one for each room. Or keep them all for yourself—I won’t tell. 😉
Merry Lights Crochet Pillow Pattern
Designed by Robyn Chachula
SKILL LEVEL
Adventurous Beginner
MEASUREMENTS
Finished Measurements
Pillow is 18” [45.5 cm] wide by 18” [45.5 cm] long.
Gauge
13 sc x 15 rows = 4.25” [11 cm] x 4” [10 cm]; use any size hook to obtain the gauge.
MATERIALS
Yarn
WeCrochet, Brava (100% acrylic, 218 yds / 199 m, 3.5 oz/ 100 g, CYCA# 4 worsted)
Merry & Bright Pillow:
- Color A: #28424 Cream, 2 balls
- Color B: #28435 Hunter, 2 balls
- Color C: #28445 Red, 10 g
Love & Lights Pillow:
- Color A: #28424 Cream, 2 balls
- Color B: #28418 Celestial, 2 balls
- Color C: #28417 Caution, 1 ball
Hook
Size I/9 (5.5 mm)
Notions
Tapestry needle, Steam Iron and Rust Proof Pins for Blocking, Trace Paper (or Tissue Paper/ Parchment Paper), 18” x 18” pillow form
ABBREVIATIONS
CC – Contrasting Color
Ch – Chain(s)
Dc – Double Crochet
MC – Main Color
PM – Place Marker
RS – Right Side
Sc – Single Crochet
Sp(s) – Space(s)
St(s) – Stitch(es)
Tch – Turning Chain
WS – Wrong Side
Yo – yarn over
SPECIAL STITCHES
⭐️ Foundation Single Crochet (fsc):
First fsc: Ch 2, insert hook into 2nd ch from hook, yarn over and pull up a loop, yarn over and draw through 1 loop on hook (forming a chain), yarn over and draw through 2 loops on hook (forming the single crochet)
Next fsc: Insert hook into base of previous stitch (in the “chain” space), yarn over and pull up a loop, yarn over and draw through 1 loop on hook (forming a chain), yarn over and draw through 2 loops on hook (forming the next single crochet). Repeat directions for desired amount of sts.
⭐️ Spike Single Crochet (spike sc):
Insert hook in previous st 1 row below, yarn over and pull up long loop, insert hook in st indicated 2 rows below, yarn over and pull up long loop, insert hook in next st 1 row below, yarn over and pull up long loop, yarn over and draw through all loops.
⭐️ Reverse Single Crochet (reverse sc):
Working from Left to Right (opposite the way you usually work) Insert hook from front to back in next st to the right, yarn over and pull up a loop, yarn over and draw through 2 loops on hook. Stitch looks twisted when complete.
STITCH DIAGRAM
*only available in the ad-free pdf
Relax & Knit
Upgrade to the Printable PDF
Beautifully formatted to print and relax while knitting. The paid pattern includes:
NOTES
- For Merry & Bright Pillow, use color A for the MC and color B for the CC on the front panel, then use color B for the MC and color A for the CC on the back panel. Use color C for the embroidery of the words.
- For Love & Lights Pillow, use color A for the MC and color C for the CC on the front panel, then color B for the MC and color C for the CC on the back panel. Use color B for the embroidery of the words on the front panel and use A for the embroidery of the words on the back panel.
- When working Row 7 and 13, make sure to work the dc behind the ch-sp of the previous row, as you would for mosaic, Do not work over the ch-sp, do not encase the ch-sp.

MERRY LIGHTS CROCHET PILLOW PATTERN INSTRUCTIONS
Merry Lights Crochet Pillow Pattern – BOTTOM PANEL
Make 2 (1 for front panel and 1 for back panel), see notes for color directions.
Row 1 (WS): With MC, fsc 55, turn.
Rows 2-5: Ch 1, sc in each st across, turn. At end of Row 5, change color to CC- 55 sc.
Row 6: Ch 1, sc in first sc, *sc in next sc, sc spike over next sc, sc in next sc, ch 8, skip 7 sc; repeat from * across to last 4 sc, sc in next sc, sc spike over next sc, sc in last 2 sc, change color to CC, turn.
Row 7: Ch 1, sc in first sc, *sc in next 3 sc, dc in next 7 sc 1 row below (work behind ch-sp); repeat from * across to last 4 sts, sc in last 4 sts, turn.
Rows 8-11: Ch 1, sc in each st across, turn. At end of Row 11, change color to CC.
Row 12: Ch 1, sc in first sc, ch 6, skip 5 sc, *sc in next sc, sc spike over next sc, sc in next sc, ch 8, skip 7 sc; repeat from * across to last 9 sc, sc in next sc, sc spike over next sc, sc in next sc, ch 6, skip 5 sc, sc in last sc, change color to CC, turn.
Row 13: Ch 1, sc in first sc, dc in next 5 sc 1 row below (work behind ch-sp), *sc in next 3 sc, dc in next 7 sc 1 row below (work behind ch-sp); repeat from * across to last 9 sts, sc in next 3 sts, dc in next 5 sc 1 row below (work behind ch-sp), sc in last sc, turn.
Rows 14-25: Repeat Rows 2-13
Rows 26-31: Repeat Rows 2-7
Rows 32-41: Ch 1, sc in each st across, turn.
Fasten off.
GROW
To Unlock Exclusive Subscriber Content click the Box below and join for free by simply adding your email and creating a password! If you are having troubles, clear your cache or reset your password or login to the Grow Publisher Portal.
>> Learn More About Grow Here <<
I’m thrilled to share this amazing pattern with you, many patterns on my blog are absolutely free! I kindly request that you don’t copy and paste or distribute this pattern. Prefer an ad-free experience? Buy a digital PDF pattern for a small fee from one of my online stores for a seamless crafting journey.
I appreciate your support and readership. You are the reason I can keep doing what I love and sharing it with others. So, thank you from the bottom of my yarn-loving heart! Disclosure: This post contains affiliate links, meaning I get a commission if you decide to make a purchase through my links at no cost to you.
Merry Lights Crochet Pillow Pattern – TOP PANEL
Make 2 (1 for front panel and 1 for back panel), see notes for color directions.
Row 1 (WS): With MC, fsc 55, turn.
Rows 2-5: Ch 1, sc in each st across, turn. At end of Row 5, change color to CC- 55 sc.
Row 6: Ch 1, sc in first sc, *sc in next sc, sc spike over next sc, sc in next sc, ch 8, skip 7 sc; repeat from * across to last 4 sc, sc in next sc, sc spike over next sc, sc in last 2 sc, change color to CC, turn.
Row 7: Ch 1, sc in first sc, *sc in next 3 sc, dc in next 7 sc 1 row below (work behind ch-sp); repeat from * across to last 4 sts, sc in last 4 sts, turn.
Rows 8-11: Ch 1, sc in each st across, turn. At end of Row 11, change color to CC.
Row 12: Ch 1, sc in first sc, ch 6, skip 5 sc, *sc in next sc, sc spike over next sc, sc in next sc, ch 8, skip 7 sc; repeat from * across to last 9 sc, sc in next sc, sc spike over next sc, sc in next sc, ch 6, skip 5 sc, sc in last sc, change color to CC, turn.
Row 13: Ch 1, sc in first sc, dc in next 5 sc 1 row below (work behind ch-sp), *sc in next 3 sc, dc in next 7 sc 1 row below (work behind ch-sp); repeat from * across to last 9 sts, sc in next 3 sts, dc in next 5 sc 1 row below (work behind ch-sp), sc in last sc, turn.
Rows 14-25: Repeat Rows 2-13
Rows 26-30: Repeat Rows 2-6
Joining Row
Option 1: Row 31 (joining row): Ch 1, remove hook from free loop, insert hook into first st on WS of last row of bottom panel, replace free loop and pull through stitch, sc in first sc of top panel, *[remove hook from free loop, insert hook into next st on bottom panel, replace free loop and pull through st, sc in next sc] 3 times, [remove hook from free loop, insert hook into next st on bottom panel, replace free loop and pull through st, dc in next sc 1 row below (work behind ch-sp)] 7 times; repeat from * across to last 4 sts, [remove hook from free loop, insert hook into next st on bottom panel, replace free loop and pull through st, sc in next sc] 4 times, fasten off.
Option 2: Row 31: Ch 1, sc in first sc, *sc in next 3 sc, dc in next 7 sc 1 row below (work behind ch-sp); repeat from * across to last 4 sts, sc in last 4 sts, fasten off. Holding RS together of Bottom and Top Panels. With tapestry needle, whipstitch panels together.
Merry Lights Crochet Pillow Pattern – FINISHING
Pin panels to finished measurements, holding steam iron an 1” [2.5 cm] above the fabric, steam to block.
Surface Slip Stitching
See video tutorial for assistance. Print out words you want to embroider below (or any that you wish). Trace words onto trace paper (or tissue paper or parchment paper). Pin paper to center of panel. With pin or pencil, poke holes in trace paper along the line of the letters spacing them about ¼” [6 mm]. Use any color yarn you wish to embroider with (Merry & Bright used color C, Love & Lights used colors A and B). Make slip knot and hold yarn on WS of panel. Insert hook through punched hole from RS to WS of panel, place slip knot on hook, pull though. Insert hook into next punched hole, yarn over from WS, and pull up a loop and through loop on hook. Repeat along lines of letters, fastening off when coming to a natural break in the letter. Weave in all ends when finished.
Seaming
Holding WS together, join color B to first st of the foundation (work though both panels at once throughout) with sc, sc up row ends evenly, 2 sc in first st of last row, turn to work on last row, sc in each sc across to last, 2 sc in last st, turn to work on row ends, sc evenly down row ends, 2 sc in last st of foundation row, turn to work on foundation row. Insert pillow form. Sc in each st across, sc in first st again. Sl st to first sc of seaming. Reverse sc in each sc of seaming round, sl st to first st, fasten off, weave in ends.


Final Thoughts: A Handmade Holiday That’s Truly Yours
Whether you’re decking the halls in full sparkle mode or just want a pop of handmade warmth, the Merry and Bright Crochet Pillow Pattern is a joyful project that works for all kinds of holiday makers. It’s cozy, customizable, and beginner-friendly—with just enough flair to make it fun.
Looking for more Holiday Decor? Check out this collection of patterns!
Grab your yarn, your hook, and a little festive spirit—let’s make something merry together! 🎁💫
❤️ Your BiCrafty Bestie,
Marly Bird

Categories: Crochet, Free Patterns, Marly Bird Premium Patterns, Our Free Patterns, Pattern