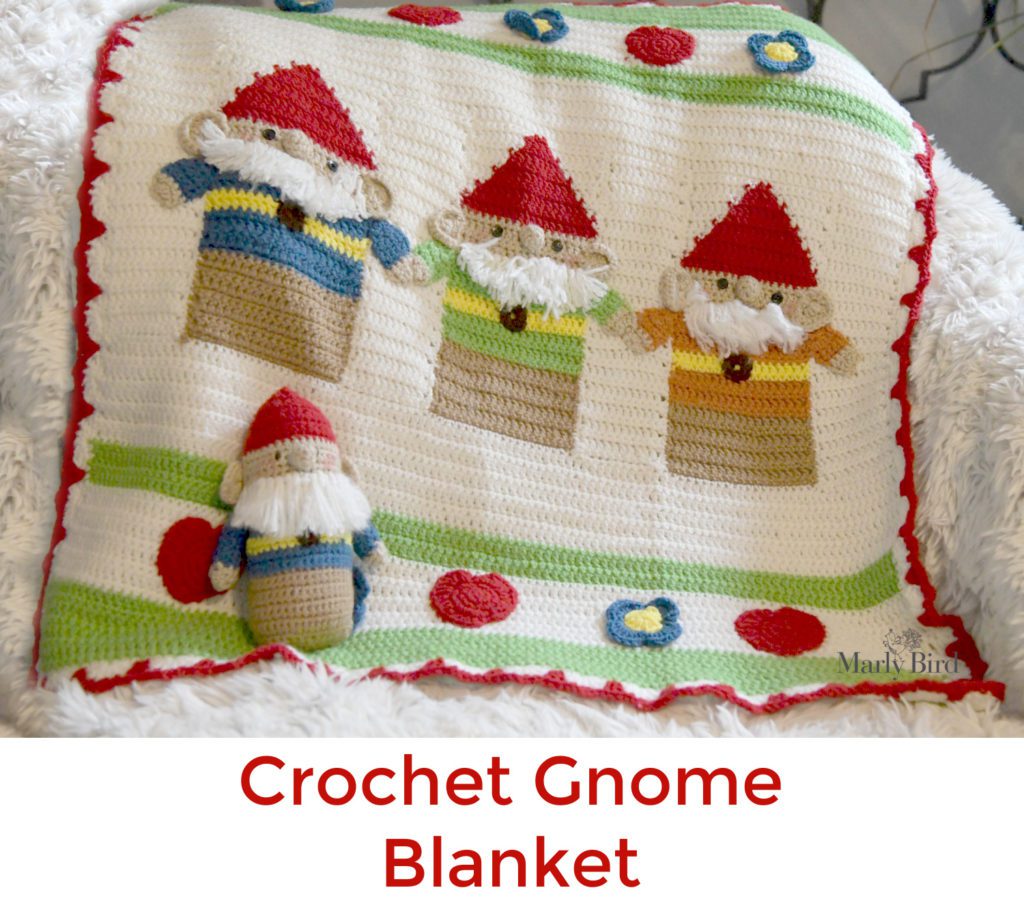
Gnome Crochet Blanket
A gnome crochet blanket is a great project for experienced crocheters and those just learning the craft. Not only are they adorable and useful, but they also provide a satisfying sense of accomplishment once completed. Plus, as a crochet baby blanket, it makes for a thoughtful and heartfelt gift for a new parent or for a baby shower.
Make it a fun set with the cute crochet gnome doll to match!

Why a Gnome Crochet Blanket?
Crochet gnomes, also known as ‘tomtar’ or ‘nisse’ in Scandinavian countries, have recently experienced a surge in popularity. These cute and charming creatures, with their distinctive pointy hats and long beards, have become popular for crocheters looking to create something unique and adorable.
But why are crochet gnomes suddenly so popular? One reason could be the increasing trend of hygge, the Danish concept of coziness and comfort. With their cozy and homely appearance, crochet gnomes fit perfectly into this trend. They are often used as decorations for the home, bringing a touch of warmth and cheer to any space.
Another reason for the popularity of crochet gnomes could be their versatility. They can be made in many sizes and styles, making them suitable for various projects. Crochet gnomes can be used as ornaments, advent calendars, gifts, or toys for children. They can also be customized with different colors and patterns, allowing crocheters to put their own spin on the classic design.
Are Crochet Gnomes Easy To Make?
Crochet gnomes are also relatively easy to make, making them accessible to crocheters of all skill levels. With just a few basic crochet stitches and yarn, anyone can create their unique gnome. Countless patterns are available online, ranging from beginner-friendly to more advanced designs. This means that anyone can join in on the fun of creating their own gnomes.
Here are a few I found on Etsy that are AMAZING!
- Nordic Gnomes with peek-a-boo eyes
- BEE-autiful Gnome pattern that is sweet as honey
- Mini Gnome Ornaments – Variety Pack
- Viking Gnome Pattern – OMG, SO CUTE!
- Hot Chocolate Gnome Pattern
Overall, the popularity of crochet gnomes can be attributed to their cute and charming appearance, versatility, and accessibility. Whether you’re an experienced crocheter or a beginner crocheter looking to try something new, crochet gnomes are a fun and rewarding project that is sure to bring a smile to your face.
Friendly Gnome Crochet Blanket
Michele Wilcox sent me a picture of this crochet baby blanket as she worked on it and asked if my audience would be interested in this whimsical pattern. Knowing how much all of you love crochet gnomes, I immediately told her YES!
She then let me know there was a crochet gnome doll to match (and we all know how much I love to have things that match or coordinate), so I purchased that too!
Now you can make this fun and festive gnome crochet baby blanket. Get the free crochet pattern below and follow along!

Friendly Gnome Crochet Blanket
Designed by Michele Wilcox for MarlyBird.com
SKILL LEVEL
Intermediate
MEASUREMENTS
Finished Measurements
Throw is 34” [85.5 cm] wide by 38” [96.5 cm] long.
Gauge
14 dc by 12 rows = 4” [10 cm] x 4 ½”[11.5 cm]; use any size hook to obtain the gauge.
MATERIALS
Yarn
Red Heart Super Saver (100% acrylic, 364 yds / 333 m, 7 oz/ 198 g, CYCA# 4 worsted)
Color A: #0316 Soft White, 2 skeins
Color B: #0236 Warm Brown, 1.5 oz
Color C: #0672 Spring Green, 2.5 oz
Color D: #0324 Bright Yellow, 1 oz
Color E: #0254 Pumpkin, 1 oz
Color F: #0886 Blue, 1 oz
Color G: #0319 Cherry Red, 1.5 oz
Color H: #0334 Buff, 1.5 oz
Color I: #0365 Coffee, small amount
Hook
Size H/8 (5.0 mm)
Notions
Tapestry needle, Black Yarn for embroidery, Red crayon for cheeks
ABBREVIATIONS
Ch – Chain(s)
Dc – Double Crochet
Hdc – Half Double Crochet
RS – Right Side
Sc – Single Crochet
Sc2tog – Single Crochet Two Together
Sl st – Slip Stitch
Sp(s) – Space(s)
St(s) – Stitch(es)
Stacked Dc – Stacked Double Crochet
Tch – Turning Chain
WS – Wrong Side
Yo – yarn over
SPECIAL STITCHES
⭐️ Stacked Double Crochet (stacked dc): (Do not ch 1 prior to making the first sc) Sc in first stitch, insert hook between two legs of the base, yarn over and pull up a loop, yarn over and draw through 2 loops on hook.
⭐️ Single Crochet 3 Together (sc3tog): *Insert hook into indicated stitch, yarn over and pull up a loop; repeat from * in next 2 stitches indicated, yarn over and draw through all 4 loops on hook. (1 decrease)
⭐️ Double Crochet Spike (dc spike): Yarn over hook, insert hook into stitch indicated 1 row below, yarn over and pull up a long loop, [yarn over and draw through 2 loops on hook] twice
GNOME CROCHET BLANKET SCHEMATIC
NOTES
- The throw is made in sections and seamed together. Work the Gnome Panels first, then the filler panels, and seam them together. Next, work on the decorations to fill out the features. Then crochet the bottom and top panels. Lastly, add the hearts, flowers, and border.

FRIENDLY GNOME CROCHET BLANKET PATTERN
GNOME PANELS
Make 3 total, 1 with F for the shirt, 1 with C for the shirt, and 1 with E for the shirt
With B, ch 21.
Row 1: (WS) Sc in 2nd ch from hook and in each ch across, turn –20sc.
Row 2: Stacked dc (see special stitches) in first sc, dc in each sc across, turn.
Row 3: Ch 1, sc in each dc across, turn.
Rows 4–7: Repeat Rows 2 and 3
Row 8: Repeat Row 2, change to color F, fasten off B.
Row 9: Repeat Row 3
Row 10-11: Repeat Rows 2-3,
Row 12: Repeat Row 2, change to color D, fasten off F.
Row 13: Repeat Row 3
Row 14: Repeat Row 2, change to color F, fasten off D.
Row 15: Repeat Row 3
Row 16-17: Repeat Rows 2-3.
Row 18: Repeat Row 2, change to color H, fasten off F.
Row 19: Repeat Row 3
Row 20-23: Repeat Rows 2-3, change to G, fasten off H.
Row 24: Repeat Row 2, change to A, do not fasten off G.
Row 25: Ch 1, sc in first dc, change to G, sc in each dc across to last dc, change to A with new ball (so you have one ball of white on each side of the hat), sc in last dc, turn.
Row 26: Stacked dc in first sc, dc in next sc, change to G, dc in each sc across to last 2 sc, change to A, sc in last 2 dc, turn.
Row 27: Ch 1, sc next 3 dc, change to G, sc in each dc across to last 3 dc, change to A, sc in last 3 dc, turn.
Row 28: Stacked dc in first sc, dc in next 3 sc, change to G, dc in each sc across to last 4 sc, change to A, sc in last 4 dc, turn.
Row 29: Ch 1, sc next 5 dc, change to G, sc in each dc across to last 5 dc, change to A, sc in last 5 dc, turn.
Row 30: Stacked dc in first sc, dc in next 5 sc, change to G, dc in each sc across to last 6 sc, change to A, sc in last 6 dc, turn.
Row 31: Ch 1, sc next 7 dc, change to G, sc in each dc across to last 7 dc, change to A, sc in last 7 dc, turn.
Row 32: Stacked dc in first sc, dc in next 7 sc, change to G, dc in each sc across to last 8 sc, change to A, sc in last 8 dc, turn.
Row 33: Ch 1, sc next 9 dc, change to G, sc in each dc across to last 9 dc, change to A, sc in last 9 dc, fasten off G, turn.
Row 34: Ch 1, sc in each sc across, fasten off, weave in all ends.
Repeat directions for gnome-panel once with C instead of F and once more with E instead of F.
GNOME CROCHET BLANKET FILLER PANELS
Make 4
With A, ch 13.
Row 1: (WS) Sc in 2nd ch from hook and in each ch across, turn– 12sc.
Row 2: Stacked dc in first sc, dc in each sc across, turn.
Row 3: Ch 1, sc in each dc across, turn.
Rows 4-33: Repeat Rows 2-3.
Row 34: Ch 1, sc in each sc across, fasten off, weave in ends.
Whipstitch 1 Gnome Panel between 2 Filler Panels. Repeat for all Gnome Panels.
GNOME DETAILS
Nose
Make 3
With H, ch 2.
Round 1: 6 sc in 2nd ch from hook, do not turn–6sc.
Round 2: 2 sc in each sc around, do not turn– 12 sc.
Rounds 3-4: Sc in each sc around, fasten off with long tail.
Stuff nose lightly. Gather stitches of Rnd 4. Sew in place on each gnome.
Ear
Make 6
With H, ch 2.
Row 1: 6 sc in 2nd ch from hook, turn–6sc.
Row 2: Ch 1, 2 sc first sc, sc in next 4 sc, 2 sc in last sc, turn– 8 sc.
Row 3: Ch 1, sc in first sc, 2 sc in next sc, sc in next 4 sc, 2 sc in next sc, sc in last sc, turn–10 sc.
Row 4: Ch 1, sc in next 4 sc, 2 sc in next 2 sc, sc in last 4 sc, turn 90 degrees, 5 sc across edge (working in row ends), sl st to first sc, fasten off leaving long tail.
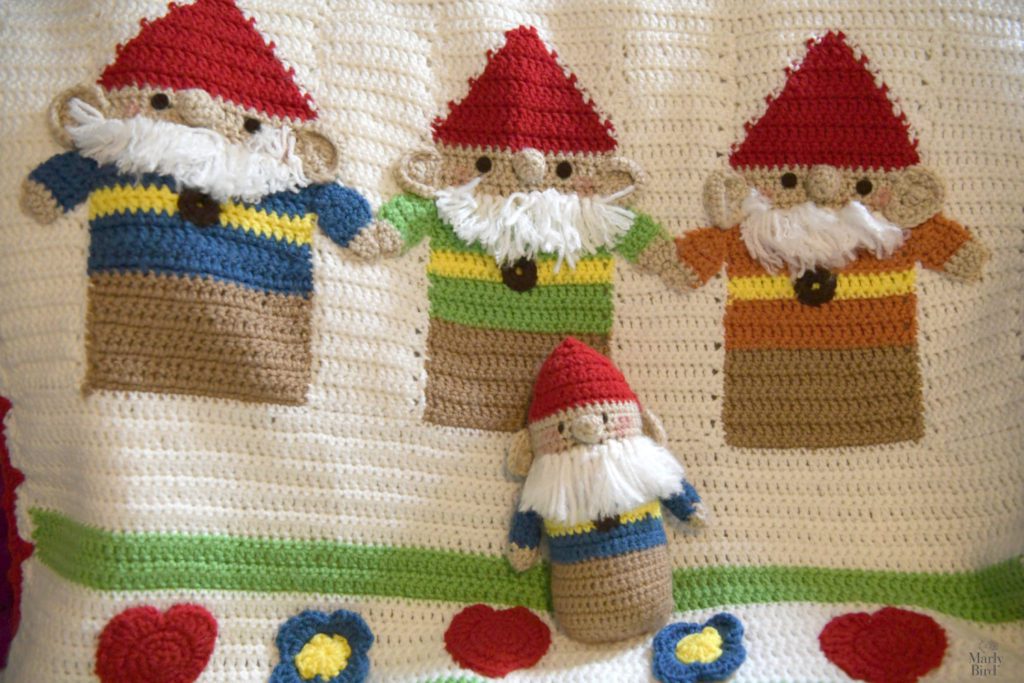
Sew ears to Gnome Panels; see photo for location.
Color cheeks with red crayon. Sew button eyes in place or embroider satin stitch eyes with color I.
Buckle
Make 3
With I, ch 6, sl st to first ch to form ring.
Round 1: Ch 1, 10 sc in ring, sl st to first sc, fasten off, leave long tail.
Sew buckle in place.
Arm
Make 2 in Color F, Make 2 in Color C, Make 2 in Color E
With H, ch 2
Row 1: 5 sc in 2nd ch from hook, turn.
Row 2: Ch 1, sc in each sc across, turn.
Row 3: Ch 1, sc in each sc across, change to F, fasten off H, turn.
Rows 4-7: Ch 1, sc in each sc across, turn.
Row 8: Ch 1, sc in first sc, sc3tog over next 3 sc, sc in last sc, turn.
Row 9: Ch 1, sc3tog over next 3 sc, fasten off, leave long tail.
Sew arm in place.
Repeat for all Gnomes.
Beard
Wrap color A around a 4” wide cardboard 40 times. Cut to have (40) 8” pieces. Fold 2 strands in half, thread loop end through any stitch on Row 19 of Gnome. Tuck ends through loop and pull tight. Repeat for each stitch on Row 19. Trim to desired length. Brush to fluff beard.
TOP AND BOTTOM SECTION
With WS facing join color A to first sc of Filler Panel with sc.
Row 1: (WS) Sc in st across Filler and Gnome Panels, turn –108sc.
Row 2: Stacked dc in first sc, dc in each sc across, turn.
Row 3: Ch 1, sc in each dc across, turn.
Rows 4–9: Repeat Rows 2 and 3
Row 10: Repeat Row 2, change to color C, fasten off A.
Row 11: Repeat Row 3
Row 12-13: Repeat Rows 2-3
Row 14: Repeat Row 2, change to color A, fasten off C.
Row 15: Repeat Row 3
Row 16-23: Repeat Rows 2-3, change to color C, fasten off A.
Row 24-31: Repeat Rows 2-3, fasten off, weave in all ends.
Repeat on opposite side of throw.
FINISHING
Border
With RS facing, join color A to any corner with sl st.
Round 1: (RS) Ch 1, 2 sc in corner, *sc evenly across side of throw in a multiple of 6 + 3**, 3 sc in corner, turn 90 degrees; repeat from * around ending at **, sc in first corner, sl st to first sc, do not turn.
Round 2: (Stacked dc, 3 dc) in first sc, *[skip 2 sc, sc in next sc, skip 2 sc, 5 dc in next] repeat from * across edge to last 6 sc before corner, skip 2 sc, sc in next sc, skip 2 sc**, 7 sc in center sc of corner; repeat from * around ending at **, 3 dc in first sc, sl st to top of stacked dc, change to G, fasten off A, do not turn.
Round 3: Ch 1, (sc, ch 1, sc) in first dc, sc in next 2 dc, *[skip next dc, 3 dc spike over next sc in st 1 row below, skip next dc, sc in next dc, (sc, ch 1, sc) in next dc, sc in next dc] repeat across to last sc before corner, 3 dc spike over next sc in st 1 row below, skip next dc, sc in next 2 dc**, (sc, ch 1, sc) in next dc, sc in next 2 dc; repeat from * around ending at **, sl st to first sc, fasten off, weave in ends.
Flower
Make 5
With color D, ch 4.
Round 1: (RS) 11 dc in 4th ch from hook (skipped ch count as dc), sl st to top of beginning ch, change to F, do not turn– 12dc.
Round 2: *Ch 4, skip 2 dc, sl st to next dc; repeat from * around, sl st to same sl st as join, do not turn–4 ch-4 sps.
Round 3: (Sc, hdc, 4 dc, hdc, sc) in each ch-4 sp around, sl st to first sc, fasten off leaving long tail for seaming.
Using photo, sew flower in place.
Heart
Make 5
With color G, ch 2.
Round 1: (RS) 6sc in 2nd ch from hook, do not turn.
Round 2: 2 sc in each sc around, do not turn– 12 sc.
Round 3: *Sc in next sc, 2 sc in next sc; repeat from * around, do not turn– 18 sc.
Round 4: 3 sc in first sc, sc in next 2 sc, hdc in next 2 sc, 2 hdc in next sc, 2 dc in next sc, 3 dc in next sc, (dc, hdc, ch 1) in next sc, sl st in next sc, (ch 1, hdc, dc) in next sc, 3 dc in next sc, 2 dc in next sc, 2 hdc in next sc, hdc in each of next 2 sc, sc in last 2 sc, sl st to first sc, fasten off leave long tail for seaming.
Using photo, sew heart in place.
And that’s it! With a little bit of patience and practice, you will have a beautiful crochet baby blanket that is sure to be treasured by the lucky recipient.
Categories: Crochet, Free Patterns, Marly Bird Premium Patterns, Our Free Patterns, Pattern


