
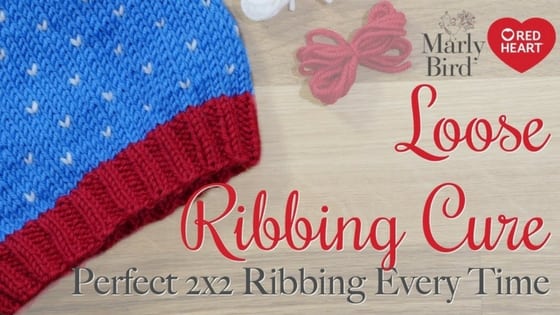
Avoid a Loose Ribbing in your Knit Hat
When knitting a hat with a knit 2, purl 2 ribbing I see many beginnings struggle to get their tension just right. In this video I will show you a little trick to get perfectly even ribbing for your next hat project.
*This post contains affiliate links. By clicking one of these link and making a purchase a portion will go to support the blog. The price that you pay will not change. Thank you for your support of the blog to keep brining you this free content.*

If you made the Snow Speckled Hat, or watched my video tutorial, you will have seen a great example of a knit 2 purl 2 ribbing for the start of hat. This ribbing pattern is very common in knitted hats but some people struggle with keeping their tension even. In the video tutorial today I share with you my tip to keep the stitches even.
It is very common in this type of ribbing to see a loose stitch when you change from the knit to purl stitches. To combat this I give an extra tug on the working yarn after completing the stitch. After making my first purl stitch I transfer the yarn to the back of the work, as if I were going to knit, and give a slight tug. You will see this tighten up any loose ribbing stitches. Make sure that you bring the working yarn back to the front before continuing your ribbing pattern to keep in pattern.
Watch the short video to see this tip in action so you can fully understand what I am doing.
Get started on your next knit hat today. Try out the Snow Speckled hat where you can work through the project with me in my video tutorial.
Loosing Ribbing Cure Video:
Also on the Blog
- 10 Things to Do with Bulky Yarn
- 12 Free Crochet Christmas Tree Skirt Patterns
- The Granny Lace Crochet Cardigan
“`html
Frequently Asked Questions
How do I avoid that pesky loose stitch in my hat ribbing?
So here's the thing… when you're knitting that knit 2, purl 2 ribbing for a hat, it's super common to get a loose stitch right where you switch from knitting to purling. It drives me nuts sometimes too!
What's your secret trick for even ribbing?
Honestly… it's all about a little extra tug! After you make your purl stitch, give your working yarn a gentle pull before you move it to the back to knit again. Just be sure to bring it back to the front for your next stitch!
Why does that loose stitch happen in the first place?
It usually happens right at that transition point… you know, when you're switching from your knit stitches to your purl stitches. The yarn just sometimes gets a little slack there if you're not careful.
Can I see this tip in action?
Yes! The best way to really get it is to watch the video tutorial that goes along with this post. Seeing it done makes all the difference, trust me!
Will this tip help with other ribbing patterns?
This trick is specifically for the knit 2, purl 2 ribbing, which is super popular for hat brims… but the idea of managing your tension on those transitions is key for any ribbing, really!
“`


Great tip! Love your videos and everything you do