Marly Bird Turkey Trot 2023 Day 6 Knitting

MEASUREMENTS
To Fit Sizes
XS (S, M, L, XL, 2XL, 3XL, 4XL, 5XL)
Finished Measurements
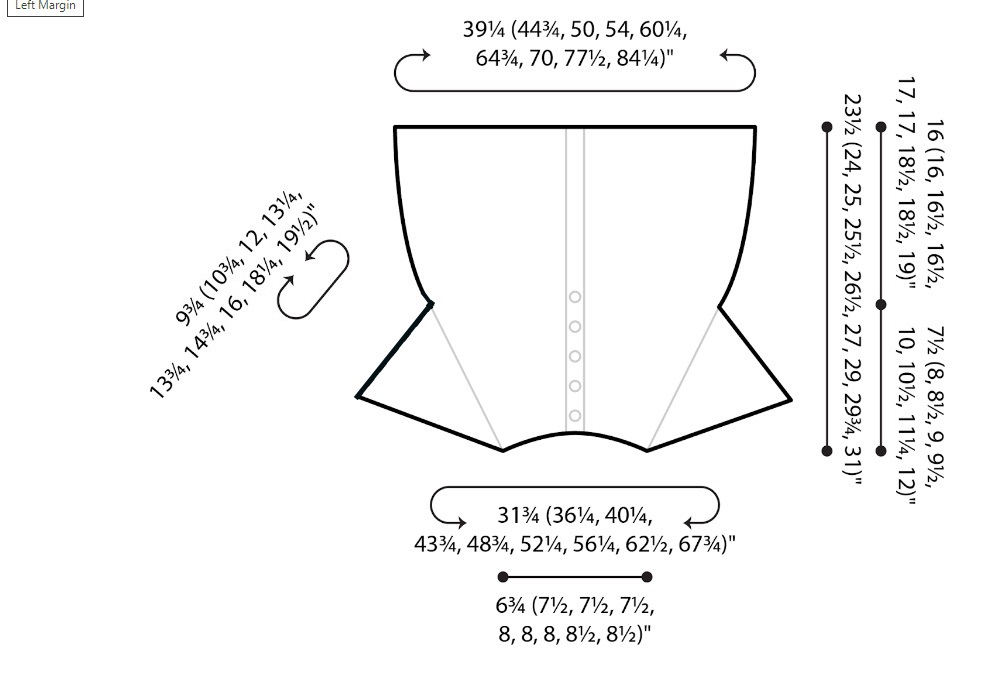
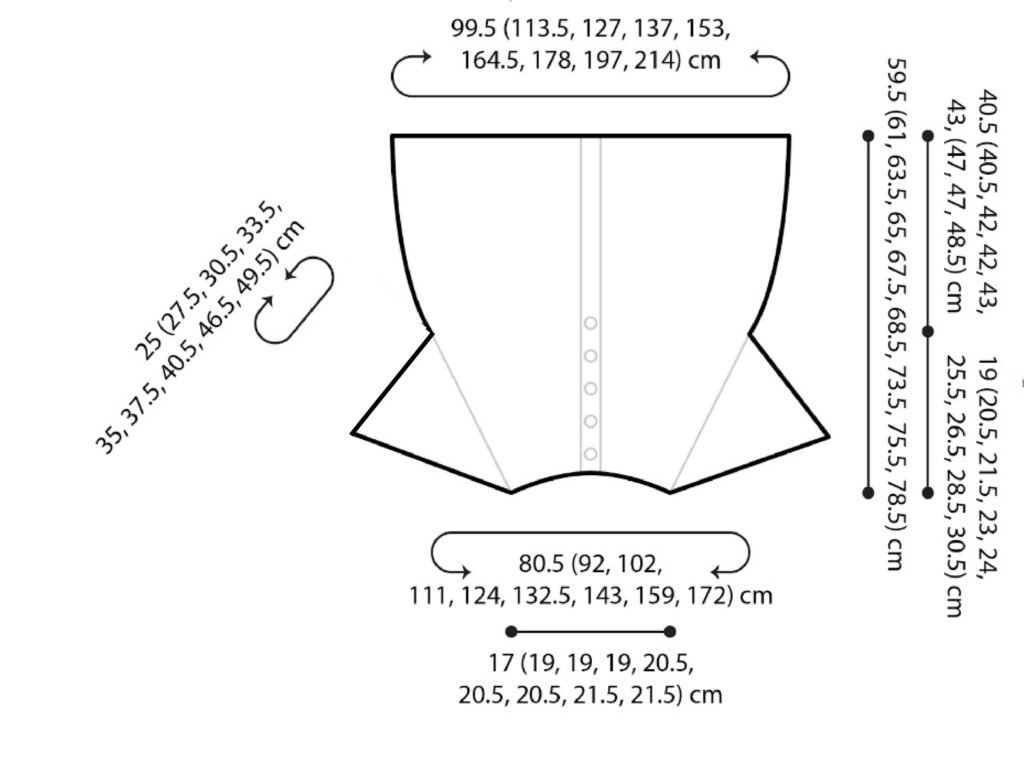
Bust (buttoned) 31¾ (36¼, 40¼, 43¾, 48¾, 52¼, 56¼, 62½, 67¾)” [80.5 (92, 102, 111, 124, 132.5, 143, 159, 172) cm]
Intended to be worn with 0-2” [2.5-5 cm] ease.
Hem 39½, (45¼, 50¼, 54 ¼, 60½, 65¼, 70¼, 77¾, 84½)” [100.5 (115, 127.5, 138, 153.5, 165.5, 178.5, 197.5, 214.5) cm]
Length 23½ (24, 25, 25½, 26½, 27, 29, 29¾, 31)” [59.5 (61, 63.5, 65, 67.5, 68.5, 73.5, 75.5, 78.5) cm]
Gauge
14 sts and 26 rows = 4” in Garter st (knit every row)
14 sts and 22 rows = 4” in Lace Bands pattern
MATERIALS
Yarn
Caron, Macchiato Cakes (80% acrylic, 20% wool, 481 yds / 440 m, 8 oz / 227 g CYCA #5 bulky)
2 (2, 2, 2, 2, 3, 3, 3, 4) cakes for cap-sleeve version or 2 (2, 2, 3, 3, 3, 4, 4, 4) cakes for long-sleeve version ; color Bewitch
Needle
U.S. 10 [6 mm] circular needle long enough to fit around your selected bust size, set of double-pointed needles in same size, or size required for gauge
Note: Body of cardigan is worked back and forth in rows; a long circular needle is used in order to hold the full length of the sts. Double-pointed needles are used for the sleeve edgings.
Notions
Removable stitch markers, tapestry needle, 5 (5, 6, 6, 6, 7, 7, 8, 8) buttons approx 1” [2.5 cm] in diameter, basic blocking supplies
ABBREVIATIONS
Inc – Increase(ing)
K – Knit
K2tog – Knit Two Stitches Together
P – Purl
Pm – Place Marker
RS – Right Side
Sl – Slip
Slm – Slip Marker
St(s) – Stitches
WS – Wrong Side
Yo – Yarn Over
SPECIAL STITCHES
M1 (Make 1 Increase): With tip of left-hand needle, pick up the horizontal strand between stitches from front to back. Knit this strand through the back leg, twisting it into a loop in the process – 1 st increased.
Ssk (Slip, Slip, Knit): Slip 2 stitches, one at a time, as if to knit. Insert left hand needle into the front of these two stitches and knit them together from this position (1 stitch decreased)
SCHEMATIC


NOTES
- Directions are for the smallest size; changes for all other sizes are in parentheses. When only one number is given then that number applies to all sizes.
- The sweater is worked in one piece from the top down. The button bands are worked at the same time as the main body.
- Sleeve and Body increases will occur at different rates. There will always be a yarn over on either side of the marked raglan sts; an increase will only result when there is no corresponding decrease (k2tog or ssk) to go with the yarn over.
VIDEO TUTORIALS
- Long-Tail Cast-On >> Click Here for Video Help <<
- Knit Stitch (continental style) >> Click Here for Video Help <<
- Purl Stitch (continental style) >> Click Here for Video Help <<
- How to Add Lifeline >> Click Here for Video Help <<
- How to Knit Lace >> Click Here for Video Help <<
- How to Tink >> Click Here for Video Help <<
- How to Bury Ends >> Click Here for Video Help <<
SHOOP, SHOOP, SHOOP KNIT CARDIGAN DAY 6
HEM
The next few rows will create the same stockinette curled edge that we used at the neckline.
Row 1 (RS): Knit.
Row 2: Purl.
Row 3: Knit.
Bind of all sts purlwise.
SLEEVES
Place held 28 (30, 32, 36, 36, 38, 40, 46, 50) Left Sleeve sts onto double-pointed needles.
Beginning at center of underarm, join new yarn and pick up and knit 3 (4, 5, 5, 6, 7, 8, 9, 9) sts along first half of cast-on edge, k28 (30, 32, 36, 36, 38, 40, 46, 50) Sleeve sts, pick up and knit 3 (4, 5, 5, 6, 7, 8, 9, 9) sts along second half of cast-on edge – 34 (38, 42, 46, 48, 52, 56, 64, 68) sts.
Join to work in the round and mark the first st.
Round 1: Knit
Round 2: Purl
Round 3: Knit
Round 4: Purl
Round 5-7: Knit
Bind off all sts knitwise.
Work right Sleeve the same way.
1st FINISHING
Weave in all loose ends.
2nd Finishing
Wash then Block sweater to schematic size
Wet blocking is like sending your yarn on a spa retreat. It’s the process where your yarn unwinds, enjoys a soothing cleanse, and settles gracefully into its final form, allowing its true beauty to flourish.
Here’s how to pamper your knitted creation with a thorough wet block:
- Begin by submerging your piece in a basin or sink filled with water. This is a great moment to add a touch of gentle soap or specialized wool wash—enhanced with lanolin and fiber conditioners—to not only clean but also condition the yarn. (Just remember to rinse well, especially if you aren’t using a no-rinse wash.)
Remove as much water as you can without stretching or distorting the fibers.
- Some helpful techniques include:
- Pressing the piece against the sink to shed excess water.
- Gently squeezing between your hands—just avoid any twisting or wringing.
- 💡 Always support the entire garment when lifting to prevent any part from stretching out of shape.
- Carefully lay the piece on a large towel without stretching it. Fold the towels ends over your knitting and roll it up like a burrito to wick away more moisture. Aim for a balance—your piece should be damp, not sopping, and certainly not dry, to avoid any creases.
- Place your piece on the blocking board with care.
- Align with the grid if your board has one, centering your work for symmetry.
- Gently expand your piece to the desired measurements, using your pattern’s schematic and the grid for precision, especially from the bottom to the armhole and up to the shoulder. 🚨 USE EXTRA CARE TO AVOID OVERSTRETCHING! As the garment is damp, some yarns like to overstretch or grow and you must be vigilant to avoid this!
- Secure with pins, using them sparingly to keep the fabric flat. Smooth the piece with your hands to ensure an even spread.
- Now, shape it while it’s damp.
- Let the stockinette stitch at the neckline, hem and sleeves naturally roll towards the RS of the garment. If yours is not rolling well, gently give a nudge in that direction and let it dry.
- For this garment, do not open up lace too much or you will get a more ruffled look.
- Pin out any scalloped or pointed edges to define their shape.
- Leave your masterpiece to dry and take this chance to cast on a new project. Drying could take a full day, but if you’re pressed for time, setting up a fan can speed up the process significantly. DO NOT PLACE IN DIRECT SUNLIGHT as that may discolor the yarn!
Once the garment is dry, sew buttons opposite buttonholes.
Time to enjoy your new cardigan!


