This FREE pattern is a Corner to Corner Planned Pooling Blanket with a chevron pattern. If you have loved planned pooling crochet this is a great next step. This uses the corner to corner technique with a pooling yarn to get this great corner to corner planned pooling chevron crochet blanket.
This pattern is by Rockinlola for MarlyBird.com. The official name is Planned Pooling C2C Blanket.
*THIS POST CONTAINS AFFILIATE LINKS. BY CLICKING ONE OF THESE LINKS AND MAKING A PURCHASE A SMALL PORTION COMES BACK TO THE BLOG. THE PRICE YOU PAY WILL NOT CHANGE. THANK YOU FOR YOUR SUPPORT OF THE BLOG.*
Materials
Yarn
- Red Heart Super Saver in Black (1 skein) – [Color A]
- Red Heart Super Saver Stripes in Primary Stripe (10 skeins) – [Color B]
- Red Heart Super Saver in Saffron (1 skein) – [Color C]
Hook
- Susan Bates Silvalume Soft Ergonomic Crochet Hook, Size H/8, 5mm
Gauge
3.2 squares = 4″; in other words 6 squares across a panel = 4.8″. GAUGE IS VERY IMPORTANT. CHECK YOUR GAUGE. Use any size hook to obtain the gauge.
Notions
- Stitch Markers
- Yarn Needle to weave in ends
Finished Measurements
Finished Size: 48” x 58”
Size can be modified by adding or removing rows to the first Corner to Corner strip.
Special Stitches
This blanket is made in Corner to Corner (C2C) in double crochet (dc) and incorporates planned pooling.
Marly Bird’s video tutorial on C2C can be found here: https://www.youtube.com/watch?v=rAVwGIoOoXI&feature=youtu.be
Written pattern for C2C is below.
Abbreviations
- A and B = color A and color B
- ch= chain
- slst= slip stitch
- dc= double crochet
- sk= skip
- sp= space
- JAYGO= join-as-you-go
- st(s)=stitch(es)
- sc= single crochet
- * to * = work directions from * to * the number of times specified or to a specific stitch.

Pattern Notes
- Blanket is worked in a diagonal in corner to corner.
- Color A is used to make the first 5 rows of each panel corner before switching to Color B for the planned pooling stripes, ending on a colored row. Color A is then used for the remaining 5 rows of the panel corner.
- The panels are connected in Join-As-You-Go (JAYGO), however, if you prefer, you can make all of your panels and stitch them together at the end.
- Using an H 5mm hook, I was able to get 6 squares of color in one C2C row. Adjustments with tension will be necessary. You may need to pull out some of your work in order to force the yarn to start and end in the proper place. If you find that you need to adjust your hook size to maintain 6 squares per color, do what works for you. You may also find that you get different number of squares per color (ie. 7 squares instead of 6). Planned pooling takes some effort and lots of manipulation in order to get a clean end piece.
Super Saver Primary Stripes Notes
- This yarn has 10 colors in one sequence (red, black, orange, black, yellow, black, green, black, blue, black). Think of each color in the sequence as being the exact same length. There are many ways to pool this yarn which will give you a variety of outcomes. For the purpose of this tutorial we will be doing planned in stripes, each row of C2C being one color and the next row starting with the next color.
- If you pull from the middle of the skein, the color sequence usually comes out in the forward rainbow order listed above. At times, a skein may be wound in the opposite direction.
- When adding a new skein, start your next skein with the color that your previous skein left off with. If you have multiple skeins, check each skein to see which one is closest to the color that you need in order to minimize cutting. Save any of the pieces that you cut in case you need them to bridge between skeins.
- The Neon Stripes colorway can also be used in lieu of Primary Stripes since they are made exactly the same way.
FAVORITE the Planned Pooling C2C Pattern on Ravelry

Planned Pooling C2C Blanket Pattern
PANEL 1
With A, ch 6.
Row 1 (right side): Skip 3 ch, dc in 4th ch from hook and in each of 2 remaining ch, turn – 1 square made.
Row 2 (wrong side): Ch 6, skip 3 ch, dc in 4th ch from hook and in each of next 2 ch, *slst in ch-3 space of the previous row, ch 3, 3dc in the same ch-3 space below*, turn – 2 squares.
Row 3: Ch 6, skip 3 ch, dc in 4th ch from hook and in each of next 2 ch, repeat * to * 2 more times, turn – 3 squares.
Row 4: Ch 6, skip 3 ch, dc in 4th ch from hook and in each of next 2 ch, repeat * to * 3 more times, turn – 4 squares.
Row 5: Ch 6, skip 3 ch, dc in 4th ch from hook and in each of next 2 ch, repeat * to * 4 more times. Complete the last pull through of the last dc by attaching Color B on the beginning of the red section (or any colored section you prefer). Cut Color A and leave a few inches for weaving in ends. Turn – 5 squares.

Row 6: With B, ch 6. Skip 3 ch, dc in 4th ch from hook and in each of next 2 ch, repeat * to * 5 more times. You should now reach the end of your red. Make sure that you end your last dc by pulling up the beginning of the black section. Turn– 6 squares.
This is the width of each panel, approximately 4.5 inches wide. From this point forward, you will only be increasing on one side and decreasing on the other side to maintain 6 squares across.

Row 7: Ch 6 (this is the increase side). Skip 3 ch, dc in 4th ch from hook and in each of next 2 ch, repeat * to * 5 more times. When you are completed with your last black square, you should have approximately 4 inches of black yarn before your next color. You need this in order to work your decrease.

Decrease: Slst in the ch-3 space next to your hook. Turn. Slst through the next 3dc of the previous row, slst in the ch-3 space pulling up a loop in the next color. The color change here has to be exact in order to have clean and proper planned pooling. Begin your next row.

Row 8: Ch 3, 3dc in the same ch-3 space below, *slst in ch-3 space of the row below, ch 3, 3dc in the same ch-3 space below*. Repeat * to * until the end of the row, making sure to end your row as you did on row 6.
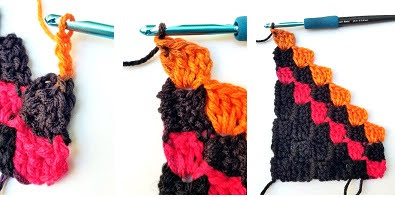
Rows 9-74: Repeat Rows 7 and 8.
To make this blanket, I went through 7 color sequence repeats- each color repeated seven times. 74 rows will be approximately 58” in length. You may choose to make your length longer or shorter depending on your preference. After you have made your last row of color (mine was blue), cut Color B, fasten off, and leave a few inches for weaving in ends. Turn.
Rows 75-79: Use color A and decrease rows on both sides. The last five rows will match your first five rows on the opposite corner of your strip.
Row 75: Attach A using a slst to the ch-3 of previous row. Ch 3, 3dc in the same ch-3 space below, *slst in ch-3 space of the row below, ch 3, 3dc in the same ch-3 space below*. Repeat * to * until the end of the row, making sure to decrease for the last square – 5 squares.
Row 76: – 4 squares.
Row 77: – 3 squares.
Row 78: – 2 squares.
Row 79: – 1 square.
Do not fasten off if you want to proceed with JAYGO. Simply slip stitch to the corner and start with JAYGO Panel 2 Row 1 instructions below.
If you choose to make multiple panels and stitch together (not using JAYGO), cut the yarn and begin at Row 1 for your next panel.
Join-As-You-Go (JAYGO)
In order for the colors to line up correctly, there is a specific way to start the second panel. There are two ways to connect your yarn, 1) on the beginning corner, or 2) on the ending corner. Since this blanket requires multiple panels, you will eventually be working from both directions.
NOTE ON ENDING CORNER: When working from corner 2 and are ready to connect your blue section, you will have to work from the opposite end of the skein that you previously were working on when you started the red in order for the color sequence to be in the reverse direction.
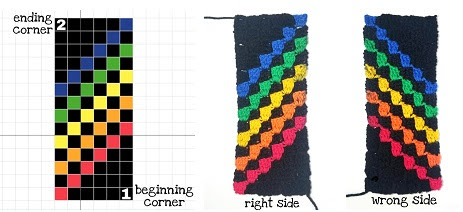
When beginning to connect panel 2 to panel 1, you must connect right side to right side. If you connect right side to wrong side, the pooling will not line up correctly. It is also important to connect a square in a vertical direction to a square in the horizontal direction to continue the same c2c pattern. Therefore, the 2 connecting squares from one panel to the other will be a right side vertical to a right side horizontal (shown in the below stitch images).
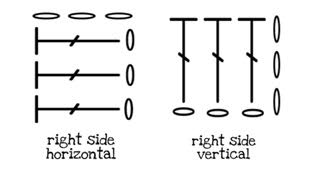
I will demonstrate how to JAYGO with two swatches 1) a bright colored swatch so that it is easier to see where the stitches go and 2) the original black and primary.
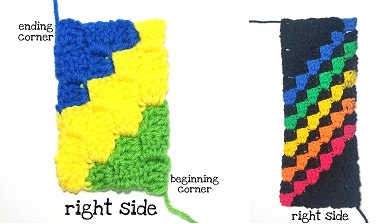
Panel 2 – Beginning Corner
With right side facing up with your first panel, join your new yarn in the beginning corner of panel 1 with a slst.

Row 1: Ch 6. Skip 3 ch, dc in 4th ch from hook and in each of 2 remaining ch. Slst in space between the first and second square on panel 1. Ch 3. Slst in space between the second and third square of panel 1. Ch 3 and turn.
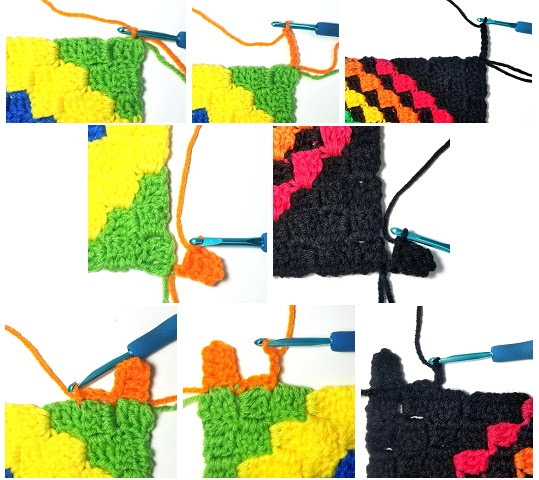
Row 2 (wrong side): 3dc in the same ch-3 space below. *Slst in ch-3 space of previous row, ch 3, 3dc in the same ch-3 space below*, turn – 2 squares.
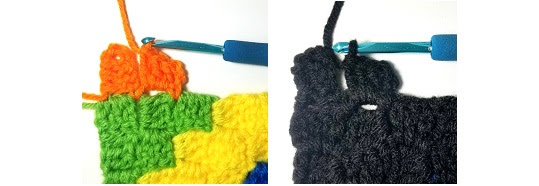
Row 3: Ch 6, skip 3 ch, dc in 4th ch from hook and in each of next 2 ch, repeat * to * 2 more times. Slst in space between the third and fourth square of panel 1. Ch 3. Slst in space between the fourth and fifth square of panel 1. Ch 3 and turn – 3 squares.
Row 4: Repeat Row 2, ending with 4 squares.
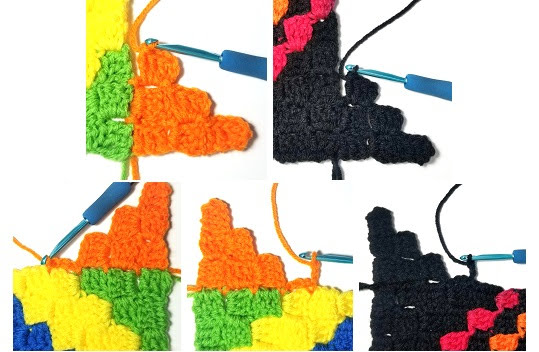
Row 5: Ch 6, skip 3 ch, dc in 4th ch from hook and in each of next 2 ch, repeat * to * 4 more times. Complete the last pull through of the last dc by attaching Color B on the beginning of the red section (or the same color that is next on your connecting panel). Slst in space between the fifth and sixth square of your previous panel. Cut Color A and leave a few inches for weaving in ends – 5 squares.

With B, Ch 3, slst in space between the next two squares of the previous panel. Ch 3 and turn.

Rows 6 – 74: Continue C2C and JAYGO, remembering to strategically start and end your rows with the appropriate color for proper planned pooling. Fasten off B.
Rows 75 – 79: With A, repeat rows 75-79 from panel 1, continuing JAYGO. Do not fasten off. Slst to the corner and continue onto your next panel.
Panel 2 – Ending Corner
NOTE: The difference with the ending corner is that you will be working your JAYGO along the ch edge. I have marked the ch-3 spaces so that they are easier to see.
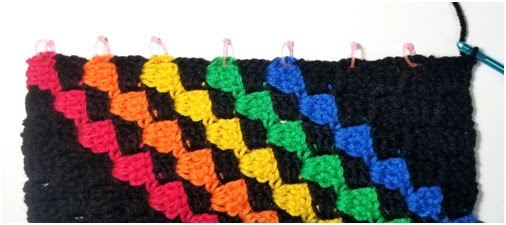
Row 1 (right side): With A, ch 6, skip 3 ch, dc in 4th ch from hook and in each of 2 remaining ch. Slst in space between the first and second square on panel 1. Ch 3. Slst in space between the second and third square of panel 1. Ch 3 and turn.
Row 2 (wrong side): 3dc around the ch-3 space below and around the ch-3 edge from panel 1 at the same time. [Do this now and throughout the rest of the pattern when working on an ending corner. It helps to sharpen the joining of colors when connecting panels]. *Slst in ch-3 space of previous row, ch 3, 3dc in the same ch-3 space below*, turn – 2 squares.

Rows 3 – 79: Repeat rows 3 – 79 from panel 1, making sure to 3dc over both sets of ch-3 spaces when joining panels.
Additional details of rows 6 for clarity: 3dc over both sets of ch-3 spaces.

Continue joining panels until you have reached your desired width. To continue with border in A, do not fasten off.
The blanket pictured in the beginning has 10 panels all together.
BORDER (block stitch):
Continue with A and slst to the corner.
Row 1 (right side): ch1, *sc in corner (mark with stitch marker), ch2, sc in space between squares all the way to the next corner *, repeat * to * until you reach the starting sc. Slst to join. Turn.
Row 2 (wrong side): ch3 (counts as a dc), 2dc in same sc below (mark the middle stitch with a stitch marker). 3dc in next ch-2 space all the way to the next corner sc. *3dc in next corner sc (mark the middle stitch with a stitch marker), 3dc in next ch-2 space all the way to the next corner sc*. Repeat * to * around. Slst last dc to the top of the beginning ch3. Fasten off A. Turn.
Row 3 (right side): With Color C, join a slip knot to the marked stitch in the corner. Ch1, *sc in marked corner stitch. Ch2, sc between each 3dc cluster all the way to the next marked corner*. Repeat * to * all the way around. Slst to beginning sc. Fasten off C. Turn.
Row 4 (wrong side): With A, join with slst to any corner sc. Repeat Row 2 without marking corners. Fasten off.
Finishing
Weave in all ends with a yarn needle.


