Blocking Made Easy with Tools
Blocking…like swatching it can be something that knitters and crocheters try to avoid. I can understand that it is something that is different but it doesn’t have to be scary or hard when you use the right tools. Blocking your knits just got easier by grabbing yourself some of these great blocking pins.
*THIS POST CONTAINS AFFILIATE LINKS. BY CLICKING ONE OF THESE LINKS AND MAKING A PURCHASE A SMALL PORTION COMES BACK TO THE BLOG. THE PRICE YOU PAY WILL NOT CHANGE. THANK YOU FOR YOUR SUPPORT OF THE BLOG.*
What is Blocking?
Just in case you haven’t heard of blocking yet it is the process of getting your fabric to relax into the place where it wants to be. Umm…what?
Think about it this way. If you knit or crochet a lace shawl you will find that when you are finished the stitches might be all crumpled up and not really look like anything. When you block the shawl you are letting the yarn relax and you will see that the stitches open up and reveal their beautiful pattern.
How to Block Your Knits
Blocking can be done in one of three ways. Wet blocking and steam blocking are the most common. Sometimes people will just throw their finished piece in the wash and then lay it flat to dry. This is okay when that is the way that you will launder the piece. It can be harder on your knitwear so I suggest one of the other two options if possible.
Wet blocking is the process of soaking your finished piece in a water bath, typically with a wool wash, for at least 20 min. You will want to leave your piece in the water long enough for it to soak up the water. Once it is saturated you will squeeze out the water, NEVER ring it, and then you will leave it flat to dry.
Steam blocking is the process of using steam to set or relax your stitches. I prefer to use a steamer but you can use your iron if very carful. NOTE: this can be dangerous when using acrylic yarn. It is possible to ‘kill’ your yarn by over steaming it! Keep that in mind.
Tools For Blocking
Really you don’t need a ton of new tools for blocking but there are a few that make the process easier. I have a blocking mat that I can change the size of, it is like a big puzzle, which allows me to pin my piece to and keep its shape while drying.
Along with my blocking mat I use knit blockers. These have been a game changer for me. Typically you would use stainless steel (something that won’t rust) T-pins to hold your piece in place if needed. Using T-pins requires a lot of pins and time. It can also put little peaks along your edge as it might stand up a little more where the pin is. Want to know how to avoid this!
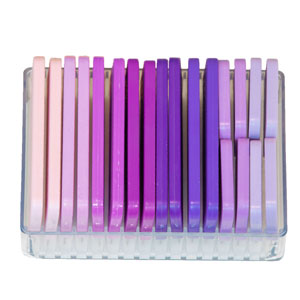
Grab a set of knit blockers! These are blocking pins that are put together in lengths so that they help you maintain straight lines. Perfect for blocking straight edges on sweaters, scarves and shawls this is a must have for all knitters. You can think of them like blocking wires but without the need of threading the wire through your project.
I LOVE using them and they make the process faster and helps me keep straighter lines! Jimmy Beans Wool has a great set of knit blockers, coming in a pink and purple colors for breast cancer awareness.
Along with this special set you can also get a rainbow set or the original set in white on their website.
Use your Knit Blockers on these Knit Shawl Patterns
Categories: Giveaways, Product Reviews




The top of my ribbed hat once I decreased doesn’t look ribbed no more. Any ideas of what I did wrong?
I am not sure what hat pattern you are talking about. If it is one of my patterns, or another designer, the best thing to do is reach out on Ravelry with an image of your project and we can try to help.
Thank you. I’ve been wondering about blocking just the last couple of days, and you answered my questions!
So happy that I could help you with your blocking questions! Hope you get to use your blocking skills soon!
I have 2 sets of these and I just love them!