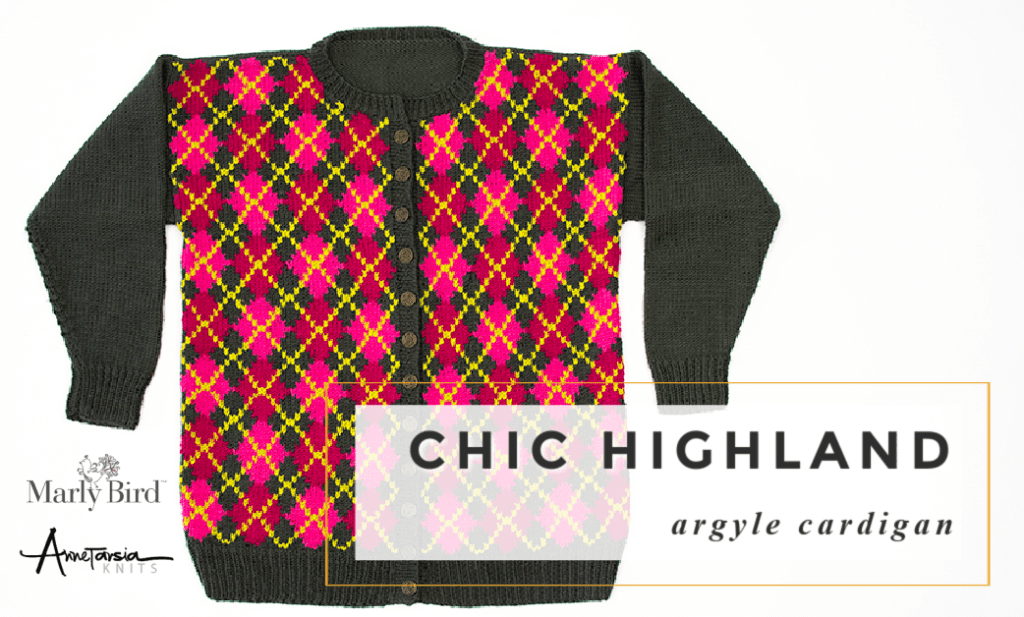
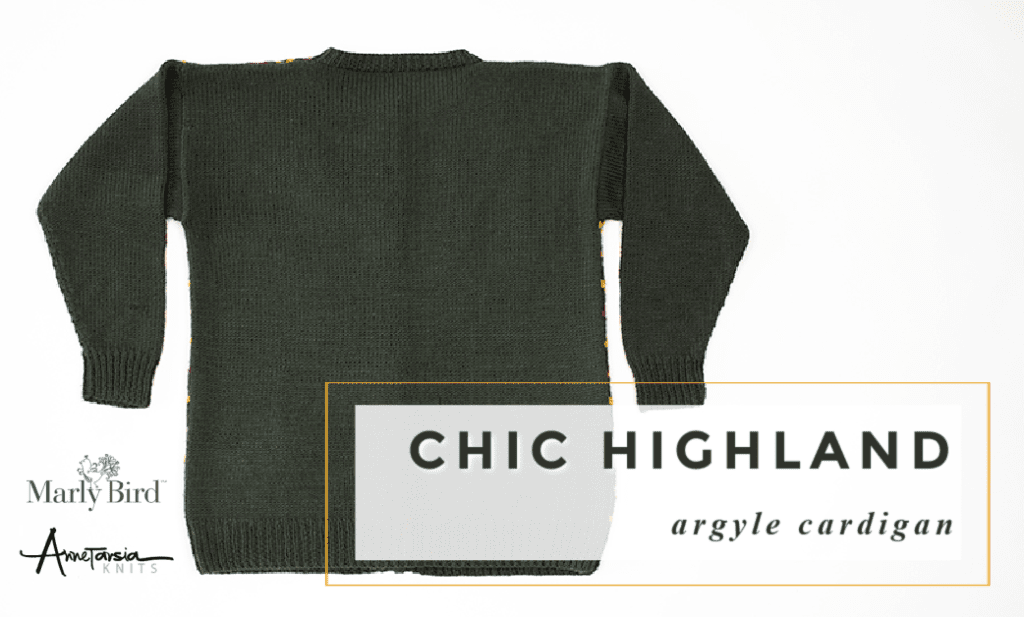
Perfect Argyle Knit Cardigan Pattern || Chic Highland Argyle Cardigan
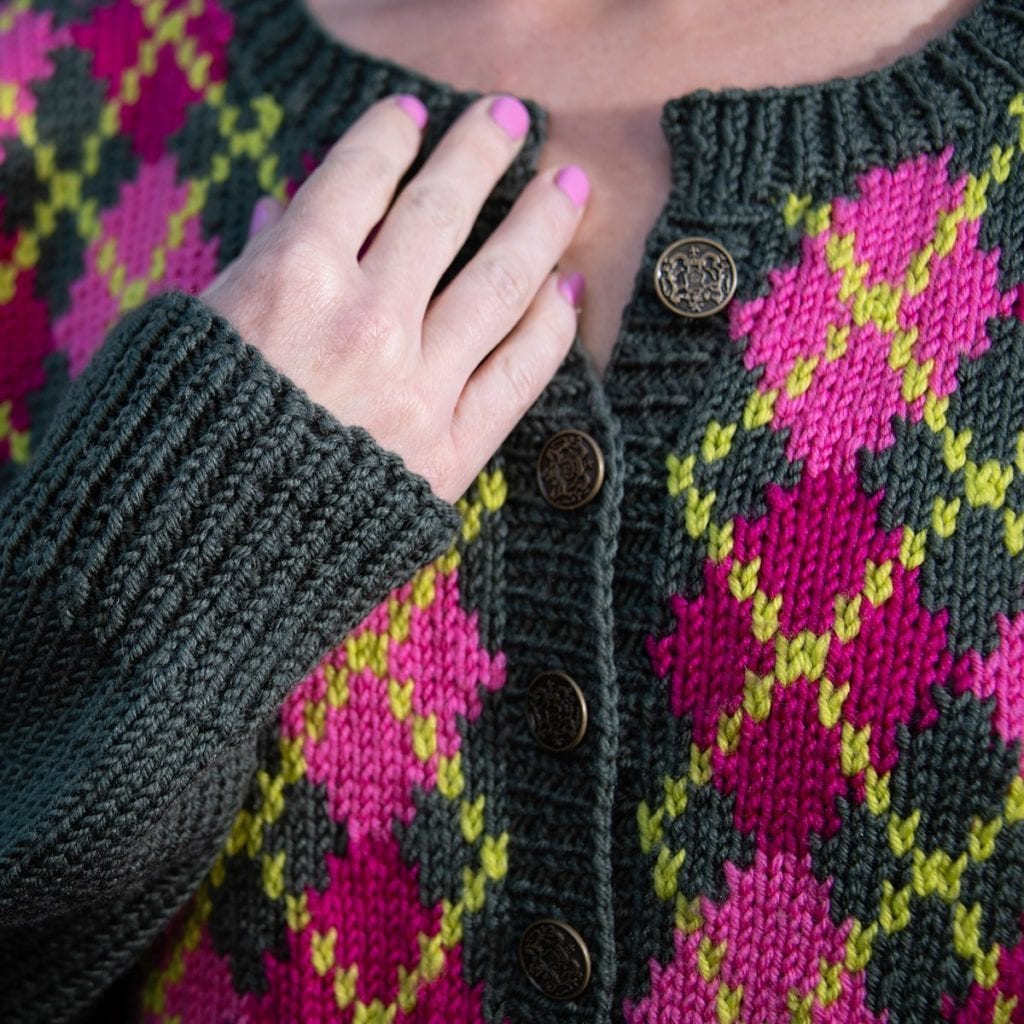
This is a classic, cozy argyle knit cardigan pattern. It is very basic except for the argyle patterning on the front pieces. However, with the video help from Anne Berk of Annetarsia Knits even an adventurous beginner can make this! On trend in every way, this cardigan is designed to be over-sized and light-weight. It’s perfect for layering over any outfit.
Note from Anne: My mother learned to knit in college in the 1950’s, making argyle socks for her boyfriend, and you can do this, too! The wool yarn is almost lighter than air, making it a pleasure to knit with and to wear as a finished garment.
THIS PATTERN IS FOREVER FREE ON MY WEBSITE
Yes, this is a free argyle knit cardigan pattern here on the website, but there is an FULL PDF available for purchase if you want everything in one place.
TO PURCHASE THE AD-PDF CLICK HERE!
INTARSIA VIDEOS BY ANNE BERK
If you follow the videos below then you’ll know all that you need to know in order to create the argyle print on this cardigan. It’s the only part of the pattern that’s really challenging. Yet, these videos make it an accessible design. Plus a lot of this information will be useful for your other projects, too!
- Determining Yarn Amounts for Butterflies: https://youtu.be/swsoUuKQOes
- Winding butterflies: https://youtu.be/P-i2T5IxL3Q
- How to Finish Perfect Intarsia: https://youtu.be/hxYe0gNIUww
- How to Knit Straight Intarsia: https://youtu.be/hLbfjLV1PIc
- How to Bury In Ends: https://youtu.be/8_NBGUKjO-E
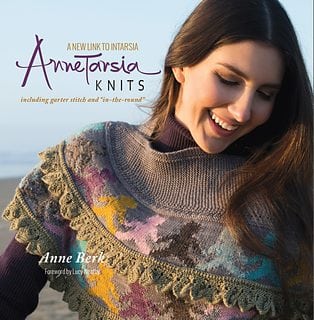
For more information and patterns, check out “Annetarsia Knits: A New Link to Intarsia (available at www.annetarsia.com)
CHIC HIGHLAND ARGYLE KNIT CARDIGAN PATTERN – MEASUREMENTS
To Fit Sizes
36 (40, 44, 48, 54, 60, 64)” [91.5 (101.5, 112, 122, 137, 152.5, 162.5) cm]
Finished Bust Circumference
40 (44, 48, 54, 60, 65, 70)” [101.5 (112, 122, 137, 152.5, 165, 178) cm]
- Designed with 4-6″ [10-15 cm] positive ease
- Sample is modeled on a size 40” [101.5 cm] bust with 4” [10 cm] positive ease
Gauge
Yarn Gauge (an Annetarsia technique for knowing how many inches of yarn used per stitch <watch video explaining this here>) used for yardage calculations: 0.72
18 sts and 28 rows = 4” [10 cm] in blocked stockinette. To save time, check gauge, and adjust needle size accordingly.
Important note about gauge: measure the unblocked gauge, and measure gauge again after blocking. Gauge may change significantly, especially on the front pieces, so trust your BLOCKED gauge, and count rows, not inches, for best results.
…trust your BLOCKED gauge, and count rows, not inches, for best results.
anne berk of annetarsia knits
MATERIALS FOR CHIC HIGHLAND ARGYLE KNIT CARDIGAN
You can use any yarn or needles you wish when working with this argyle knit cardigan pattern. However, it is important to note that this argyle cardigan is designed to be knit with a soft and springy 100% washable merino yarn. Therefore, it may look different if you use 100% acrylic. A natural wool really is the best choice when making this Chic Highland Argyle Cardigan.
Yarn
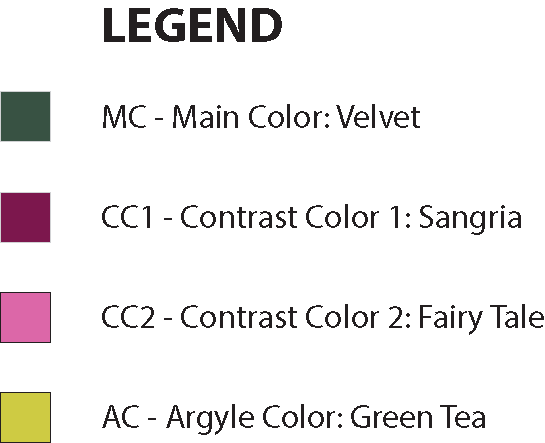
❤️ Red Heart Chic Sheep by Marly Bird™: 5 (5, 5, 5, 6, 7, 7) skeins Velvet (MC) , 1 skein Sangria – dark (CC1) , 1 skein Fairy Tale – light (CC2), 1 skein Green Tea (AC)
Needles
US Size 7 (4.5 mm) make sure to use the same needles for your swatch that you will use for your cardigan.
Notions
- waist yarn for swatch
- stitch markers
- 12 size ¾” buttons (sample uses LaMode brand #513)
- yarn needle for seaming
- chenille needle for burying ends <watch video to learn how to do this magical technique>
Notes & Intarsia Tips
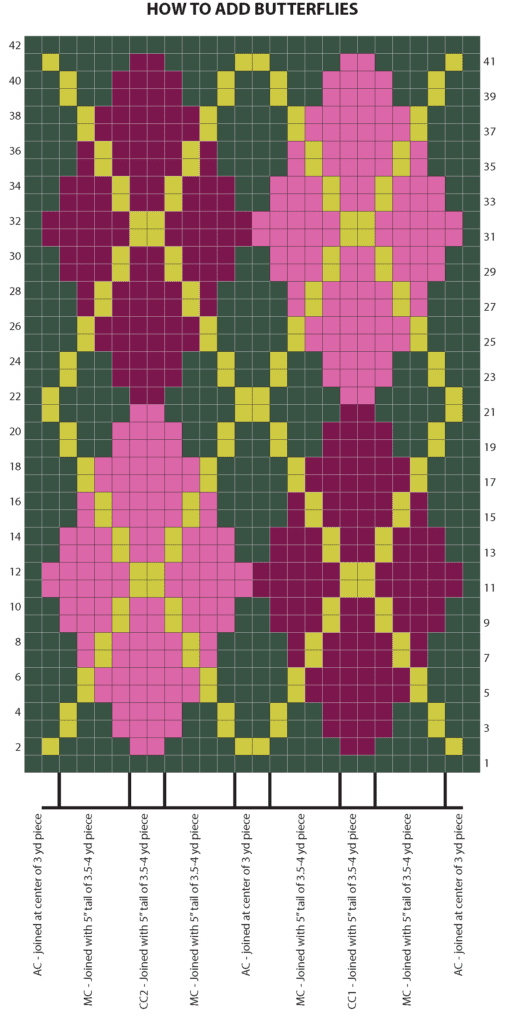
Regarding yarn amounts for yarn butterflies: Diamonds A and B require approximately 3.5 yds each, based on the stated Yarn gauge. If you don’t know your yarn gauge, wind butterflies 4 yds long for your first diamond layer, and see if you need more or less for the second layer. Once you know how much yardage you need per diamond, you can wind remaining butterflies needed for the total project.
Wind off 3.5-4 yds of yarn to make butterflies for A and B diamonds, and MC. Measure all 3 colors together and create 3 strands with one cut, to save time. For the accent color, cut 2 pieces of AC color, approx. 3 yds (Twice the length of your outstretched arms). Leave these as loose strands, as you will be working from the center of the strand for the middle AC motifs. The first MC butterfly can be wound from the needle, after completing the ribbing.
When adding any new yarn: always leave a 5” end, which will anchor the stitch and give you enough yarn to adjust tension and bury the end, in finishing. Add yarn within 1 st from the link, for ease in finishing.
How to read the chart: Chart rows are worked from right to left on RS rows and left to right on WS rows. Each row begins and ends with 1 st MC selvedge.
Avoid holes when knitting intarsia: To link between motifs, lay the old color over the new color, then work the next stitch with the new color to link the old yarn gently with the new color yarn. Do not overtighten, as the link and stitches need room to breathe.
lay the old color over the new color
When 3 colors come together and one will not be used lay both the old and the unused color over the new piece of yarn, then make the stitch with the new color, locking in the other 2 colors, which will be in position to be worked on the next row.
Keep control of the butterflies: When yarn supplies tangle, first pull the loose strands of AC away. As you knit, the yarn butterflies will get smaller and can also be converted to loose strands. ALL yarn supplies can be converted to loose strands if you choose, you will just need to add new yarn more often. As you practice, you will gain confidence and the butterflies will become faster and easier to use. Using smaller lengths of yarn in the beginning might be less stressful, and your fabric will be just fine, so don’t hesitate to try that method.
Change Cardigan Length: Pattern is written for total length of 27“, unblocked. If another length is desired, work the same number of rows for fronts and back. A full diamond adds 20 rows. Working only the bottom half of a diamond adds 10 rows. If a small number of rows is needed, consider working them in MC only on the shoulder of the front pieces. If adding length make sure to have enough yarn on hand.
GET THE BOOK! Hey, it’s Marly. I want to highly recommend that you grab the Annetarsia book by Anne Berk. It is an amazing book and you will not be disappointed in it at all. It is so much more than a book about intarsia knitting. There are lessons in there that will really improve your general knitting as well. Order if from Amazon or directly from Anne. Simply click the links.
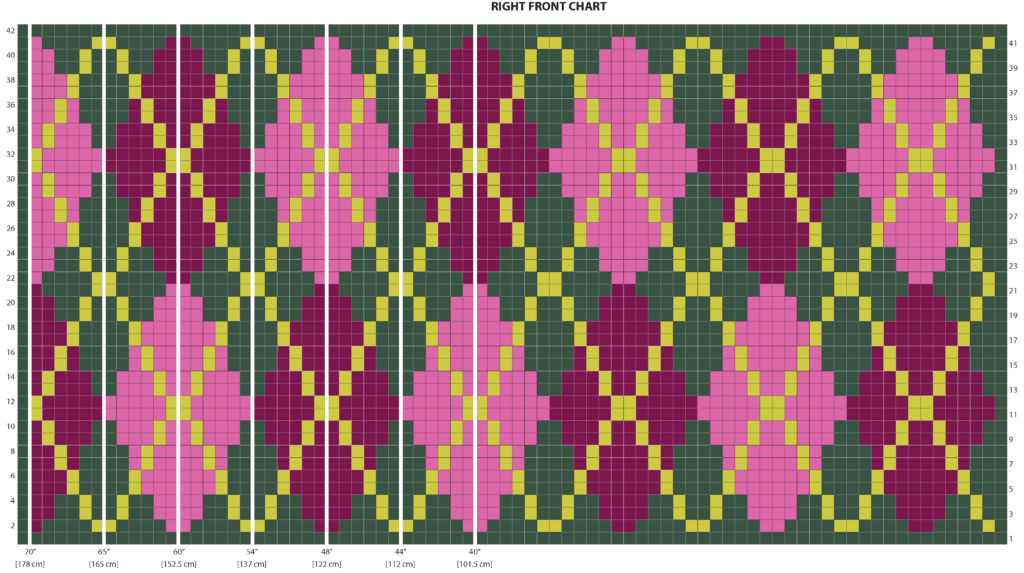
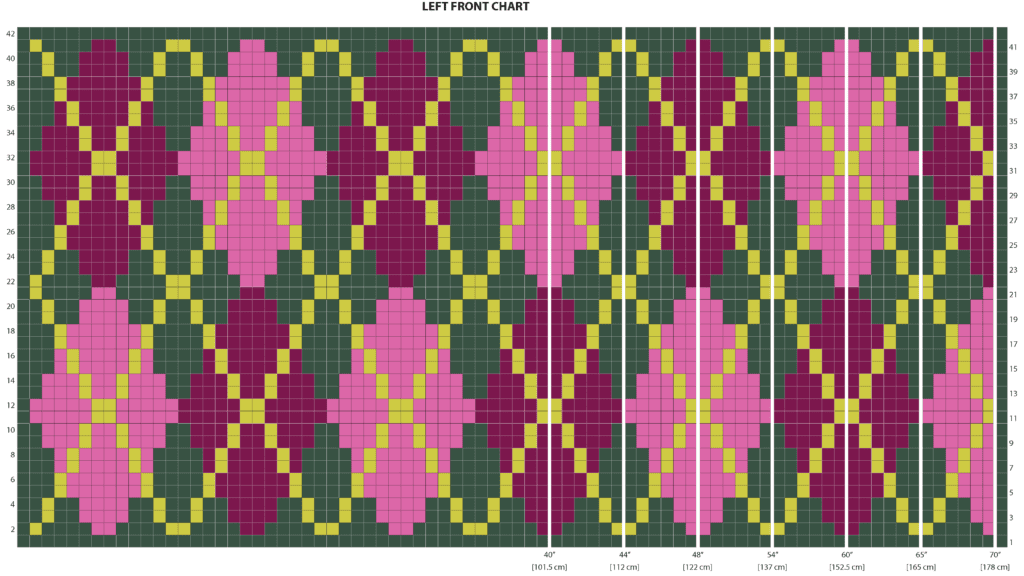
CHIC HIGHLAND ARGYLE KNIT CARDIGAN PATTERN CHART
The legend and chart below will be followed for the fronts of the cardigan. The each square on the chart represents one stitch. You can change out any color you wish but be sure the contrast between colors is enough so your work is noticed.
If you click each image it will take you to the attachment page of the image and you can print it should you wish.
Repeat chart from rows 2-41.
Throughout the chart, strand the MC behind the single stitch of AC.
CHIC HIGHLAND ARGYLE KNIT CARDIGAN PATTERN
Back
With MC, using long tail method cast on 92 (100, 110, 122, 136, 144, 156) sts.
Ribbing Row: *K1, p1; rep from * to end.
Rep Ribbing Row until hem measures 2.5” [6.5 cm].
Work in stockinette stitch (knit all RS rows, purl all WS rows) until 160 rows of body have been worked. Bind off all sts.
Tip: Place locking markers at each side of work, every 20th row. This will make mattress stitch seaming very easy, as you match the diamond repeats on the fronts with the marked rows on the back.
Right Front
With MC, using long-tail method cast on 44 (50, 56, 62, 68, 74, 80) sts. (includes 1 selvedge st on each side, the pattern is not written to slip this stitch)
Ribbing Row: *K1, p1; rep from * to end.
Rep Ribbing Row until hem measures 2.5” [6.5 cm].
Next Row (RS): Knit all sts with MC.
Intarsia Note: When adding AC in the center of chart (2 sts) work from the center of the strand. One end will move to the right and the other to the left, as you knit up the chart. There will not be any ends to bury on this first row, so keep the sts on row 1 loose. If they tighten up on row 2, the sts will disappear! You will always strand MC behind the AC. This is the only place you will stranding in the pattern.
You will always start new diamonds on the wrong side of work, so that the strands will be facing you. Be sure to leave a good 5” [12.5 cm] end for each added color, and to lock each new strand by placing the old color over the new yarn before making that first stitch with the new color.

Row 2 (WS): For the right front, begin ALL sizes by purling one st in MC, and then moving to the next stitch indicated on the chart for your size by the white lines. Refer to the “How To Add Butterflies” chart to see how to add the yarns as you work Row 2. Each new grouping of AC sts will be added as a 3 yd piece at the center of the piece of yarn. Each new grouping of MC, CC1, or CC2 will be added as a 3.5-4 yd piece with a 5” tail left.
Row 3 (RS): Work as directed in chart, knitting all sts. Work AC with one strand moving up and to the left, the other strand up and to the right. Strand MC behind AC. Link MC with all diamond colors, by laying the old color over the new color and gently working the next st with the new color. The old color is linked, and will wait to be worked on the next row.
Work in chart as established, repeating Rows 2-41, until 142 (142, 140, 140, 140, 138, 138) rows of chart have been completed.
Neck Shaping
Next Row (RS): Bind off 10 (10, 10, 10, 12, 12, 12) sts at the neck edge, work in pattern to end.
Following Row (WS): Work in pattern as established.
Dec Row (RS): K1, ssk, work in pattern to end.
Continuing to work in pattern as established, repeat this Dec Row at the neck edge every RS row 7 (7, 8, 8, 8, 9, 9) times more— 26 (32, 37, 43, 47, 52, 58) sts.
Bind off all sts.

Left Front
With MC, using long-tail method cast on 44 (50, 56, 62, 68, 74, 80) sts. (includes 1 selvedge st on each side)
Ribbing Row: *K1, p1; rep from * to end.
Rep Ribbing Row until hem measures 2.5” [6.5 cm].
Next Row (RS): Knit all sts with MC.
Row 2 (WS): For the left front, begin all sizes by working the chart as written to the white line indicating the end of your size. The last stitch in ALL sizes is purling one st in MC. Refer to the “How To Add Butterflies” chart to see how to add the yarns as you work Row 2. Each new grouping of AC sts will be added as a 3 yd piece at the center of the piece of yarn. Each new grouping of MC, CC1, or CC2 will be added as a 3.5-4 yd piece with a 5” tail left.
Row 3 (RS): Work as directed in chart, knitting all sts. Work AC with one strand moving up and to the left, the other strand up and to the right. Strand MC behind AC. Link MC with all diamond colors, by laying the old color over the new color and gently working the next st with the new color. The old color is linked, and will wait to be worked on the next row.
Work in chart as established, repeating Rows 2-41, until 143 (143, 141, 141, 141, 139, 139) rows of chart have been completed.
Neck Shaping
Next Row (WS): Bind off 10 (10, 10, 10, 12, 12, 12) sts at the neck edge, work in pattern to end.
Dec Row (RS): Work in pattern to last 3 sts, k2tog, k1.
Continuing to work in pattern as established, repeat this Dec Row at the neck edge every RS row 7 (7, 8, 8, 8, 9, 9) times more— 26 (32, 37, 43, 47, 52, 58) sts.
Bind off all sts.
Sleeves (Make 2)
With MC, using long-tail method cast on 44 (46, 50, 52, 52, 54, 56) sts.
Ribbing Row: *K1, p1; rep from * to end.
Rep Ribbing Row until hem measures 2” [5 cm].
Begin Sleeve Shaping
Increase Row (RS): K1, kfb, knit to last 2 sts, kfb, k1.
Working in Stockinette stitch, rep this Inc Row every fourth row 20 (21, 24, 23, 25, 26, 27) times—86 (90, 100, 100, 104, 108, 112) sts.
Cont in Stockinette st until piece meas approx 17½ (18½, 19½, 19½, 20, 20½, 21)” [44.5 (47, 49.5, 49.5, 51, 52, 53.5) cm] or desired length. Bind off all sts.
1st FINISHING
Front Bands
Left Front Band: With RS of left front facing, pick up and knit sts in 3 out of 4 rows (pick up 1 st in each of 3 rows, then skip the 4th row)—121 sts (approx). The number of sts isn’t crucial – look instead at how the band lays with the fabric, you want a smooth appearance. Once you like the fabric, count the final number of sts you have for the first band and write it down.
Ribbing Row: *K1, p1; rep from * to last st, k1.
Work 8 rows in this rib, ending on WS.
Bind off all sts in ribbing.
Right front band: With RS of right front facing, pick up and knit sts as for the left front. Work 3 rows of ribbing as above.
Buttonhole Row (WS): P1, (k1, p1) twice, *yo, p2tog, (k1, p1) four times; rep from * ten times more, work one more buttonhole (yo, p2tog), and work remaining sts in ribbing.
Work four more rows in ribbing as established. Bind off all sts in ribbing.
2nd FINISHING
Sew shoulder seams with mattress stitch.
Collar: With RS facing, pick up and knit into every bound off stitch ( back and neck sts) , and pick up and knit 3 out of every 4 rows, on slope of neck (approx. 13 sts) and button bands (6 sts).
Ribbing Row: *K1, p1; rep from * to end.
Work 8 rows in this rib, ending on WS.
Bind off all sts in ribbing.
Seaming: With locking marker, pin center of sleeve to the shoulder seam. Pin sleeve edges 60 rows from shoulder seam (3 diamonds from the shoulder). Pin more locking markers to secure sleeve to body. Use mattress stitch to sew sleeve to body: *seam one BO st to 1 row (scooping up 1 strand between rows) 2x, then one BO to 2 rows once (scooping up 2 strands between rows) *, rep to end. Adjust the ratio as needed for smooth fabric between the locking markers.
Sew sleeve and side seams with mattress stitch.
Blocking: Soak in warm water and rinse-free soap, for 30 min. Drain water, roll up into towels and gently press until just damp. Lay flat to dry.
Buttons: Place locking markers on Left front buttonband, to match buttonholes on Right front band, every 5th knit rib from the first buttonhole. (There will be 4 knit ribs in between buttonholes) Thread Chenille needle with yarn. Sew buttons, bringing yarn from WS through Button shank on RS, to the back and repeat one time. (2 passes through the button shank) On WS, tie the ends into a square knot and clip yarn.
Optional: If the yarn you used is a superwash or 100% washable, you can machine wash and dry will condense fabric and reduce size slightly, but will not damage the sweater. Now, this is what Anne did with her sweater and it turned out beautifully!
Hopefully you enjoy this knit argyle cardigan pattern and the finished product you make with it.
MORE INTARSIA PATTERNS
When I had the idea for this blanket I knew that Anne could make it happen. I love this blanket so much and it is a wonderful pattern. I know if looks super intimidating but I promise, you can do it!
It is a GREAT stash busting project (so are these if you are interested) and perfect to keep you and your whole family warm.