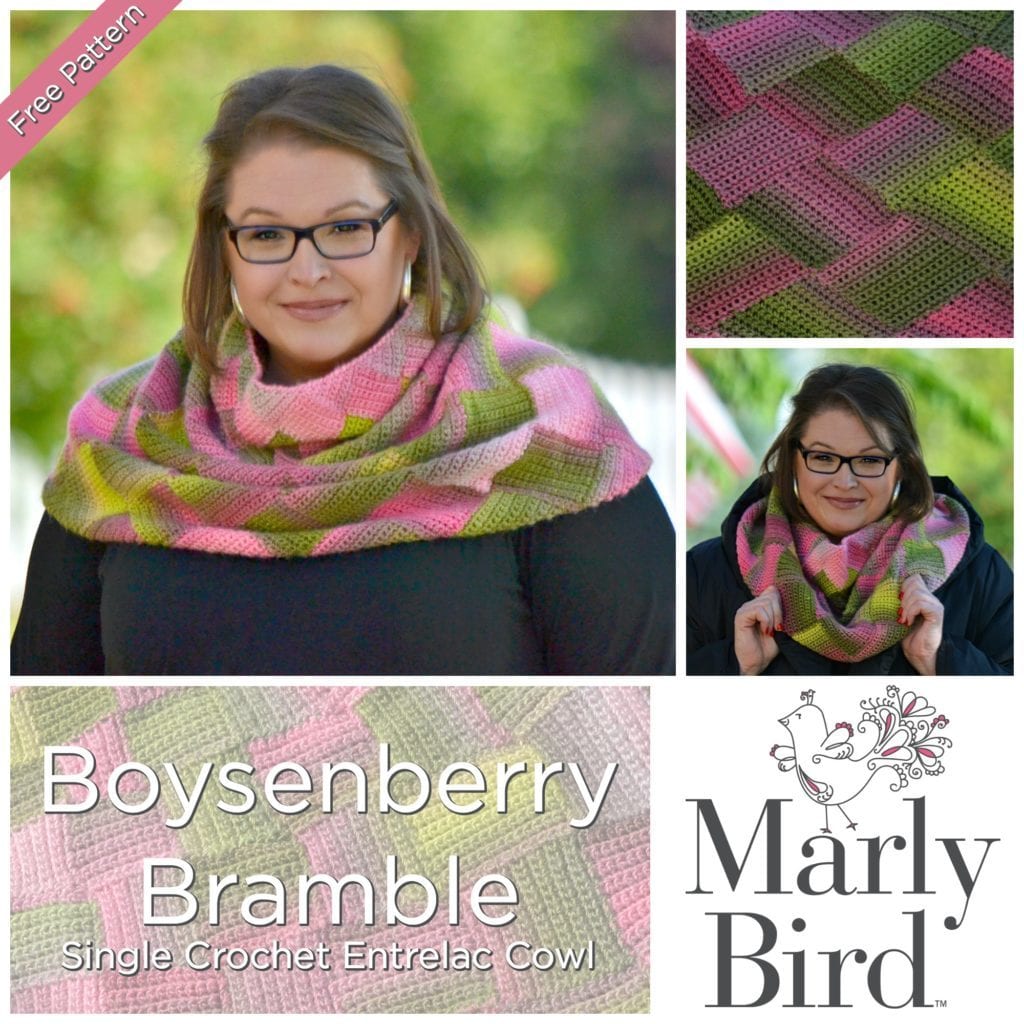
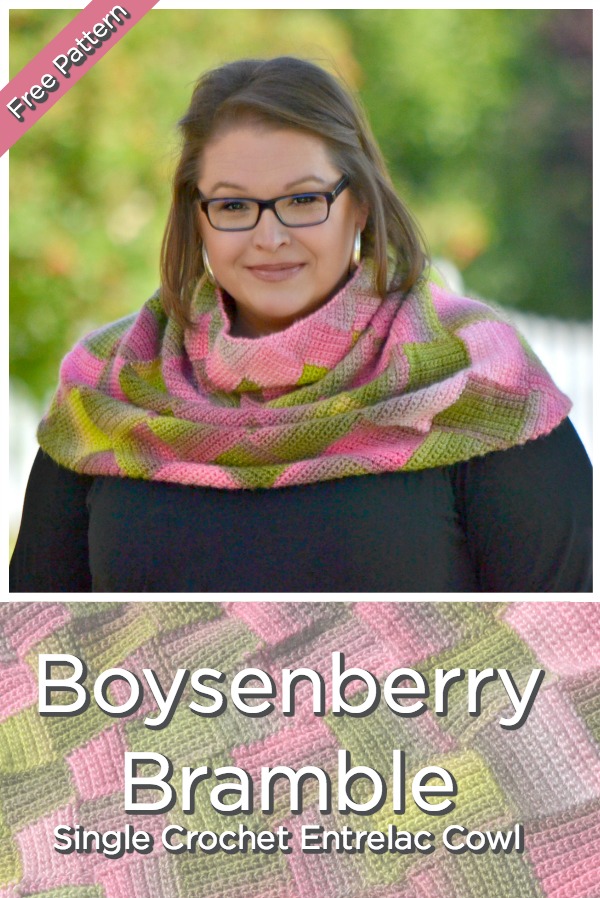
Boysenberry Bramble Single Crochet Entrelac Cowl
The Free Crochet Pattern boysenberry bramble single crochet entrelac cowl uses a simple single crochet coupled with crochet entrelac technique to create this unique cowl that will become a favorite accessory in your closet. Using one of the most favorite yarns, Unforgettable™ by Red Heart Yarns (check out the link below) to create this amazing cowl. This piece is the perfect layering piece.
![]()
Queue it up and Like the Pattern on Ravelry
Disclosure: This page may contain affiliate links which help me cover the cost of publishing my blog. Should you choose to make a purchase, at no additional cost to you, I may earn a small percentage of the sale.
Free Crochet Pattern Boysenberry Bramble Single Crochet Entrelac Cowl
by Marly Bird
Materials
Yarn RED HEART® Unforgettable™; 3.5oz (100 g) ball, 270 yd (247 m) 100% Acrylic, [Art. E793 available in 3.5 oz (100 g), 270 yd (247 m) balls]; 4 balls #3962 Sugarcane
Hook Size G-6 (4.25 mm) hook or size required for gauge
Notions
Bent tip yarn needle
Measurements
Gauge
15 sc = 3¼” and 15 sc rows = 2¾” after blocking. CHECK YOUR GAUGE. Use any size hook to obtain the gauge.
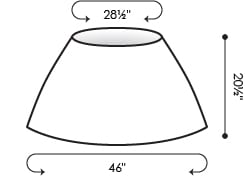
Finished Size
Bottom Circumference 46″ / 117 cm
Neck Circumference 28½” / 72.5 cm
Length 20½” / 52 cm

Abbreviations
Special Stitches
Sc2tog: Pull up a loop in each of 2 indicated sts, yo and draw through all 3 loops on hook.
Sc3tog: Pull up a loop in each of 3 indicated sts, yo and draw through all 4 loops on hook.
Reverse Single Crochet: Sc in last st of previous row or round, * sc in next st to the RIGHT of last st; rep from * around (reversing normal direction of round), sl st in 1st sc to connect. Fasten off.
Notes
–Cut yarn and re-join with a sl st in indicated st after each tier of squares or triangles.
–The working direction of each tier is the opposite of the previous tier.
–If you would like an ad free PDF that includes a chart for the stitches used in this wrap, that is available on Ravelry for only $3.99!
Video Support
Here is a basic video for how to do Single Crochet Entrelac
Boysenberry Bramble Single Crochet Entrelac Cowl Pattern
Tier 1
Entrelac builds upon itself on the bias in this pattern. In order to do that we have to begin with a tier of base triangles that we can work off of to make our square blocks on the next tier.
Base Triangle 1
Ch 2.
Row 1 (RS): Sc in 2nd ch from hook and mark this sc – 1 st. Ch 2 (does not count as a st), turn.
Row 2: (Hdc, sc) in sc – 2 sts. Ch 1, turn.
Row 3: Sc in first 2 sts and in next ch – 3 sts. Ch 2, turn.
Row 4: (Hdc, sc) in first st, sc in each of next 2 sts – 4 sts. Ch 1, turn.
Row 5: Sc in first 4 sts and in next ch – 5 sts. Ch 2, turn.
Row 6: (Hdc, sc) in first st, sc in each of next 4 sts – 6 sts. Ch 1, turn.
Row 7: Sc in first 6 sts and in next ch – 7 sts. Ch 2, turn.
Row 8: (Hdc, sc) in first st, sc in each of next 6 sts – 8 sts. Ch 1, turn.
Row 9: Sc in first 8 sts and in next ch – 9 sts. Ch 2, turn.
Row 10: (Hdc, sc) in first st, sc in each of next 8 sts – 10 sts. Ch 1, turn.
Row 11: Sc in first 10 sts and in next ch – 11 sts. Ch 2, turn.
Row 12: (Hdc, sc) in first st, sc in each of next 10 sts – 12 sts. Ch 1, turn.
Row 13: Sc in first 12 sts and in next ch – 13 sts. Ch 2, turn.
Row 14: (Hdc, sc) in first st, sc in each of next 12 sts – 14 sts. Ch 1, turn.
Row 15: Sc in first 14 sts and in next ch, mark last sc made – 15 sts. Ch 1 loosely; do not turn.
Mark RS of triangle to keep track of RS of work.
Base Triangle 2
Row 1 (RS): Sc in left edge of last sc worked – 1 st. Ch 2, turn.
Rows 2-15: Work same as Rows 2-15 of Base Triangle 1.
Mark RS of triangle to keep track of RS of work.
Base Triangles 3-11
Work same as Base Triangle 2.
Fasten off.
![]()
Tier 2
This tier is built on Base Triangles of Tier 1.
Each square will begin with WS facing.
Join yarn with sl st to top corner of last completed triangle.
Square 1
Row 1 (WS): Working along side edge of triangle, sc in edge st of first 14 rows of triangle, sc2tog over edge st of next row and marked st on next triangle, remove marker, sl st in next st on same triangle – 15 sts. Turn.
Row 2: Sk sl st, sc in each of next 15 sts. Ch 1, turn.
Row 3: Sc in first 14 sts, sc2tog over next sc and next st on adjoining triangle, sl st in next st on same triangle – 15 sts. Turn.
Rows 4-14: Rep the last 2 rows 5 more times, then rep Row 2 only once more.
Row 15: Sc in first 14 sts, sc2tog over next sc and next st on adjoining triangle, mark sc2tog just made. Ch 1 loosely; do not turn.
Squares 2-11
Work same as Square 1.
Fasten off.
Tier 3
This tier is worked evenly, building on Tier 2.
Each square will begin with RS facing.
Join yarn with sl st to top corner of last completed square.
Square 1
Row 1 (RS): Working along side edge of square, sc in edge st of first 14 rows of square, sc2tog over edge st of next row and marked st on next square, remove marker, sl st in next st on same square – 15 sts. Turn.
Row 2: Sk sl st, sc in each of next 15 sts. Ch 1, turn.
Row 3: Sc in first 14 sts, sc2tog over next sc and next st on adjoining square, sl st in next st on same square – 15 sts. Turn.
Rows 4-14: Rep the last 2 rows 5 more times, then rep Row 2 only once more.
Row 15: Sc in first 14 sts, sc2tog over next sc and next st on adjoining square, mark sc2tog just made. Ch 1 loosely; do not turn.
Squares 2-11
Work same as Square 1.
Fasten off.
Tier 4
This is a 1-st decrease tier.
Each square will begin with WS facing.
Join yarn with sl st to top corner of last completed square.
Square 1
Row 1 (WS): Working along side edge of square, sc in edge st of first 12 rows of square, sc2tog over edge sts of next 2 rows, sc2tog over edge st of next row and marked st on next square, remove marker, sl st in next st on same square – 14 sts. Turn.
Row 2: Sk sl st, sc in each of next 14 sts. Ch 1, turn.
Row 3: Sc in first 13 sts, sc2tog over next sc and next st on adjoining square, sl st in next st on same square – 14 sts. Turn.
Rows 4-14: Rep the last 2 rows 5 more times, then rep Row 2 only once more.
Row 15: Sc in first 14 sts, sc2tog over next sc and next st on adjoining square, mark sc2tog just made. Ch 1 loosely; do not turn.
Squares 2-11
Work same as Square 1.
Fasten off.
Tier 5
This is a 1-st and 2-row decrease tier.
Each square will begin with RS facing.
Join yarn with sl st to top corner of last completed square.
Square 1
Row 1 (RS): Working along side edge of square, sc in edge st of first 12 rows of square, sc2tog over edge sts of next 2 rows, sc3tog over edge st of next row, marked st on next square, and next st on same square (this is the one you would have normally worked sl st into), remove marker, sl st in next st on same square – 14 sts. Turn.
Row 2: Sk sl st, sc in each of next 14 sts. Ch 1, turn.
Row 3: Sc in first 12 sts, sc3tog over next 2 sc and next st on adjoining square, sl st in next st on same square – 13 sts. Turn.
Row 4: Sk sl st, sc in each of next 13 sts. Ch 1, turn.
Row 5: Sc in first 12 sts, sc2tog over next sc and next st on adjoining square, sl st in next st on same square – 13 sts. Turn.
Rows 6-12: Rep the last 2 rows 3 more times, then rep Row 2 only once more.
Row 13: Sc in first 12 sts, sc2tog over next sc and next st on adjoining square, mark sc2tog just made. Ch 1 loosely; do not turn.
Squares 2-11
Work same as Square 1.
Fasten off.
Tier 6
This is a 1-st decrease tier.
Each square will begin with WS facing.
Join yarn with sl st to top corner of last completed square.
Square 1
Row 1 (WS): Working along side edge of square, sc in edge st of first 10 rows of square, sc2tog over edge sts of next 2 rows, sc2tog over edge st of next row and marked st on next square, remove marker, sl st in next st on same square – 12 sts. Turn.
Row 2: Sk sl st, sc in each of next 12 sts. Ch 1, turn.
Row 3: Sc in first 11 sts, sc2tog over next sc and next st on adjoining square, sl st in next st on same square – 12 sts. Turn.
Rows 4-12: Rep the last 2 rows 4 more times, then rep Row 2 only once more.
Row 13: Sc in first 12 sts, sc2tog over next sc and next st on adjoining square, mark sc2tog just made. Ch 1 loosely; do not turn.
Squares 2-11
Work same as Square 1.
Fasten off.
Tier 7
This is a 1-st and 2-row decrease tier.
Each square will begin with RS facing.
Join yarn with sl st to top corner of last completed square.
Square 1
Row 1 (RS): Working along side edge of square, sc in edge st of first 10 rows of square, sc2tog over edge sts of next 2 rows, sc3tog over edge st of next row, marked st on next square, and next st on same square (this is the one you would have normally worked sl st into), remove marker, sl st in next st on same square – 12 sts. Turn.
Row 2: Sk sl st, sc in each of next 12 sts. Ch 1, turn.
Row 3: Sc in first 10 sts, sc3tog over next 2 sc and next st on adjoining square, sl st in next st on same square – 11 sts. Turn.
Row 4: Sk sl st, sc in each of next 11 sts. Ch 1, turn.
Row 5: Sc in first 10 sts, sc2tog over next sc and next st on adjoining square, sl st in next st on same square – 11 sts. Turn.
Rows 6-10: Rep the last 2 rows twice more, then rep Row 2 only once more.
Row 11: Sc in first 10 sts, sc2tog over next sc and next st on adjoining square, mark sc2tog just made. Ch 1 loosely; do not turn.
Squares 2-11
Work same as Square 1.
Fasten off.
Tier 8
This is a 1-st decrease tier.
Each square will begin with WS facing.
Join yarn with sl st to top corner of last completed square.
Square 1
Row 1 (WS): Working along side edge of square, sc in edge st of first 8 rows of square, sc2tog over edge sts of next 2 rows, sc2tog over edge st of next row and marked st on next square, remove marker, sl st in next st on same square – 10 sts. Turn.
Row 2: Sk sl st, sc in each of next 10 sts. Ch 1, turn.
Row 3: Sc in first 9 sts, sc2tog over next sc and next st on adjoining square, sl st in next st on same square – 10 sts. Turn.
Rows 4-10: Rep the last 2 rows 3 more times, then rep Row 2 only once more.
Row 11: Sc in first 10 sts, sc2tog over next sc and next st on adjoining square, mark sc2tog just made. Ch 1 loosely; do not turn.
Squares 2-11
Work same as Square 1.
Fasten off.
Tier 9
This is a 1-st and 2-row decrease tier.
Each square will begin with RS facing.
Join yarn with sl st to top corner of last completed square.
Square
Row 1 (RS): Working along side edge of square, sc in edge st of first 8 rows of square, sc2tog over edge sts of next 2 rows, sc3tog over edge st of next row, marked st on next square, and next st on same square (this is the one you would have normally worked sl st into), remove marker, sl st in next st on same square – 10 sts. Turn.
Row 2: Sk sl st, sc in each of next 10 sts. Ch 1, turn.
Row 3: Sc in first 8 sts, sc3tog over next 2 sc and next st on adjoining square, sl st in next st on same square – 9 sts. Turn.
Row 4: Sk sl st, sc in each of next 9 sts. Ch 1, turn.
Row 5: Sc in first 8 sts, sc2tog over next sc and next st on adjoining square, sl st in next st on same square – 9 sts. Turn.
Rows 6-8: Rep the last 2 rows once more, then rep Row 4 only once more.
Row 9: Sc in first 8 sts, sc2tog over next sc and next st on adjoining square, mark sc2tog just made. Ch 1 loosely; do not turn.
Squares 2-11
Work same as Square 1.
Fasten off.
Tier 10
This tier is worked evenly.
Each square will begin with WS facing.
Join yarn with sl st to top corner of last completed square.
Square 1
Row 1 (WS): Working along side edge of square, sc in edge st of first 8 rows of square, sc2tog over edge st of next row and marked st on next square, remove marker, sl st in next st on same square – 9 sts. Turn.
Row 2: Sk sl st, sc in each of next 9 sts. Ch 1, turn.
Row 3: Sc in first 8 sts, sc2tog over next sc and next st on adjoining square, sl st in next st on same square – 9 sts. Turn.
Rows 4-8: Rep the last 2 rows twice more, then rep Row 2 only once more.
Row 9: Sc in first 8 sts, sc2tog over next sc and next st on adjoining square, mark sc2tog just made. Ch 1 loosely; do not turn.
Squares 2-11
Work same as Square 1.
Fasten off.
Tiers 11 & 12
Work same as Tier 10, being sure to begin all Tier 11 squares with RS facing, and all Tier 12 squares with WS facing.
Tier 13
This tier is worked in Ending Triangles to make a flat top edge.
Each triangle will begin with RS facing.
Join yarn with sl st to top corner of last completed square.
Ending Triangle 1
Row 1 (RS): Working along side edge of square, sc in edge st of first 8 rows of square, sc2tog over edge st of next row and marked st on next square, remove marker, sl st in next st on same square – 9 sts. Turn.
Row 2: Sk sl st, sc in each of next 7 sts, sc2tog over last 2 sts – 8 sts. Ch 1, turn.
Row 3: Sc2tog over first two sts, sc in each of sc to last sc, sc2tog over next sc and next st on adjoining square, sl st in next st of same square – 7 sts. Turn.
Row 4: Sk sl st, sc in each sc to last 2 sc, sc2tog over last 2 sts – 6 sts. Ch 1, turn.
Rows 5-7: Rep the last 2 rows once more, then Rep row 3 only once more – 3 sts. Ch 1, turn.
Row 8: Sk sl st, sc in next st, sc2tog over last 2 sts – 2 sts. Ch 1, turn.
Row 11: Sc3tog in over next 2 sts and next st on square– 1 st. Ch 1; do not turn.
Ending Triangles 2-11
Work same as Ending Triangle 1. Do not fasten off.
Finishing
Work a 1 round in Reverse Single Crochet around top edge.
Fasten off.
Weave in ends.
Block to schematic measurements.
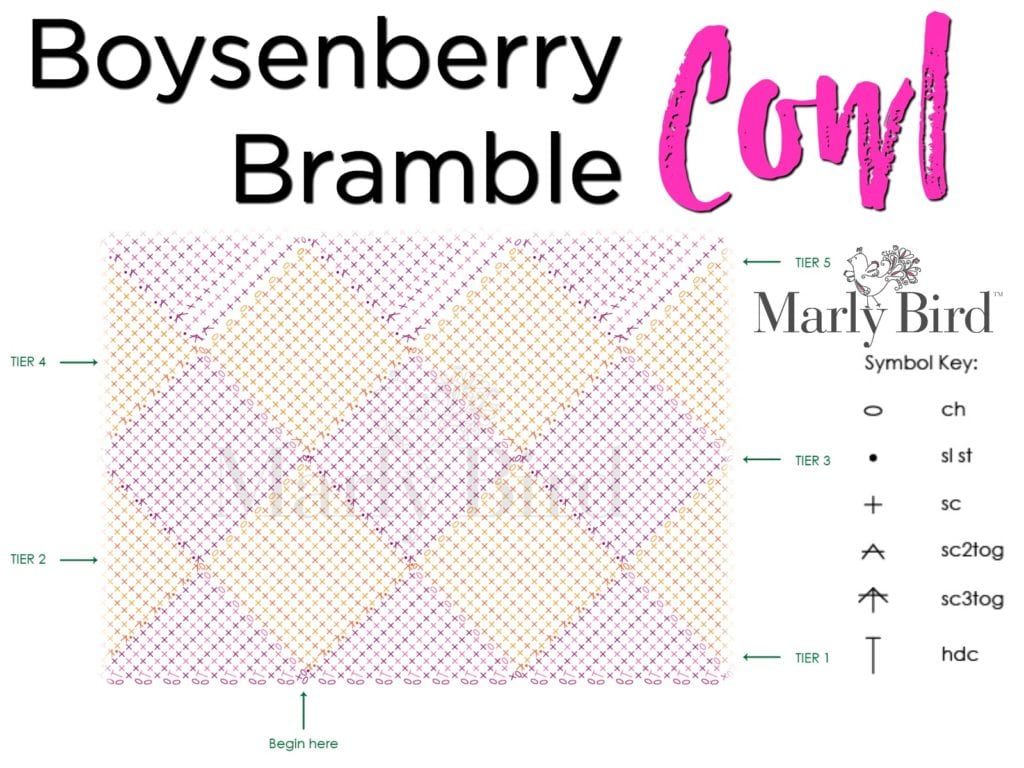
Free Crochet Pattern Boysenberry Bramble Cowl Stitch Diagram / Chart


Don’t forget to favorite this pattern on Ravelry and link to it when you make your square 🙂
Also on the Blog:
- Super Simple Shawl
- Abstractly Chic Shawl
- Bluebonnet Shawl
- Crochet Chic Log Cabin Blanket