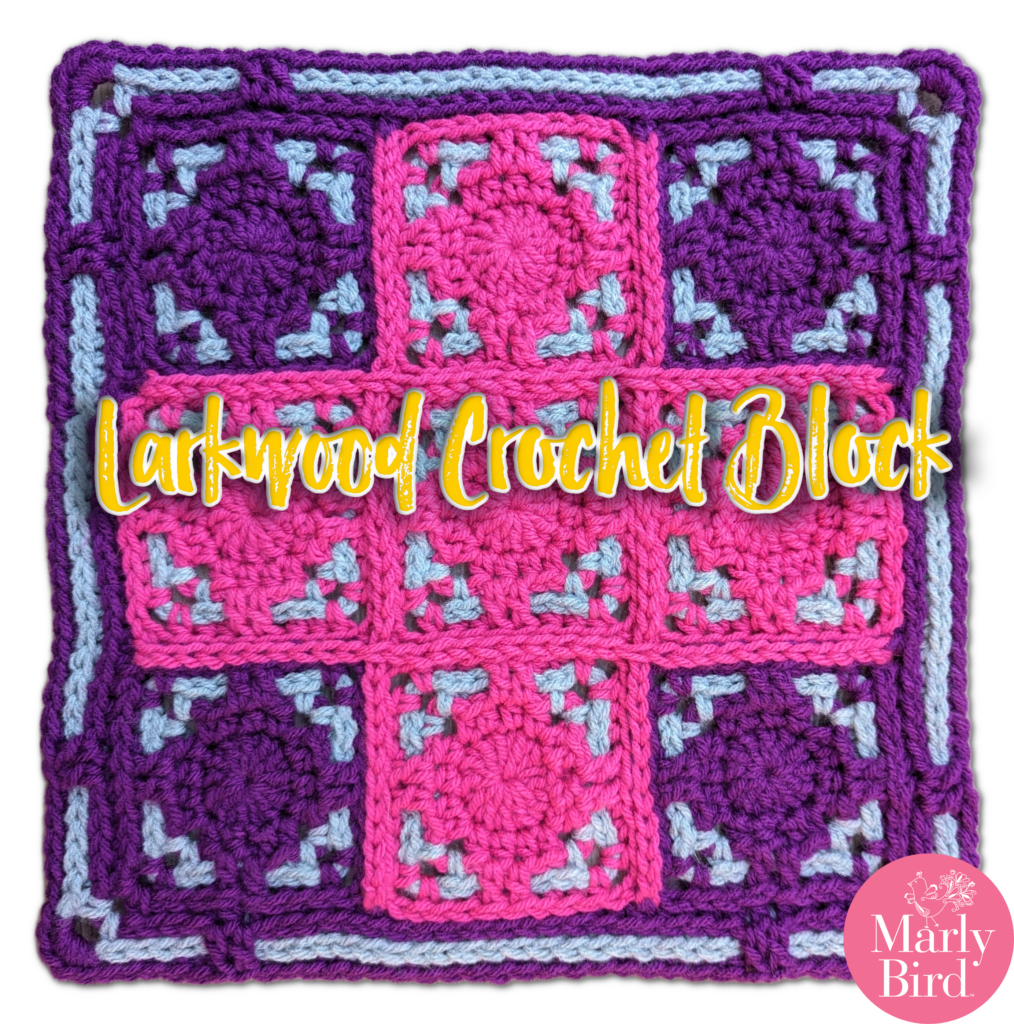
Looking for a project that jumps your crochet skills up a level? Then come check out the simple yet ornate Larkwood Crochet Block—a pattern that promises to be a wonderful addition to your crochet repertoire! The Main Block is constructed from 9 smaller motifs that can be arranged in numerous layouts. The smaller motifs are seamed with a clever joining technique that you can use again and again on other projects. Robyn crafted this project to dip our toes into with what mosaic crochet and third loop crochet can create when they mix together.
Moogly CAL 2023 || Crochet Mosaic Tile Block
Hello, fellow yarn enthusiasts! Welcome back to another exciting crochet journey with us. Today, we’re unveiling the vibrant and intricate Crochet Mosaic Tile Block—a pattern that promises to be a delightful addition to your crochet repertoire! Crafted with love and expertise by Robyn Chachula, Marly Bird’s creative partner, this block is a harmonious blend of color and texture. It’s perfect for those looking to elevate their crafting skills.
[Read more…]Amigurumi Free Crochet Animal Pattern || Alden the Owl
Step into the enchanting world of Apricot Lane, where the art of crochet brings magic and friendship to life. Here, you’ll discover a community of amigurumi animals with unique personalities and heartwarming stories. They’re sure to capture your heart. You can’t help but be drawn into their magical world when you work on this amigurumi free crochet animal pattern. Because, beyond their fluffy exterior lies a deeper message of friendship, love, and creativity woven into every stitch.
Whether a seasoned amigurumi lover or new to the craft, Apricot Lane will ignite your imagination and fill you with wonder. The delightful creatures of this whimsical world are more than just crocheted toys. They embody the essence of childhood innocence and imagination.
Travel Apricot Lane
Embark on a journey through Apricot Lane and discover the wise and helpful Alden the Owl. He’s always there for his friends in need. Or get to know the adventurous Felix the Fox. He always seems to find himself in the middle of a good mystery. Each creature brings a unique story, and the opportunity to craft your very own with our crochet patterns.
So, grab your yarn, hook, and this amigurumi free crochet animal pattern, and get ready to create your magical friend. Join us on this journey of whimsy and wonder in Apricot Lane.
Read more: Amigurumi Free Crochet Animal Pattern || Alden the OwlApricot Lane Amigurumi Free Crochet Animal Pattern
If you’re a fan of amigurumi and love to crochet, you’re in for a treat. Apricot Lane, a magical world of crochet amigurumi creatures, is waiting for you to explore. And the best part? MarlyBird.com offers a variety of amigurumi free crochet animal patterns for you to create your very own creatures.
Make friends with Felix the Fox and Alden the Owl. Introduce yourself to Freddie the Frog and Teddy the Turtle (both coming this summer). Each amigurumi creature of Apricot Lane has its own unique personality and story. With the amigurumi free crochet animal patterns available on MarlyBird.com, you can bring these lovable characters to life. Make them in various sizes, from tiny keychain companions to huggable stuffed animals.
Create And Share Your Crochet Amigurumi Creatures
From beginner crocheters to seasoned veterans, these amigurumi patterns are sure to spark your creativity and bring a smile to your face. Each amigurumi free crochet animal pattern comes with detailed instructions and video to guide you through the process. Now you can create your own adorable amigurumi animals with ease.
But the fun doesn’t stop there. Once you’ve finished your amigurumi creations, share them with the Apricot Lane community on social media. Use the hashtag #apricotlanecrochet. You’ll be amazed at the creativity and talent of other crocheters who share your passion for these charming creatures.
Now, let’s meet the newest member of Apricot Lane Amigurumi and embrace our love of crochet and amigurumi.
Meet Alden the Owl of Apricot Lane Amigurumi
As you wander deeper into the magical world of Apricot Lane, you might hear a gentle hoot from above. Meet Alden the Owl, a wise and helpful creature who calls this enchanting world his home. With warm, earthy colors and a piercing gaze, Alden is a crochet amigurumi creature exuding an air of quiet confidence.
But Alden isn’t just any ordinary owl. He’s a true friend and mentor to all who are lucky enough to cross his path. Need a shoulder to cry on or someone to offer wise advice? Alden is always there with an open heart and an open mind. He’s a steadfast companion. He’ll stick with you through thick and thin, helping you navigate the twists and turns of life’s journey.
And like all the creatures of Apricot Lane, Alden has his own story to tell. He spent his early days as a fledgling learning to fly. Now he’s a wise old sage teaching others how to crochet and knit. Alden’s journey is sure to inspire and captivate you.
Who Else Will You Meet In Apricot Lane?
As you continue your journey through Apricot Lane, you’ll be delighted to meet a host of other amigurumi creatures. They each have their own unique personality and story. Meet Felix the Fox with his playful antics. Or Freddie the Frog and his love of music. There’s always something new and exciting to discover in this whimsical world. So dive in now to this amigurumi free crochet animal pattern. Come and explore the wonders of Apricot Lane and the lovable creatures that call it home.
Crochet Alden the Owl Pattern || APRICOT LANE AMIGURUMI
This amigurumi free crochet animal pattern is perfect for the adventurous beginner crocheter needing a fun challenge. With a little patience and lots of love, create your very own Alden the Owl in a variety of sizes. How? By changing the yarn weight and hook size.
So grab your crochet hook, and your favorite yarn, and let’s get started!
ALDEN THE OWL CROCHET STUFFIE
APRICOT LANE AMIGURUMI FREE CROCHET ANIMAL PATTERN
Designed by Marly Bird and Robyn Chachula
SKILL LEVEL
Adventurous Beginner
MEASUREMENTS
Finished Measurements
Owl is 5.25 (6.5, 13.25)” [13.5, 16.5, 33.5 cm] in body circumference by 3.25 (4, 8)” [8.5, 10, 20.5 cm] tall.
Gauge
Tiny Version: 18 sc x 18 rounds = 4” [10 cm] x 4” [10 cm]; use any size hook to obtain the gauge.
Small Stuffie Version: 15 sc x 16 rounds = 4” [10 cm] x 4” [10 cm]; use any size hook to obtain the gauge.
Large Stuffie Version: 7 sc x 8 rounds = 4” [10 cm] x 4” [10 cm]; use any size hook to obtain the gauge.
MATERIALS
Yarn
Tiny Version
WeCrochet, Brava Sport (100% acrylic, 340 yds / 311 m, 3.5 oz/ 100 g, CYCA# 2 sport)
Color A: #28406 Umber Heather, 20 g
Color B: #28368 Brindle, 15 g
Color C: #28377 Cream, 5 g
Color D: #28370 Caution, small amount
Color E: #28366 Black, small amount
Small Stuffie Version
WeCrochet, Brava Worsted Mini Ball (100% acrylic, 54 yds / 49 m, 0.9 oz/ 25 g, CYCA# 4 worsted)
Color A: #28449 Sienna, 20 g
Color B: #28410 Almond, 15 g
Color C: #28424 Cream, 5 g
Color D: #28417 Caution, small amount
Color E: #28413 Black, small amount
Small Stuffie Version- Gray Colorway
WeCrochet, Brava Worsted Mini Ball (100% acrylic, 54 yds / 49 m, 0.9 oz/ 25 g, CYCA# 4 worsted)
Color A: #28450 Silver, 20 g
Color B: #28428 Dove Heather, 15 g
Color C: #28455 White, 5 g
Color D: #28416 Canary, small amount
Color E: #28413 Black, small amount
Large Stuffie Version
Bernat, Blanket (100% polyester, 220 yds / 201 m, 10.5 oz/ 300 g, CYCA# 6 super bulky)
Color A: #10044 Dark Gray, 100 g
Color B: #38001 Ivory Tweed, 50 g
Color C: #10986 Birch, small amount
Color D: #10963 Red Rust, small amount
Color E: #10040 Coal Black, small amount
Hook
Size D/3 [3.25 mm], G/6 [4.0 mm], N/ [9.0 mm]
Notions
Tapestry needle, Polyester Fiberfill, Stitch Markers, (optional) (2) safety animal eyes
ABBREVIATIONS
Ch – Chain(s)
Dc – Double Crochet
Hdc – Half Double Crochet
PM – Place Marker
RS – Right Side
Sc – Single Crochet
Sl st – Slip Stitch
Sp(s) – Space(s)
St(s) – Stitch(es)
WS – Wrong Side
SPECIAL STITCHES
⭐️ Single Crochet 2 Together (sc2tog): *Insert hook into indicated stitch, yarn over and pull up a loop; repeat from * in next stitch indicated, yarn over and draw through all 3 loops on hook. (1 decrease)
⭐️ Single Crochet 2 Together Spike (sc2tog spike): Insert hook into previous stitch 1 row below, yarn over and pull up a long loop, skip next stitch, insert hook into following stitch 1 row below, yarn over and pull up a long loop, yarn over and draw through all 3 loops on hook.
⭐️ Double Magic loop or Double Adjustable Ring: Wrap yarn around your fingers twice, pull up a loop through the ring created, chain 1. Follow directions for number of stitches for round 1. Pull on yarn end to determine which strand will be closed with yarn end. Pull that strand to close 2nd strand of ring, then pull yarn end to close first strand of ring.
⭐️ Double Crochet 2 Together (dc2tog): *Yarn over hook, insert hook into indicated stitch, yarn over and pull up a loop, yarn over and draw through 2 loops on hook; repeat from * in next stitch indicated, yarn over and draw through all 3 loops on hook. (1 decrease)
NOTES
- Owl is worked in pieces and seamed together. Details are added last.
- Body parts are worked in continuous spiral rounds that are not joined at the end of the round.
- Body parts start with a double adjustable ring. You can substitute a chain 2 and sc in the 2nd chain if you wish for the double adjustable ring.
- Use a stitch marker to mark the first stitch of each new round throughout the project.
- Use the smallest gauge and hook plus sport weight yarn for the tiny version. Use the middle gauge and hook plus worsted weight yarn for the small stuffie version. Use the largest gauge and hook plus super bulky yarn for the larger stuffie version.
- If using safety eyes, make head and crocheted eyes first. Seam crocheted eyes to head. Then add safety eyes to the owl before you stuff the head.
VIDEO TUTORIAL
- Coming Soon
APRICOT LANE AMIGURUMI || ALDEN THE OWL CROCHET STUFFIE PATTERN
HEAD
Note: Head is worked from the top of the head at the increasing rounds through the bottom of the head while decreasing.
With A, make a double adjustable ring.
Round 1 (RS): 6 sc in ring, pull ring closed, do not turn–6 sc.
Round 2: 2 sc in each sc around, do not turn– 12 sc.
Round 3: *Sc in next sc, 2 sc in next sc; repeat from * around, do not turn– 18 sc.
Round 4: *2 sc in next sc, sc in next 2 sc; repeat from * around, do not turn– 24 sc
Round 5: Sc in each sc around, do not turn.
Round 6: *Sc in next 3 sc, 2 sc in next sc; repeat from * around, do not turn– 30 sc
Rounds 7-11: Sc in each st around, do not turn.
Round 12: *Sc2tog in front loops only over next 2 sc, sc in next 3 sc; repeat from * around, do not turn– 24 sc.
Round 13: *Sc in next 2 sc, sc2tog in front loops only over next 2 sc; repeat from * around, do not turn– 18 sc.
Round 14: *Sc2tog in front loops only over next 2 sc, sc in next sc; repeat from * around, sl st to first sc, fasten off leaving long tail for seaming– 12 sc.
Stuff head with fiberfill.
BODY
Note: Body is worked from the bottom at the increasing rounds through the top of the body while decreasing.
With B, make a double adjustable ring.
Round 1 (RS): 6 sc in ring, pull ring closed, do not turn–6 sc.
Round 2: 2 sc in each sc around, do not turn– 12 sc.
Round 3: *Sc in next sc, 2 sc in next sc; repeat from * around, do not turn– 18 sc.
Round 4: *2 sc in next sc, sc in next 2 sc; repeat from * around, do not turn– 24 sc
Round 5: *Sc in next 3 sc, 2 sc in next sc; repeat from * around, do not turn– 30 sc.
Round 6: Sc in each sc around, do not turn.
Round 7: Sc in next 9 sc, [change color to C, sc2tog spike over prev sc (skip next sc) and next sc into 1 row below, change color to B, sc in next sc] 6 times, sc in each remaining sc around, do not turn.
Round 8: Sc in each sc around, do not turn.
Round 9: Sc in next 10 sc, [change color to C, sc2tog spike over prev sc (skip next sc) and next sc into 1 row below, change color to B, sc in next sc] 5 times, sc in each remaining sc around, do not turn.
Round 10: Sc in next 4 sc, *sc2tog in front loop only over next 2 sc, sc in next 8 sc; repeat from * around to last 6 sc, sc2tog in front loop only over next 2 sc, sc in last 4 sc, do not turn– 27 sc.
Round 11: Sc2tog in front loops only over next 2 sc, sc in next 6 sc, sc2tog in front loops only over next 2 sc, [change color to C, sc2tog spike over prev sc (skip next sc) and next sc into 1 row below, change color to B, sc in next sc] 4 times, sc2tog in front loops only over next 2 sc, sc in each remaining sc around, do not turn– 24 sc.
Round 12: Sc in next 3 sc, *sc2tog in front loop only over next 2 sc, sc in next 6 sc; repeat from * around to last 5 sc, sc2tog in front loop only over next 2 sc, sc in last 3 sc, do not turn– 21 sc.
Round 13: Sc2tog in front loops only over next 2 sc, sc in next 4 sc, sc2tog in front loops only over next 2 sc, [change color to C, sc2tog spike over prev sc (skip next sc) and next sc into 1 row below, change color to B, sc in next sc] 3 times, sc2tog in front loops only over next 2 sc, sc in each remaining sc around, do not turn– 18 sc.
Round 14: Sc in next 2 sc, *sc2tog in front loop only over next 2 sc, sc in next 4 sc; repeat from * around to last 4 sc, sc2tog in front loop only over next 2 sc, sc in last 3 sc, do not turn– 15 sc.
Round 15: *Sc2tog in front loop only over next 2 sc, sc in next 3 sc; repeat from * around, sl st to first sc, fasten off leave long tail for seaming– 12 sc.
Stuff body with fiberfill.
Weave tail through sts of last round, pull snug to make hole smaller.
Sew head to body working through last round of head and Round 14 of body. Seam a second time to make it more sturdy. Using color D, satin stitch feet to body around Round 5.
APRICOT LANE AMIGURUMI OWL || WINGS
Make 2
With A, ch 7.
Row 1 (RS): (Stacked dc, dc) in first ch, [dc in next 2 ch, 2 dc in next ch] twice, turn–10 dc.
Row 2: (Stacked dc, dc) in first dc, [dc in next 3 dc, 2 dc in next dc] twice, dc in last dc, turn – 13 dc.
Row 3: Stacked dc in first dc, dc in each dc across, turn.
Row 4: Sc in first dc, dc in each dc across to last 2 dc, dc2tog over last 2 dc, turn. –11 dc.
Round 5: Ch 1, skip first dc, sc in next dc, hdc in next dc, dc in next 5 dc, hdc in next dc, sc in next dc, (sl st, sc) in last dc, turn work 90 degrees to work on row ends, sc evenly across row ends to foundation ch, turn work 90 degrees, (sc, sl st ) in first ch, sl st in each ch across to last ch, (sl st, sc) in last ch, turn work 90 degrees to work on row ends, sc evenly across row ends to first st, sl st in first ch, fasten off. Weave in ends.
With color A, seam top of wing (foundation ch) to neck, overlapping wings at the back.
OWL TAIL FEATHER
With A, ch 5.
Row 1 (WS): Stacked dc in first ch, dc in next ch, 3 dc in next ch, dc in next 2 ch, turn–7 dc.
Row 2: Ch 1, sc in next 3 dc, 2 sc in next dc, sc in last 3 dc, turn – 8 sc.
Row 3: Stacked dc in first sc, dc in next 2 sc, 2 dc in next 2 sc, dc in last 3 sc, turn – 10 dc.
Row 4: Ch 1, sc in next 5 dc, sc in space between prev and next dc, sc in last 5 dc, change color to B, turn. –11 dc.
Row 5: Sc in first sc, dc in next 4 sc, 2 dc in next sc, dc in next 3 sc, dc2tog over last 2 sc, turn.
Round 6: Sl st in first dc, sc in next 4 dc, sc in space between prev and next dc, sc in next 4 dc, sl st in next dc, turn work 90 degrees to crochet over row ends, sc twice over row ends, change color to A, sc 4 times over row ends, turn work 90 degrees to crochet in foundation chain, 3 sc in first ch, sc in next ch, skip next ch, sc in next ch, 3 sc in last ch, turn work 90 degrees to crochet over row ends, sc 4 times over row ends, change color to B, sc twice over row ends, sl st to first st, fasten off. Weave in ends.
With color A, seam top of tail feather (foundation ch) to back of bird, under the wings.
EARS
Make 2
With A, make a double adjustable ring.
Round 1 (RS): 4 sc in ring, pull ring closed, do not turn–4 sc.
Round 2: [2 sc in next sc, sc in next sc] twice, do not turn – 6 sc.
Round 3: [2 sc in next sc, sc in next 2 sc] twice, sl st to first sc, fasten off with long tail for seaming– 8 sc.
BEAK
With D, make a double adjustable ring.
Round 1 (RS): 4 sc in ring, pull ring closed, do not turn–4 sc.
Round 2: [2 sc in next sc, sc in next sc] twice, do not turn – 6 sc.
Round 3: Sc in each sc around, sl st to first sc, fasten off, leave long tail for seaming.
EYES
Make 2
With C, make a double adjustable ring.
Round 1 (RS): 6 sc in ring, pull ring closed, do not turn–6 sc.
Round 2: 2 sc in each sc around, change color to B, do not turn – 12 sc.
Round 3: Sl st in next st, [sc in next 2 st, 2 sc in next st] 4 times, sl st to first sc, fasten off with long tail for seaming– 16 sc.
FINISHING AMIGURUMI
Seam eyes to head working around Round 2 with tail. Using color E, satin stitch pupils in the eyes using photo as a guide. Seam beak to head nested between eyes. Using tails, seam ears to head. Cut (3) 3” [7.5 cm] strands of Color B. Insert hook at top of ear, fold strands over hook. Pull halfway through the ear to form a loop. Tuck ends through the loop. Trim ends as desired. Repeat on the opposite ear.
More Amigurumi Free Crochet Animal Patterns from Apricot Lane
Stay tuned for more exciting stories! Get ready to meet new friends too. We’ll take you on a journey through the magical and enchanting world of Apricot Lane. You won’t want to miss the thrilling tales and endearing characters we have in store for you.
So, grab your crochet hook and bring these lovable creatures to life with this amigurumi free crochet animal pattern. Join us on an adventure like no other.
The wonders of Apricot Lane are calling your name. See you soon!
BiCrafty Bootcamp: Triple Threat Tunisian Crochet for Beginners: Four
We will add to our skills by learning how to work Tunisian Crochet for beginners in the round with a double-ended hook. This skill is one of our favorites!
What Have We Learned So Far in BiCrafty Bootcamp: Triple Threat Tunisian?
We have grown our skills quite a lot! We have learned Tunisian Simple Stitch, Tunisian Knit Stitch, Tunisian Purl Stitch, Tunisian Reverse Stitch, Tunisian Wrap Stitch, Tunisian Slip Stitch, and Foundation Slip Stitches. We have learned how to edge our work with single crochet and the best ways to seam Tunisian Crochet fabric.
>>Click Here<< to visit the lesson one blog post and view the video instructions.
>>Click Here<< to visit the lesson two blog post and view the video instructions.
Tunisian Crochet for Beginners: Video Lesson Three
BiCrafty Bootcamp: Triple Threat Tunisian Crochet for Beginners
Tunisian Double Ended Hooks or Afghan Hooks
Double ended hooks come in 2 varieties. They are either one solid shaft with a hook on either end or a cable with a Tunisian Crochet hook on either end. Both are easy to work with. If you have a set of interchangeable Tunisian Crochet Hooks, you can make your own double ended hook with the size hook needed on one end and a smaller size hook on the other end. Use the size needed for the forward pass and the smaller size for the return pass.
➸ Knit Pals- Solid Double Ended Tunisian Hooks
➸ ChiaoGoo T-Spin Tunisian Interchangeable Set with Swivel Cords (swivel cords are purchased separately) ➸ ChiaoGoo SWIV 360 cord (this is an extra purchase but WORTH IT): http://shrsl.com/3q1kd
➸ Clover Interchangeable Takumi Tunisian Crochet Set
➸ Knitter’s Pride Dreamz (note, they do not have swivel cords)
Tunisian Crochet for Beginners: Working in the Round
There are a number of ways to work in the Round with Tunisian Crochet. Our favorite by far is with a double ended Tunisian Crochet Hook. The rounds will form a continuous spiral. But the beauty of working with a double ended hook, is you only have to work a few stitches at a time and NOT the entire round. You work a comfortable amount of stitches from the forward pass with one end, then TURN and work off those stitches in your return pass with the other end. You can do as many or as few stitches as you wish to work your way all around the project. See Video Tutorial for demonstration.
SWISS WOODS TUNISIAN CROCHET HAT
Designed by Robyn Chachula
SKILL LEVEL
Adventurous Beginner
MEASUREMENTS
Finished Measurements
Hat is 18.5” [47 cm] in circumference.
Gauge
12 sts x 11 rows = 4” [10 cm] x 4” [10 cm]; use any size hook to obtain the gauge.
MATERIALS
Yarn
Red Heart, With Love (100% acrylic, 338m/ 370yds, 198g/ 7oz, CYCA# 4 worsted)
Color A: Peacock, 1 ball
Color B: Mallard, 1 ball
Color C: Tangerine, 1 ball
Note: WeCrochet Swish Worsted can be substituted.
Hook
Notions
Tapestry needle, Stitch Marker, Optional: Pom Pom
ABBREVIATIONS
Ch – Chain(s)
PM – Place Marker
RS – Right Side
Sl st – Slip Stitch
St(s) – Stitch(es)
Tch – Turning Chain
TSS- Tunisian Simple Stitch
TKS – Tunisian Knit Stitch
TRS – Tunisian Reverse Stitch
WS – Wrong Side
SPECIAL STITCHES
⭐️ Foundation Slip Stitch:
First Stitch: Ch 1, insert hook into back ridge of chain, yarn over and pull up loop (2 loops on hook), yarn over and draw through 1 loop on hook (creates chain), draw through next loop on hook (creates slip stitch).
Next Stitch: Insert hook into chain just created (vertical bar furthest from hook), yarn over and pull up a loop (2 loops on hook), yarn over and draw through both loops on hook (first loop creates chain, second creates slip stitch)
⭐️ Tunisian Simple Stitch (TSS): Insert hook from right to left into front vertical bar of next st, yarn over and pull up a loop.
⭐️Tunisian Knit Stitch (TKS): Insert hook from front to back between the front and back vertical bars of the next st (under horizontal bars), yarn over and pull up a loop.
⭐️Tunisian Reverse Stitch (TRS): Insert hook from right to left into back vertical bar of next st on the wrong side (or back of work), yarn over and pull up a loop. This pushes the return pass to the front of the work creating a purl-like look.
⭐️ “Work Loops off as normal” Yarn over and draw through 1 loop on hook, *yarn over, pull through 2 loops on hook; repeat from * to end of project. Note: project is worked in a continuous spiral so there is only 1 first stitch and all the remaining will be pulling through 2 loops.
⭐️ Tunisian Simple Stitch Decrease (TSS dec): Insert hook from right to left into the front vertical bar of the next 2 sts at the same time, yarn over and pull up a loop (1 st decreased).
⭐️ Tunisian Simple Stitch in Back Bump (TSS in back bump): Insert hook into the back bump of the horizontal bar of the stitch indicated, yarn over and pull up a loop.
DIAGRAM
NOTES
- If you do not want to use the Foundation Slip Stitch as a start, you can chain instead.
- If you do not enjoy working TRS or if you don’t like the look, you can do TPS for all TRS stitches throughout the pattern.
- Hat is worked in the round in a continuous spiral. Place marker in the first stitch of each round.
- In the brim, make a small ball of color A and use color A for the forward and return pass.
- In the body and crown use color A for every forward pass, change color to B or C at the start of each new return pass.
- On the forward pass work any number of stitches that comfortably fit on the Tunisian Double Ended hook. Turn and work stitches off of hook for the return pass until 2 loops are left on hook, then turn and work more forward pass stitches. Keep switching between forward and return passes until the round is complete.
- When working the body section, the stitch pattern repeat is an even number of stitches, but the stitch count is an odd number of stitches. This means you will have 1 stitch left at the end of the round. This is on purpose so the next round will be offset from the round before it and the decreases will spiral and not stack. Work the last stitch in the next round. See Video Tutorial for assistance.
SWISS WOODS TUNISIAN CROCHET HAT PATTERN
BRIM
Foundation Slip Stitch or Chain 55 with color A, sl st in first st to form ring. See notes for how to work fwd and rtn passes with double ended hook.
Round 1: Fwd: Pull up loop in each st around (loop on hook counts as a st).. Rtn: With color A, work loops off as normal. (55 sts)
Rounds 2-4: Fwd: *Tks in next 3 sts, trs in next st; repeat from * around to last 3 sts, tks in next 2 sts, trs in last st. Rtn: With color A, work loops off as normal.
Round 5: Fwd: *Tks in next 3 sts, trs in next st; repeat from * around to last 3 sts, tks in next 2 sts, trs in last st. Rtn: With color B, work loops off as normal.
BODY
Begin changing colors between color B and C on each round of the return pass. Color A will be used exclusively on every round of the forward pass.
Rounds 1-9: Fwd: With color A, *Tss dec in next 2 sts, tss in back bump of second st; repeat from * around to last st, leave last stitch unworked for next round (work last st in next round, see notes) . Rtn: Change color, work loops off as normal.
CROWN
We will start decreasing for the crown. The simple way we will decrease is to NOT pick up a stitch in the back bump. Continue changing colors each round in the return pass.
Round 1 (decrease round): Fwd: With color A, *[Tss dec in next 2 sts, tss in back bump of second st] 3 times, tss dec in next 2 sts (do not pick up a stitch in the back bump); repeat from * around to last 7 sts, [tss dec in next 2 sts, tss in back bump of second st] 3 times, leave last stitch unworked for next round (work last st in next round, see notes) . Rtn: Change color, work loops off as normal. – 49 sts.
Round 2: Fwd: With color A, *Tss dec in next 2 sts, tss in back bump of second st; repeat from * around to last st, leave last stitch unworked for next round (work last st in next round, see notes) . Rtn: Change color, work loops off as normal. – 49 sts.
Round 3 (decrease round): Fwd: With color A, *[Tss dec in next 2 sts, tss in back bump of second st] 3 times, tss dec in next 2 sts (do not pick up a stitch in the back bump), [tss dec in next 2 sts, tss in back bump of second st] twice, tss dec in next 2 sts (do not pick up a stitch in the back bump); repeat from * around to last 7 sts, [tss dec in next 2 sts, tss in back bump of second st] 3 times, leave last stitch unworked for next round (work last st in next round, see notes) . Rtn: Change color, work loops off as normal. – 43 sts.
Round 4 (decrease round): Fwd: With color A, *[Tss dec in next 2 sts, tss in back bump of second st] twice, tss dec in next 2 sts (do not pick up a stitch in the back bump); repeat from * around to last st, leave last stitch unworked for next round (work last st in next round, see notes) . Rtn: Change color, work loops off as normal. – 36 sts.
Round 5 (decrease round): Fwd: With color A, *[Tss dec in next 2 sts, tss in back bump of second st] twice, tss dec in next 2 sts (do not pick up a stitch in the back bump), tss dec in next 2 sts, tss in back bump of second st, tss dec in next 2 sts (do not pick up a stitch in the back bump); repeat from * around to last 6 sts, [tss dec in next 2 sts, tss in back bump of second st] twice, tss dec in next 2 sts (do not pick up a stitch in the back bump) . Rtn: Change color, work loops off as normal. – 29 sts.
Round 6 (decrease round): Fwd: With color A, *Tss dec in next 2 sts, tss in back bump of second st, tss dec in next 2 sts (do not pick up a stitch in the back bump); repeat from * around to last st, leave last stitch unworked for next round (work last st in next round, see notes) . Rtn: Change color, work loops off as normal. – 22 sts.
Round 7 (decrease round): Fwd: With color A, *Tss dec in next 2 sts, tss in back bump of second st, tss dec in next 2 sts (do not pick up a stitch in the back bump), tss dec in next 2 sts (do not pick up a stitch in the back bump); repeat from * around to last 4 sts, tss dec in next 2 sts, tss in back bump of second st, tss dec in last 2 sts (do not pick up a stitch in the back bump) . Rtn: Change color, work loops off as normal. – 15 sts.
Round 8 (decrease round): Fwd: With color A, *Tss dec in next 2 sts (do not pick up a stitch in the back bump); repeat from * around to last st, leave last stitch unworked for next round (work last st in next round, see notes) . Rtn: Change color, work loops off as normal. – 8 sts.
Bind Off Round: *Tss dec in next 2 sts, pull loop through loop on hook; repeat from * around, sl st in last st, fasten off with a long tail. Weave the long tail through the last round to close hole in the top of the hat.
FINISHING
Fasten off, weave in ends. Add pom pom to top of hat if desired.