6 Steps for Yarn Wrapped Storage
If you are anything like me there is a lot of stuff floating around your home and office. Trying to work in clutter can be very hard to focus. Rather and going out and purchasing storage containers try making these yarn wrapped storage containers of your own. In five easy steps you will have a perfectly coordinated box that you made yourself.

Materials
For this project you will need a short list of materials.
- empty cardboard box (any size desired)
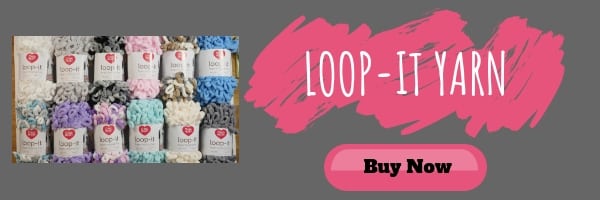
- Loop It Yarn (The bigger your box the more yarn you will need)
- Hot glue gun
- Ruler (optional)
UPDATE: It’s no longer as easy to find Loop It Yarn. However, you can use Bernat Alize Blanket – EZ yarn in exactly the same way. Feel free to substitute this yarn in any of the Loop It Free Patterns you want to use.

Learn about Loop It Yarn
This yarn is not just for knitters and crocheters though, it is for all crafters. You can learn the mechanics of knitting with this loopy yarn and without having to wrangle the needles to get that really great knit look. How do you knit without needle? Well, that’s easy, you use your fingers!
Learn more about Loop It Yarn with my review on the blog.
6 Steps to Yarn Wrapped Storage
Step 1
First you will need to prepare your yarn. Working with loop it makes this project super easy and beginner friendly. Even your kids could help with this project.

Working the knit stitch with the yarn you will make one long chain for the entire ball of the yarn. Haven’t worked with Loop It before? Don’t worry I have a video tutorial that you can check out to see exactly how to work the knit stitch. Just remember, you won’t be turning your work or starting a new row for this project.
Step 2
Once you have all of your yarn prepared you will need to prepare your box. Start by cutting off the top flaps of the box. The bottom should remained taped together.
Depending on how many colors you will use for your box you will also want to mark off sections. Don’t take the time to put a line around the entire box. By making hash marks you will be able to stay on track, they are guidelines for you to use along the way.

Step 3
Now that you have your box and your yarn ready you can start to attach the yarn to your box with a hot glue gun. In this project I am using a Sure Bonder glue gun. What did I choose this one? I love that they have a glue stick that is 5 feet long. Using this make it possible to work the entire project without needing to add any more glue! What a time saver.
Starting at the bottom of the box you will put a small amount of glue to secure the first part of your looped yarn.

Gently press down your yarn and continue around the box until you get back to the start.
Step 4
Rather than working in a spiral around the box I opted to turn and go back the other way around the box. This gives the yarn more of a knit look and allows me to get a cleaner finish.

After completing this for the number of rounds you want for that color you can cut the yarn, with a tail long enough to cover the edge of the rounds you just completed. Using the tail glue it over the corner to give it a clean, finished look.

Step 5
Repeat this for as many other colors as you would like to use, or for as many rounds as it takes to cover your box. When you are finished you can start to use it as storage for yarn, craft supplies or anything else that you need to organize in your home.

5 Red Heart Yarn Reviews
Categories: Dibble Dabble Inspiration